Reading time: 14 min read
Managing Vercel Deployments with Azure DevOps Release Pipelines
A Guide to artifact-based deployments with multi-environment promotion
Start typing to search...
This guide expands on our previous article Deploying from Azure DevOps to Vercel: A Comprehensive Guide by introducing a release pipeline approach that gives you greater control over your Vercel deployments from Azure DevOps. Instead of triggering deployments directly from your build pipeline, this method creates redistributable deployment artifacts that can be promoted through multiple environments (development, staging, production) using Azure DevOps Release Pipelines.
Traditional approach limitations:
Release pipeline benefits:
Before starting this guide, ensure you have:
Azure DevOps
Vercel
Your Project
Technical knowledge
By the end of this guide, you will have:
End result: You'll be able to trigger a build, create a release artifact, and promote that artifact through your environments with proper controls and approvals—integrating Vercel deployments into your broader CI/CD workflow.
Support for classic build pipelines is needed and must be enabled. 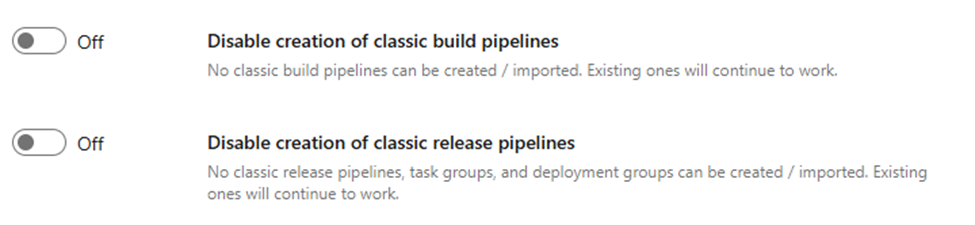 This can be done at the project level, but if these options are greyed out (disabled) and locked down, then you will need to do it at the account level under Pipelines → Settings.
Start by creating the YAML file vercel-artifact.yml for import into your repository.
trigger:
- none
pool:
  vmImage: 'ubuntu-latest'
variables:
  buildConfiguration: 'Release'
  targetDirectory: '$(Build.SourcesDirectory)/src/Rendering'
  artifactName: 'deployment-package'
  zipFileName: 'deployment.zip'
stages:
- stage: BuildAndPackage
  displayName: 'Build and Package'
  jobs:
  - job: CreateArtifact
    displayName: 'Create Deployment Artifact'
    steps:

    # Checkout source code
    - checkout: self
      displayName: 'Checkout Repository'

    # Validate target directory exists
    - task: PowerShell@2
      displayName: 'Validate Target Directory'
      inputs:
        targetType: 'inline'
        script: |
          $targetDir = "$(targetDirectory)"
          Write-Host "Checking if target directory exists: $targetDir"

          if (Test-Path $targetDir) {
            Write-Host "✓ Target directory found: $targetDir"
            $itemCount = (Get-ChildItem -Path $targetDir -Recurse | Measure-Object).Count
            Write-Host "Directory contains $itemCount items"
          } else {
            Write-Error "✗ Target directory not found: $targetDir"
            exit 1
          }

    # Copy vercel-release.ps1 to artifact staging directory
    - task: PowerShell@2
      displayName: 'Copy Vercel Release Script'
      inputs:
        targetType: 'inline'
        script: |
          $sourceFile = "$(Build.SourcesDirectory)/vercel-deploy-temp/vercel-release.ps1"
          $destinationDir = "$(Build.ArtifactStagingDirectory)"
          $destinationFile = "$destinationDir/vercel-release.ps1"

          Write-Host "Source file: $sourceFile"
          Write-Host "Destination: $destinationFile"

          if (Test-Path $sourceFile) {
            Write-Host "✓ Found vercel-release.ps1 script"
            Copy-Item -Path $sourceFile -Destination $destinationFile -Force
            Write-Host "✓ Successfully copied vercel-release.ps1 to artifact staging directory"
          } else {
            Write-Warning "⚠ vercel-release.ps1 not found at: $sourceFile"
            Write-Host "Pipeline will continue without the script"
          }

    # Copy vercel-release.ps1 to artifact staging directory
    - task: PowerShell@2
      displayName: 'Copy Vercel Promote Script'
      inputs:
        targetType: 'inline'
        script: |
          $sourceFile = "$(Build.SourcesDirectory)/vercel-deploy-temp/vercel-promote.ps1"
          $destinationDir = "$(Build.ArtifactStagingDirectory)"
          $destinationFile = "$destinationDir/vercel-promote.ps1"

          Write-Host "Source file: $sourceFile"
          Write-Host "Destination: $destinationFile"

          if (Test-Path $sourceFile) {
            Write-Host "✓ Found vercel-promote.ps1 script"
            Copy-Item -Path $sourceFile -Destination $destinationFile -Force
            Write-Host "✓ Successfully copied vercel-promote.ps1 to artifact staging directory"
          } else {
            Write-Warning "⚠ vercel-promote.ps1 not found at: $sourceFile"
            Write-Host "Pipeline will continue without the script"
          }
    # Create zip archive
    - task: ArchiveFiles@2
      displayName: 'Create Zip Archive'
      inputs:
        rootFolderOrFile: '$(targetDirectory)'
        includeRootFolder: false
        archiveType: 'zip'
        archiveFile: '$(Build.ArtifactStagingDirectory)/$(zipFileName)'
        replaceExistingArchive: true
        verbose: true

    # Display artifact information
    - task: PowerShell@2
      displayName: 'Display Artifact Information'
      inputs:
        targetType: 'inline'
        script: |
          $zipPath = "$(Build.ArtifactStagingDirectory)/$(zipFileName)"
          $scriptReleasePath = "$(Build.ArtifactStagingDirectory)/vercel-release.ps1"
          $scriptPromotePath = "$(Build.ArtifactStagingDirectory)/vercel-promote.ps1"

          # Check zip file
          if (Test-Path $zipPath) {
            $fileInfo = Get-Item $zipPath
            $fileSizeMB = [math]::Round($fileInfo.Length / 1MB, 2)
            Write-Host "✓ Zip file created successfully"
            Write-Host "File: $($fileInfo.Name)"
            Write-Host "Size: $fileSizeMB MB"
            Write-Host "Path: $($fileInfo.FullName)"
          } else {
            Write-Error "✗ Zip file was not created"
            exit 1
          }

          # Check release script file
          if (Test-Path $scriptReleasePath) {
            $scriptInfo = Get-Item $scriptReleasePath
            Write-Host "✓ Vercel release script included"
            Write-Host "Script: $($scriptInfo.Name)"
            Write-Host "Script Path: $($scriptInfo.FullName)"
          } else {
            Write-Host "ℹ Vercel release script not included in artifacts"
          }
          # Check promote script file
          if (Test-Path $scriptPromotePath) {
            $scriptInfo = Get-Item $scriptPromotePath
            Write-Host "✓ Vercel promote script included"
            Write-Host "Script: $($scriptInfo.Name)"
            Write-Host "Script Path: $($scriptInfo.FullName)"
          } else {
            Write-Host "ℹ Vercel promote script not included in artifacts"
          }

    # Publish zip artifact
    - task: PublishBuildArtifacts@1
      displayName: 'Publish Zip Artifact'
      inputs:
        pathToPublish: '$(Build.ArtifactStagingDirectory)/$(zipFileName)'
        artifactName: '$(artifactName)'
        publishLocation: 'Container'

    # Publish vercel release script as separate artifact (if exists)
    - task: PublishBuildArtifacts@1
      displayName: 'Publish Vercel Release Script'
      condition: succeeded()
      continueOnError: true
      inputs:
        pathToPublish: '$(Build.ArtifactStagingDirectory)/vercel-release.ps1'
        artifactName: '$(artifactName)'
        publishLocation: 'Container'

    # Publish vercel promote script as separate artifact (if exists)
    - task: PublishBuildArtifacts@1
      displayName: 'Publish Vercel Promote Script'
      condition: succeeded()
      continueOnError: true
      inputs:
        pathToPublish: '$(Build.ArtifactStagingDirectory)/vercel-promote.ps1'
        artifactName: '$(artifactName)'
        publishLocation: 'Container'
    # Summary
    - task: PowerShell@2
      displayName: 'Pipeline Summary'
      inputs:
        targetType: 'inline'
        script: |
          Write-Host "==================== PIPELINE SUMMARY ===================="
          Write-Host "Source Directory: $(targetDirectory)"
          Write-Host "Zip File: $(zipFileName)"
          Write-Host "Artifact Name: $(artifactName)"
          Write-Host "Artifact Location: $(Build.ArtifactStagingDirectory)"
          Write-Host "Build ID: $(Build.BuildId)"
          Write-Host "Build Number: $(Build.BuildNumber)"

          # Check what artifacts were created
          $zipExists = Test-Path "$(Build.ArtifactStagingDirectory)/$(zipFileName)"
          $scriptReleaseExists = Test-Path "$(Build.ArtifactStagingDirectory)/vercel-release.ps1"
          $scriptPromoteExists = Test-Path "$(Build.ArtifactStagingDirectory)/vercel-promote.ps1"

          Write-Host ""
          Write-Host "Artifacts Created:"
          Write-Host "- Zip Package: $(if($zipExists){'✓ Yes'}else{'✗ No'})"
          Write-Host "- Vercel Release Script: $(if($scriptReleaseExists){'✓ Yes'}else{'✗ No'})"
          Write-Host "- Vercel Promote Script: $(if($scriptPromoteExists){'✓ Yes'}else{'✗ No'})"
          Write-Host "========================================================"
Key Configuration:
The release script is where the Vercel CLI commands live that will perform the specific deployment. Create a new file named vercel-release.ps1 in your repository at the path vercel-deploy-temp/vercel-release.ps1. This path can be modified but ensure it matches the referenced path in Step 2’s build pipeline.
Add the following PowerShell code:
# PowerShell Script to deploy via Vercel

Write-Host "Starting vercel-release.ps1"
# Define the specific zip file to look for
$zipFileName = "deployment.zip"
$zipPath = "./$zipFileName"
Write-Host "Looking for deployment package: $zipFileName @ $zipPath"
if (Test-Path $zipPath) {
    Write-Host "Zip found and extracting: $zipFileName" -ForegroundColor Green

    # Extract the zip file
    Expand-Archive -Path $zipPath -DestinationPath "./extracted" -Force

    # Change to the extracted directory
    Set-Location "./extracted"

    Write-Host "Contents after extraction:"
    Get-ChildItem -Recurse | Format-Table Name, Length, LastWriteTime

	if ($env:projectTarget) {
		Write-Host "Found Target: $env:projectTarget" -ForegroundColor Green

		# Rename .vercel-* to .vercel if it exists
		if (Test-Path ".vercel-$env:projectTarget") {
			Write-Host "Renaming .vercel-$env:projectTarget to .vercel" -ForegroundColor Yellow
			Rename-Item -Path ".vercel-$env:projectTarget" -NewName ".vercel"


			Write-Host "Running Vercel deployment process..." -ForegroundColor Green

			if ($env:VercelToken -AND $env:VercelScope -AND $env:VercelSlot) {
				Write-Host "Found Token: $($env:VercelToken.Substring(0,8))..." -ForegroundColor Green
				Write-Host "Found Scope: $env:VercelScope" -ForegroundColor Green
				Write-Host "Found Slot: $env:VercelSlot" -ForegroundColor Green

				Write-Host "Installing Vercel CLI" -ForegroundColor Green
				npm install --global vercel@33.5.5

				if ($LASTEXITCODE -eq 0) {
					Write-Host "Vercel CLI installed successfully" -ForegroundColor Green

					Write-Host "Pulling environment variables" -ForegroundColor Green
					vercel env pull --yes --environment=$env:VercelSlot --token $env:VercelToken --scope $env:VercelScope

					if ($LASTEXITCODE -eq 0) {
						Write-Host "Environment variables pulled successfully" -ForegroundColor Green

						Write-Host "Deploying to Vercel with target: $env:VercelSlot" -ForegroundColor Green

						# Use -prod flag if the slot is "production", otherwise it deploys to Preview by default
						$prodFlag = ""
						if ($env:VercelSlot -eq "production") {
						    $prodFlag = "--prod"
						    Write-Host "Using --prod flag for Production deployment." -ForegroundColor Green
						} else {
						    Write-Host "Deploying to Preview/Development (default)." -ForegroundColor Yellow
						}
						# The deployment command
						vercel $prodFlag --token $env:VercelToken --scope $env:VercelScope

						if ($LASTEXITCODE -eq 0) {
							Write-Host "Deployment completed successfully!" -ForegroundColor Green
						} else {
							Write-Error "Vercel deployment failed with exit code: $LASTEXITCODE"
							exit 1
						}
					} else {
						Write-Error "Failed to pull environment variables. Exit code: $LASTEXITCODE"
						exit 1
					}
				} else {
					Write-Error "Failed to install Vercel CLI. Exit code: $LASTEXITCODE"
					exit 1
				}
			} else {
				Write-Error "VercelToken or VercelScope or VercelSlot environment variables are not defined"
				Write-Host "Please ensure these environment variables are set:"
				Write-Host "- VercelToken: Your Vercel authentication token"
				Write-Host "- VercelScope: Your Vercel team/scope identifier"
				Write-Host "- VercelSlot: Your Vercel slot identifier"
				exit 1
			}
		} else {
			Write-Error ".vercel-$env:projectTarget directory not found"
			Write-Host "Please ensure these environment variables are set:"
			Write-Host "- projectTarget: match the directory target for Vercel settings"
			exit 1
		}
	} else {
		Write-Error "projectTarget environment variables are not defined"
		Write-Host "Please ensure these environment variables are set:"
		Write-Host "- projectTarget: match the directory target for Vercel settings"
		exit 1
	}
} else {
    Write-Error "Deployment package not found: $zipPath"
    Write-Host "Available files in current directory:"
    Get-ChildItem | Format-Table Name, Length, LastWriteTime
    exit 1
}The deployment execution happens in the Vercel CLI command (around line 63 of the script): vercel $prodFlag --token $env:VercelToken --scope $env:VercelScope
This command:
The variables referenced within this PowerShell Script are all setup in the Release pipeline and will be covered within Step 4.5 Set the properties of each Stage.
Step 3.1: Quickly Review – Vercel Project Configuration
In our previous article we go into detail how to setup the Vercel Project Configuration files and directories, the details that make them up and why we use them.
Here is a direct link to that portion of the article.
If you’re building off the solution from the previous article, this review process is not needed.
The setting up of a new Release Pipeline. We’ll start in the Pipelines → Releases section, which should now be enabled with the settings we turned on at the beginning of the implementation steps.
Step 4.1 Create a New Release Pipeline
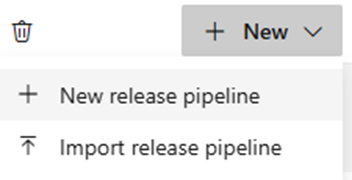
Start by clicking the “+ New” button and select the “+ New release pipeline” option.
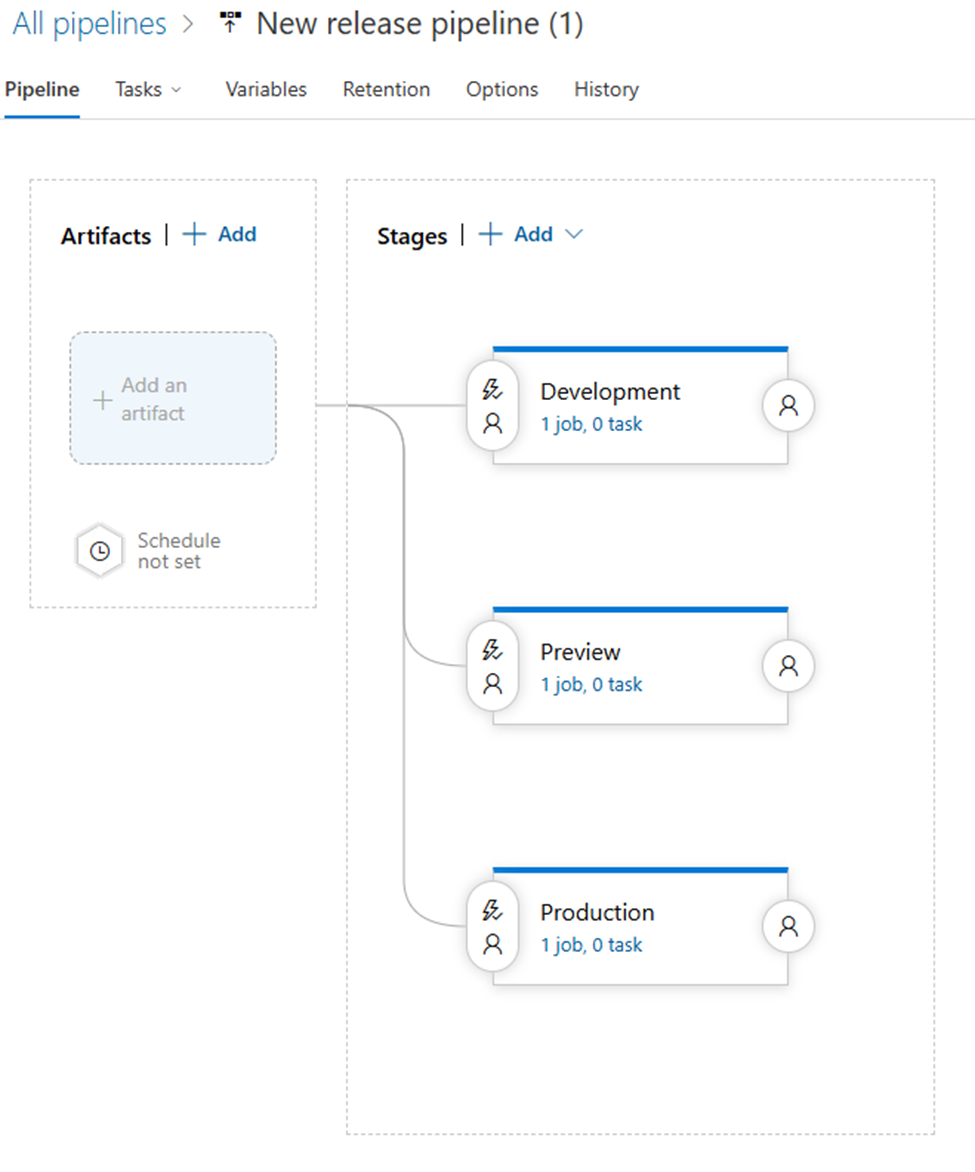
You will be presented with the following or similar screen as below:
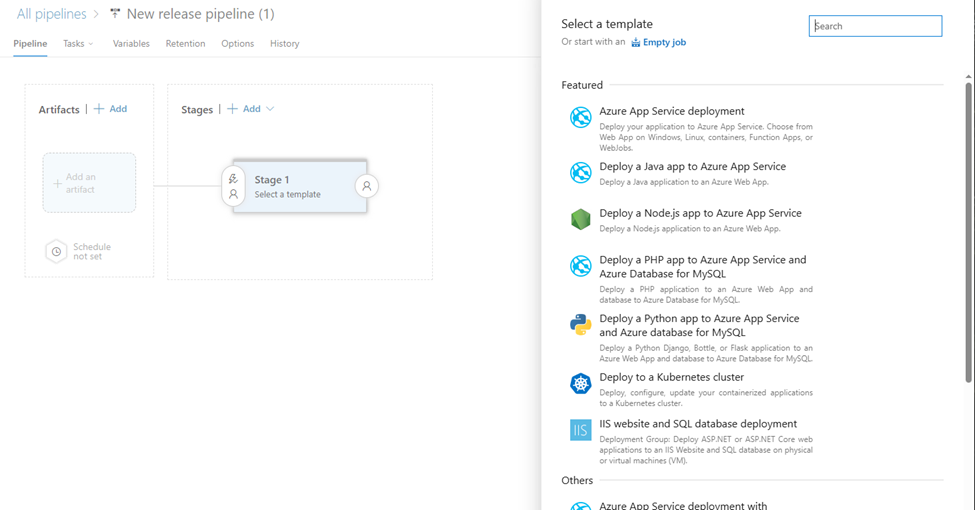
This screen sets off the process to setup the initial Stage of the new release pipeline. Right at the top of the “Select Template” modal, choose “Or start with an Empty Job”.
Step 4.2 Setting the Stage
The first settings presented here are to set the name of the Stage.
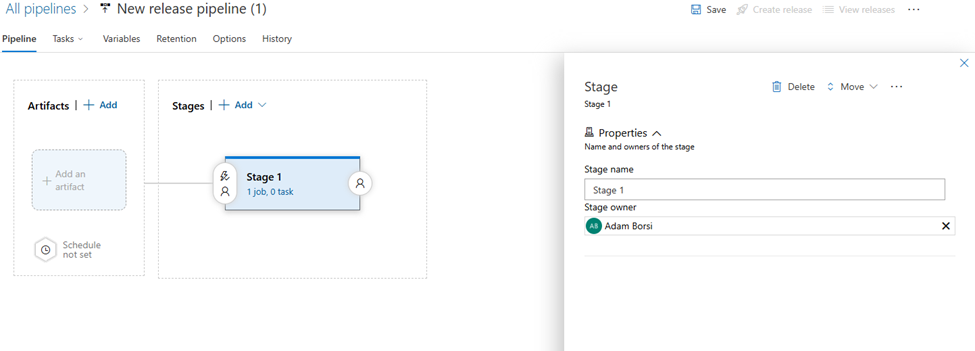
This Stage should be named after the target Environment within the Vercel Project. Once the Stage name is set click the Save button in the header. Typically, you will be adding 2-3 Stages to cover the common uses.
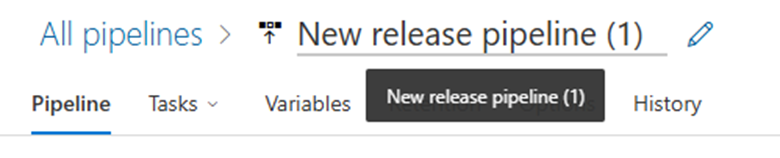
Step 4.3 Rename your Release Pipeline
We can also rename the Release Pipeline by selecting the title in the header and clicking the Save button to the right of the field.
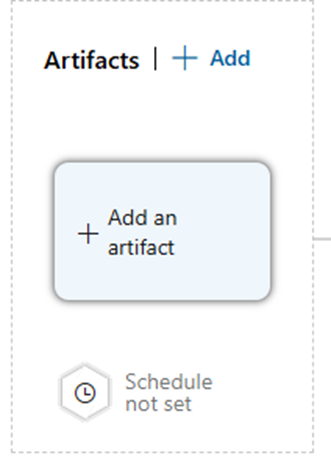
Step 4.4 Add an Artifact
Next we’ll move onto attaching an Artifact to this Release Pipeline.
Click the Add an artifact button to get started.
This will bring up the “Add an artifact” wizard to the right of the screen. In this example, it is focused on ADO Builds to Release Pipeline only, there are many other options to pull in artifacts into this process.
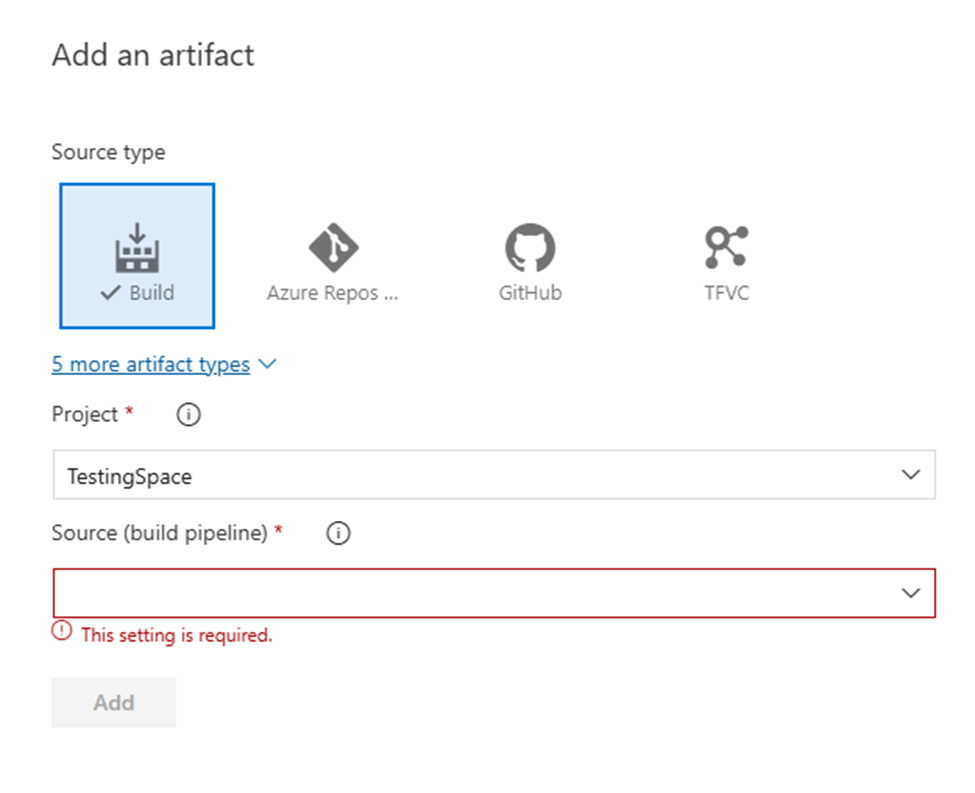
The source type should be set to “Build”, the Project set to the Target project. In this case the same project this pipeline is being created, and the Source should be the Pipeline that creates the build artifact.
Once it is chosen the wizard will update:
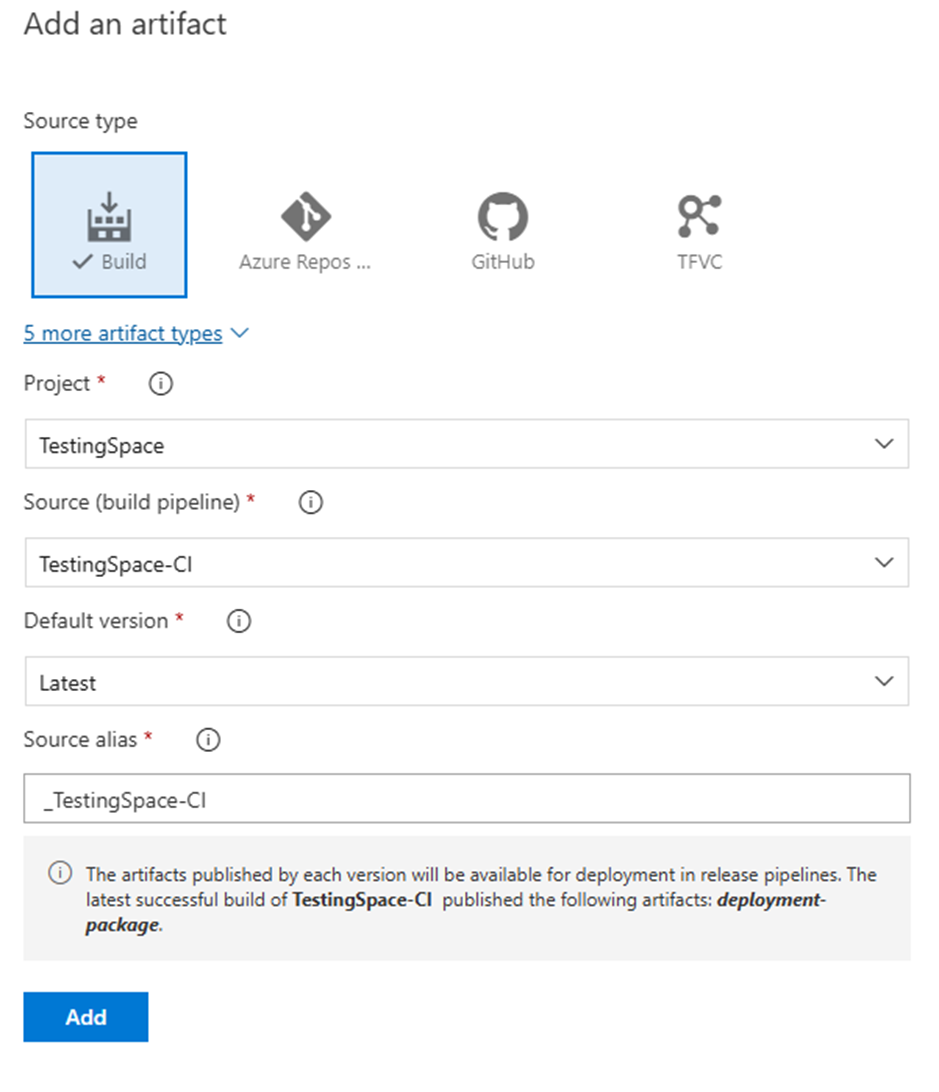
Click Add to proceed.
Key Configuration:
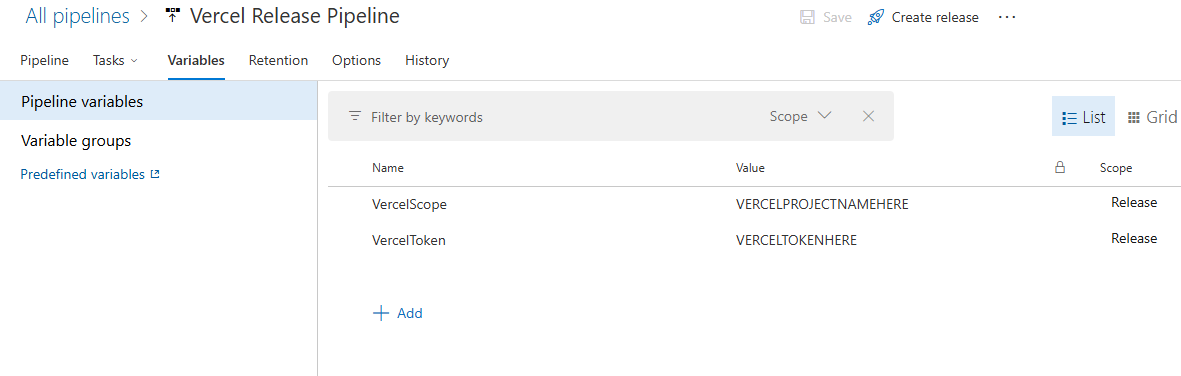
Step 4.5 Set the properties of each Stage
Before we setup each stage in the Release Pipeline, we’ll set some “global” variables to the Pipeline itself. Because these values are utilized by each of the Stages, there isn’t a need to place them on the individual Stages which may create an update headache down the line if any of these values require an update.
Start under the Pipeline Variables, and add two new items to the list:
With all the pieces in place, we now set the properties on each deployment stage and you’re ready to manage your releases.
Repeat these steps for each stage you have set up for your Release Pipeline.
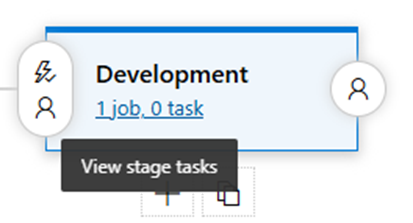
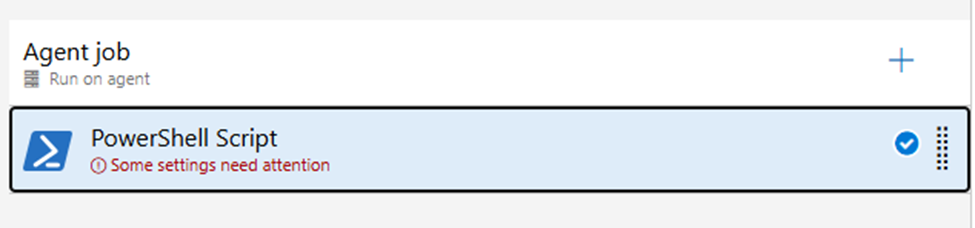
You will see a link/summary on the stage, likely 1 job, 0 task. Click it to initiate the next steps.
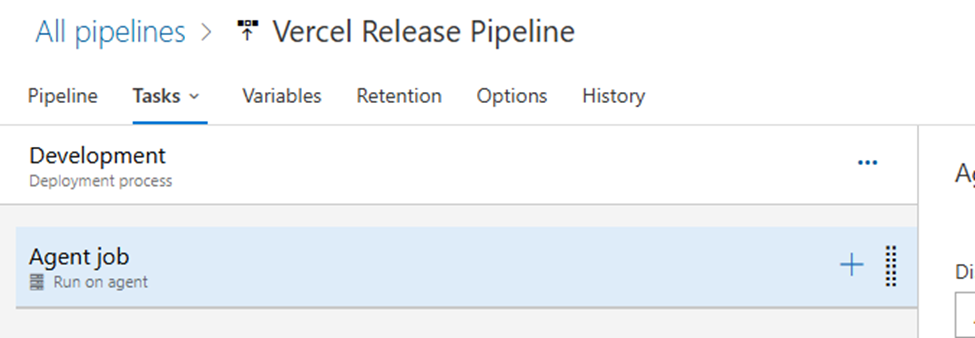
This will bring you into the Stage → Task settings.
You will see “Agent Job” and a “+” sign. Click that to add a task.
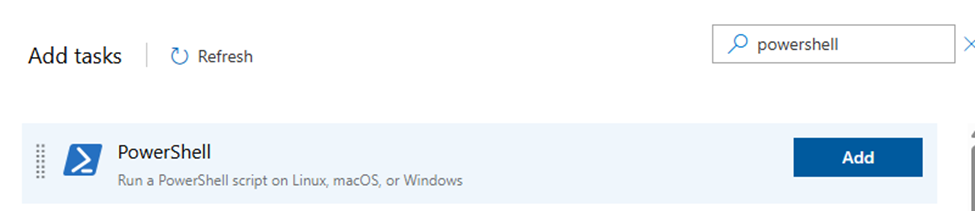
Under Add tasks, search for “Powershell” and add the first one.
Select it to fill out the properties.
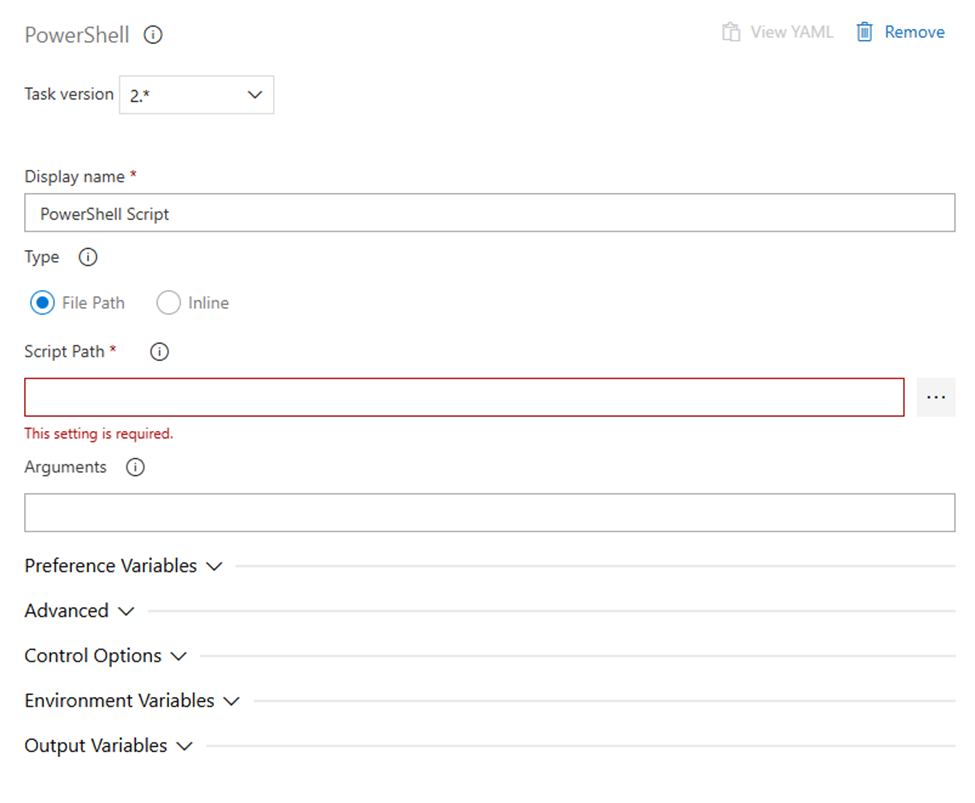
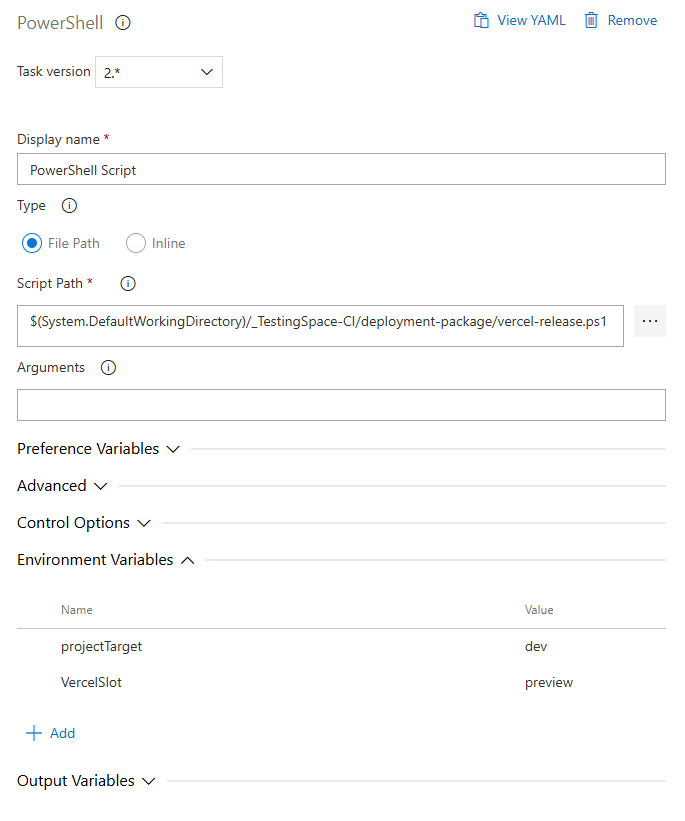
Type should be File Path, and you have to set the Script Path. Click the ellipsis button.
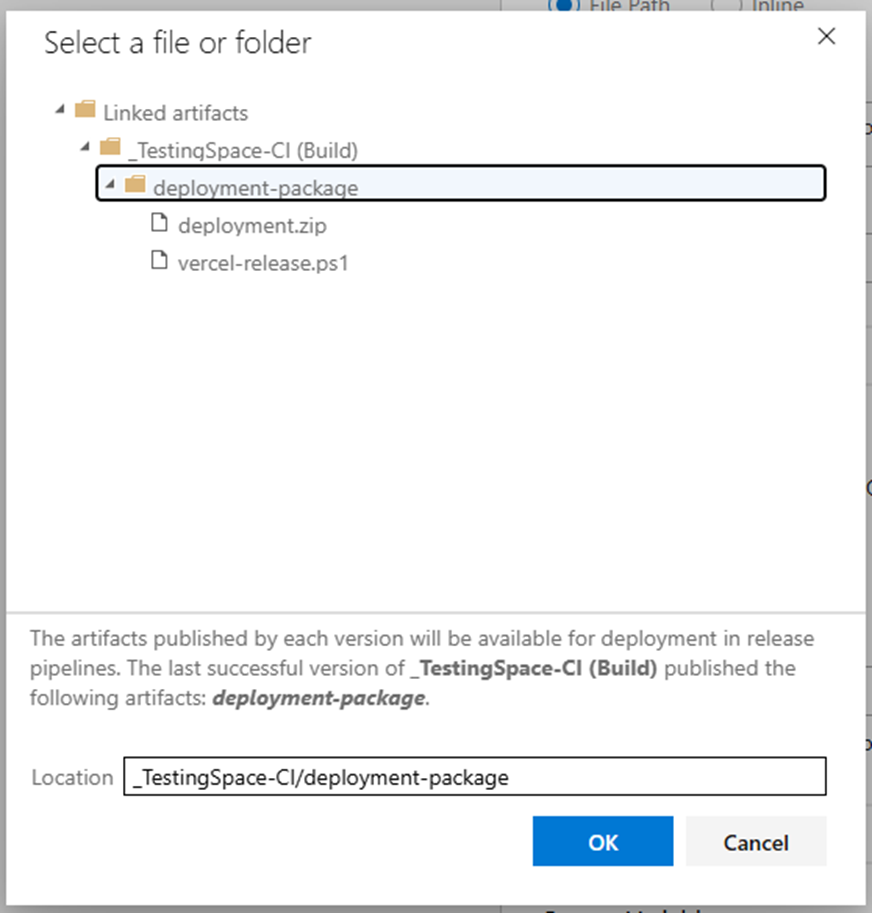
This will bring up a modal from the artifact folder structure.
 Select the
 vercel-release.ps1 file and click OK.
Next expand “Advanced” and fill out the Working Directory.
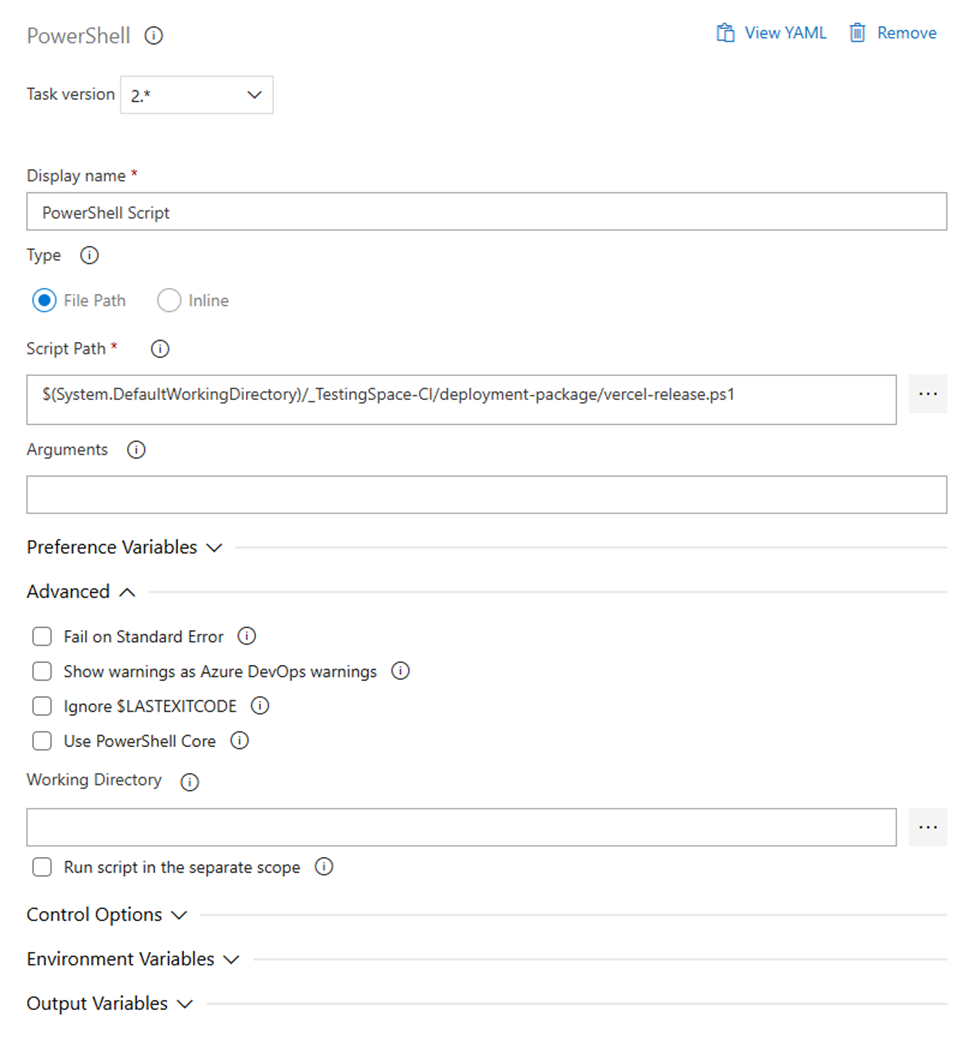
Click the ellipsis to choose a directory.
And click OK.
Next expand Environment Variables, this is where you’ll set the general Vercel variables to point to your team and the API token to access it. You will also define the project target (referencing the directory with the project specific settings, eg. dev-vercel), and set the deployment slot for vercel.
Add the following Environment Variables:

Click the Save button. Repeat the step 4.5 for any other Stages in the pipeline.
Step 4.6 Run it!
Once that is completed, you’re ready to manage your releases.

Click Create release to start the process.
Before deploying to production, verify your configuration:
vercel-artifact.yml pipelineNow that your release pipeline is configured, consider these enhancements:
"Deployment package not found" error
"Vercel CLI installation failed" error
".vercel-\[target\] directory not found" error
Authentication errors
Wrong environment deployed
Additional Resources
You now have a robust deployment pipeline that:
This approach gives your team the confidence to deploy frequently while maintaining proper controls and quality gates throughout your release process.