Reading time: 8 min read

How to Create a New Sitecore SXA Headless Site

SXA Headless is easy, awesome and powerful! Learn how to create your first Sitecore Headless Tenant & Site with SXA.

Portrait photo of Tyler Holmes, article author

Configuring Your First Sitecore Headless Site in SXA

Headless Sitecore provides a huge improvement over the traditional C# Sitecore approach, which is why XM Cloud has been focused on it as its primary architecture. However, you can also benefit from Headless without being on XM Cloud through Sitecore Experience Accelerator (SXA). In this article, I'm going to walk you through the steps to create your first Sitecore Headless Tenant in SXA to allow you to get started with your Sitecore JSS Experience.

Step 1: Access the SXA Site Creation Tools

The first step is going into the content editor and accessing the SXA toolbox.

  1. Log into Sitecore: Open your Sitecore Launchpad and navigate to the Content Editor
  2. Navigate to Site Collection: In the content tree, expand collection /sitecore/content/ to find your site
  3. Access SXA Toolbox: Go to the Experience Accelerator section in your Launchpad, or use the SXA ribbon in Content Editor

Step 2: Create a New Tenant (if Needed)

You can add new websites to an existing Tenant or create a new one for each project. Having 2 headless sites under the same tenant will allow the projects to share resources (content/data items/settings/etc…). However, it's common to create a new Tenant for a project with a new codebase to improve organization and keep the projects separated.

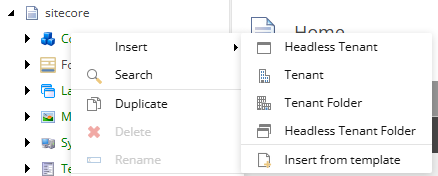
If you don't have an existing tenant for your project:

  1. Right-click on your site collection in the content tree
  2. Select "Insert" > "Headless Tenant" from the context menu

    Screenshot of a Sitecore content tree with the Insert menu open, showing options such as Headless Tenant, Tenant, Tenant Folder, and Insert from template.

  3. Configure Tenant Settings:

    1. Name: Enter a descriptive name for your tenant (e.g., "MyAccount")
    2. Module Selection: Choose relevant SXA modules for your project
    3. Folders: Specify if you want to organize content in virtual or physical folders

      physical folder

      The physical location of files for the site. The path should be specified as a path relative to Sitecore root.

      virtual folder

      This prefix is added after the host name definition and is used to resolve sites according to incoming URLs. This is the second attribute, along with the hostName, which is used to define a unique site.

  4. Save and Publish the tenant

Step 3: Create the Headless Site

Next, we want to create our actual Headless Site, which will contain all our content pages and labels for our Frontend Repository.

  1. Navigate to Your Tenant: In the content tree, locate and expand your tenant folder
  2. Right-click and Insert Site: Select "Insert" > " Headless Site" from the context menu

    Sitecore content tree showing the Insert menu with options for creating tenants and tenant folders.

  3. Choose Site Template: Select the "Headless Site" template from the available options

Step 4: Configure Site Properties

After creating the Headless site, you will need to ensure that you correctly configure all the basic settings for your new Sitecore Site. In the site creation dialog, we can configure the following essential properties:

Basic Settings

  • Site Name: Enter a clear, descriptive name
  • Host Name: Specify the domain (e.g., www.example.com )
  • Virtual Folder: Set if using folder-based organization
  • Language: Select primary language and any additional languages

Headless-Specific Settings

  • API Key: Generate or specify an API key for headless access, this can be found at /sitecore/system/Settings/Services/API Keys
  • CORS Origins: Configure allowed origins for cross-origin requests GraphQL
  • Endpoint: Verify the GraphQL endpoint configuration
  • JSS App Name: If using JSS, specify the application name. This must match the Next.js JSS App Name specified in your frontend Repository.

Theme and Design

  • Site Theme: Choose from available SXA themes or select a custom theme
  • Partial Designs: Select relevant partial designs (header, footer, navigation)
    • More info on this in Step 7.
  • Grid Settings: Configure responsive grid system

Step 5: Set Up Site Structure

After creating the site and configuring the basic settings items, we want to start to establish our basic content structure. This can just be a high level outline for now, and you can expand upon it as you start to more robustly develop your site.

Create Essential Pages

  1. Home Page: This is typically created automatically
  2. Navigation Structure: Create main navigation pages
  3. Content Folders: Set up folders for different content types

Configure Site Settings

  1. Navigate to Site Settings: Go to /Settings/Site Grouping/{Your Tenant}/{Your Site}
  2. Configure Site Information:
    1. Site logo
    2. Favicon
    3. Meta tags and SEO settings
    4. Social media integration
    5. Analytics tracking codes

Step 6: Set Up Content Types and Templates

Step 6 piggybacks off of Step 5, we can help create a strong Sitecore content architecture by how we build out and define our templates. You will want to think about how you will structure your templates. I recommend using a “modular” approach by creating reusable templates inside the Foundation folder, and applying them to each Page Template directly. This way, you can ensure any templates that have matching fields pull their data from one direct source.

Data Templates

  1. Review Existing Templates: Check available SXA data templates
  2. Foundation Templates: Create new data templates inside foundation and add any new fields to these templates. Then attach this foundation template to the project level template for your rendering and/or page.
    1. This creates a more “modular” approach to building our pages, allowing you to reuse foundation template items on multiple different renderings.
  3. Configure Template Inheritance: Ensure templates inherit from appropriate SXA base templates

Content Folders

  1. Media Library: Set up organized folder structure for media assets
  2. Data Sources: Create folders for component data sources
  3. Taxonomies: Set up tagging and categorization systems

Page & Partial Designs

  1. Partial Designs: These are found inside Presentation under the Headless Site node. Partial Designs can be used to quickly apply renderings and fields to multiple pages at a time.
    1. The most common examples would be Header or Footer partials, since these are on every page. You would create 1 partial for each item and apply any renderings to them.
  2. Page Designs: This is your “layout” for your pages, you can create as many Page Designs as you would like.
    1. Page Designs are an amalgamation of your Partial Designs; You select which partials you want to have attached to the page, and include them on that Page Design.

Step 7: Configure Headless Services

Once our templates are configured, we want to double-check and verify our endpoint configurations. SXA add a new GraphQL endpoint that you can query too, this is very useful for pulling extra data from your Sitecore content tree that isn't returned by default. It also makes sense to look at the RESTful API config’s while you're working on this step.

GraphQL Configuration

  1. Schema Generation: Verify GraphQL schema includes your custom fields
  2. Query Complexity: Set appropriate query complexity limits
  3. Field Security: Configure field-level security for sensitive data

API Configuration

  1. Item Web API: Configure if using RESTful endpoints
  2. Layout Service: Verify layout service configuration for headless rendering
  3. Authentication: Set up API authentication if required

Step 8: Content Creation and Testing

The next step is to go back to our content tree and try to create some test content to ensure that the Experience Editor (or Sitecore Pages) is working correctly. You can also use this time to check if Sitecore Preview and your local frontend project can correctly connect and pull the data from your Sitecore instance.

Create Content

  1. Home Page Content: Add content to your home page
  2. Navigation Items: Create and configure navigation menu items
  3. Test Pages: Create sample pages to test different layouts and components

Test Headless Connectivity

  1. GraphQL Playground: Test GraphQL queries in the integrated playground
  2. Layout Service: Verify layout service returns expected JSON
  3. API Endpoints: Test any configured API endpoints

Step 9: Create a Vercel Project (if Needed)

The final step is deploying your new local frontend project, we recommend using Vercel for this. Vercel is easy to deploy to and will allow you to utilize zero downtime deployments for your frontend code. If you have configured your Vercel account, you can configure and deploy directly to Vercel by using the Vercel CLI. If you're having trouble connecting your JSS frontend to Sitecore, you can also reference this Sitecore walkthrough that goes over how to do exactly that.

  1. Vercel CLI: Ensure the Vercel CLI is installed by running npm i -g vercel
  2. Login to Vercel: Using the Vercel CLI command, vercel login Console response:

     ? Log in to Vercel (Use arrow keys)
       Continue with GitHub
       Continue with GitLab
       Continue with Bitbucket
       Continue with Email
     ❯ Continue with SAML Single Sign-On
      ─────────────────────────────────
       Cancel
    
  3. Create new Project: Using the Vercel CLI run vercel project add {project-name} You cannot provide any spaces in the project name, and this allows you to have a repo disconnected project created in Vercel

Wrapping Up & Troubleshooting Common Issues

That is the basics of creating a new Sitecore Headless SXA website; however, it's common that you'll come across some issues while you do so. Here are some common items that cause popular issues that you can use to help kickstart your troubleshooting process.

Site Not Appearing

  • Verify publishing status
  • Check site binding configuration
  • Confirm host name settings
  • Review security permissions

GraphQL Issues

  • Check schema generation status
  • Verify field templates are included
  • Review query complexity settings
  • Confirm API key permissions

Component Issues

  • Verify component compatibility with headless
  • Check rendering variations
  • Review data source configurations
  • Confirm template field mappings