Reading time: 3 min read
How to add additional Hostnames To Sitecore Using Docker
Setup your docker and sitecore to get additional domains in your local environment.
Start typing to search...
When developing in Sitecore for a multi site solution you may need more domains. If you use the Sitecore Container Deployment package provided by Sitecore, then that would assign one domain for your CM (xm1cm.localhost) and CD (xm1cd.localhost) containers by default. In this blog, we'll go over on how you can have additional domains assigned to these containers.
First and foremost, we'll decide on what our domain will look like and then we'll add an environment variable with the name ALT_HOST in our .env file with the new domain value.
# .env file
...
CM_HOST=xm1cm.localhost
CD_HOST=xm1cd.localhost
ALT_HOST=`fishtank.localhost` #make sure you've the domain wrapped in "`"
...
We recommend that you create a docker-compose.override.yml , if you don't have one in your project, instead of directly modifying the docker-compose.yml file. Your docker compose should have a traefik.enable=true which tells docker to enable traefik for the cm or cd service (container). Add a new routing rule for the ALT_HOST in the docker compose override file. Only add the routing rule to one service either CM or CD and not both. If you need your domain to load the site from master database then add it to CM, however, if its web database then add it to CD.
# docker-compose.override.yml
services:
	traefik:
		...
	redis:
		...
	cm:
    ...
    labels:
      - "traefik.http.routers.cm-alt.entrypoints=websecure"
      - "traefik.http.routers.cm-alt.rule=Host(${ALT_HOST})"
      - "traefik.http.routers.cm-alt.tls=true"
      - "traefik.http.routers.cm-alt.middlewares=force-STS-Header"
  #### Only add routing rule to either CM or CD and not both ####
  cd:
    ...
    labels:
      - "traefik.http.routers.cd-alt.entrypoints=websecure"
      - "traefik.http.routers.cd-alt.rule=Host(${ALT_HOST})"
      - "traefik.http.routers.cd-alt.tls=true"
- "traefik.http.routers.cd-alt.middlewares=force-STS-Header"You'll still need to let Sitecore know that a new domain is available for use. Depending upon what setup you've i.e. if you're on SXA, then add a site grouping otherwise add a config that has the <site> definition. Following <site> definition is if you are on non-SXA solution.
# zz.Fishtank.SiteConfiguration.config
<configuration xmlns:patch="http://www.sitecore.net/xmlconfig/" xmlns:set="http://www.sitecore.net/xmlconfig/set/" xmlns:role="http://www.sitecore.net/xmlconfig/role/">
  <sitecore>
	  <sites>
		    <site name="fishtank"
		    	patch:after="site[@name='website']"
		    	inherits="website"
				database="web"
				hostname="<YOUR_ALT_HOST>" # "fishtank.localhost" in our case
		    	/>
	    </sites>
  </sitecore>
</configuration>
DO NOT FORGET to add rootPath and startItem according to your site location in CMS.
If you're on SXA, then add a site definition like below. 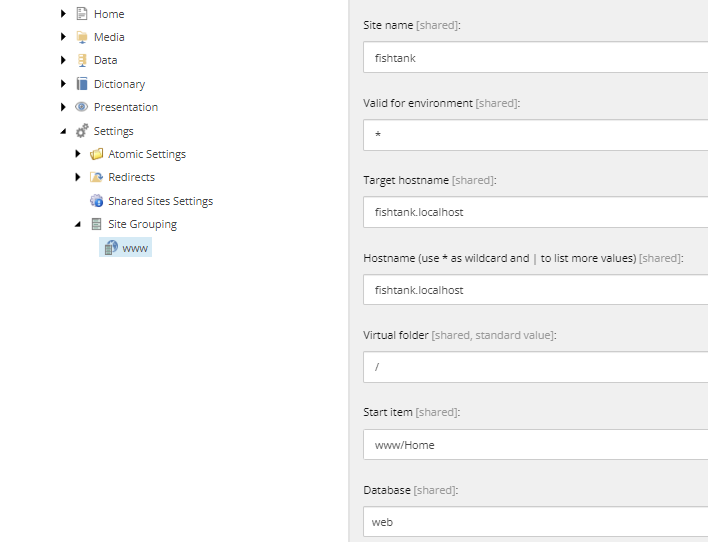
We also need to add the new domain to the window's hosts file. Go to C:\Windows\System32\drivers\etc and open up hosts as an admin. Add the following,
# hosts
127.0.0.1	fishtank.localhost
You'll also need to let other developers working on the project to add this manually. However, if you want to avoid doing this manually for NEW developers joining the project, then add it to .\init.ps1 file. Find the section called Add Windows hosts file entries and do the below,
# Add Windows hosts file entries
################################
Write-Host "Adding Windows hosts file entries..." -ForegroundColor Green
Add-HostsEntry "xm1cm.localhost"
if ($Topology -ne "xp0") {
Add-HostsEntry "xm1cd.localhost"
}
Add-HostsEntry "<your_alt_host>" # "fishtank.localhost" in our case</your_alt_host>Once you've done the above configuration, build your docker images with no cache. Use the command docker-compose build --no-cache from where you have your docker-compose.override.yml or docker-compose.yml to build your images without cache. This will ensure that your new traefik rule will be picked up.
That's it! By following the steps outlined in this guide, you can configure Docker for alternate host domains in your Sitecore environment. If you need more domains, then simply update the ALT_HOST environment variable as required like ALT_HOST=fishtank.localhost, xmcloud-fishtank.localhost. Don't forget to add site definition and modifying the hosts file plus the .\init file too. With these configurations, you can seamlessly add and manage multiple domains in your local Sitecore Docker environment.
Happy decoding!

