Reading time: 6 min read
How to Add a Sort Feature on Your Sitecore Search Component in React or Next.js
Learn how sorting can be handled using Sitecore Search
Start typing to search...
We’ve heard of different search solutions like Coveo and Algolia which we have integrated in our Sitecore projects. Now that Sitecore has introduced Sitecore Search, the game has completely changed. You can now include your search solution in your Sitecore ecosystem without the need of any external search solution.
Sitecore Search offers pretty much the same features as other search solutions but maybe you’ll need to do some specific changes that it requires you to do. Here we will learn how we can apply sorting in Sitecore Search.
First we will need to configure things within the Customer Engagement Console (CEC) in order for it to be available on our widgets on the frontend. Once you’ve logged in the CEC, navigate to the Domain Settings from the Administration Area on the left navigation.
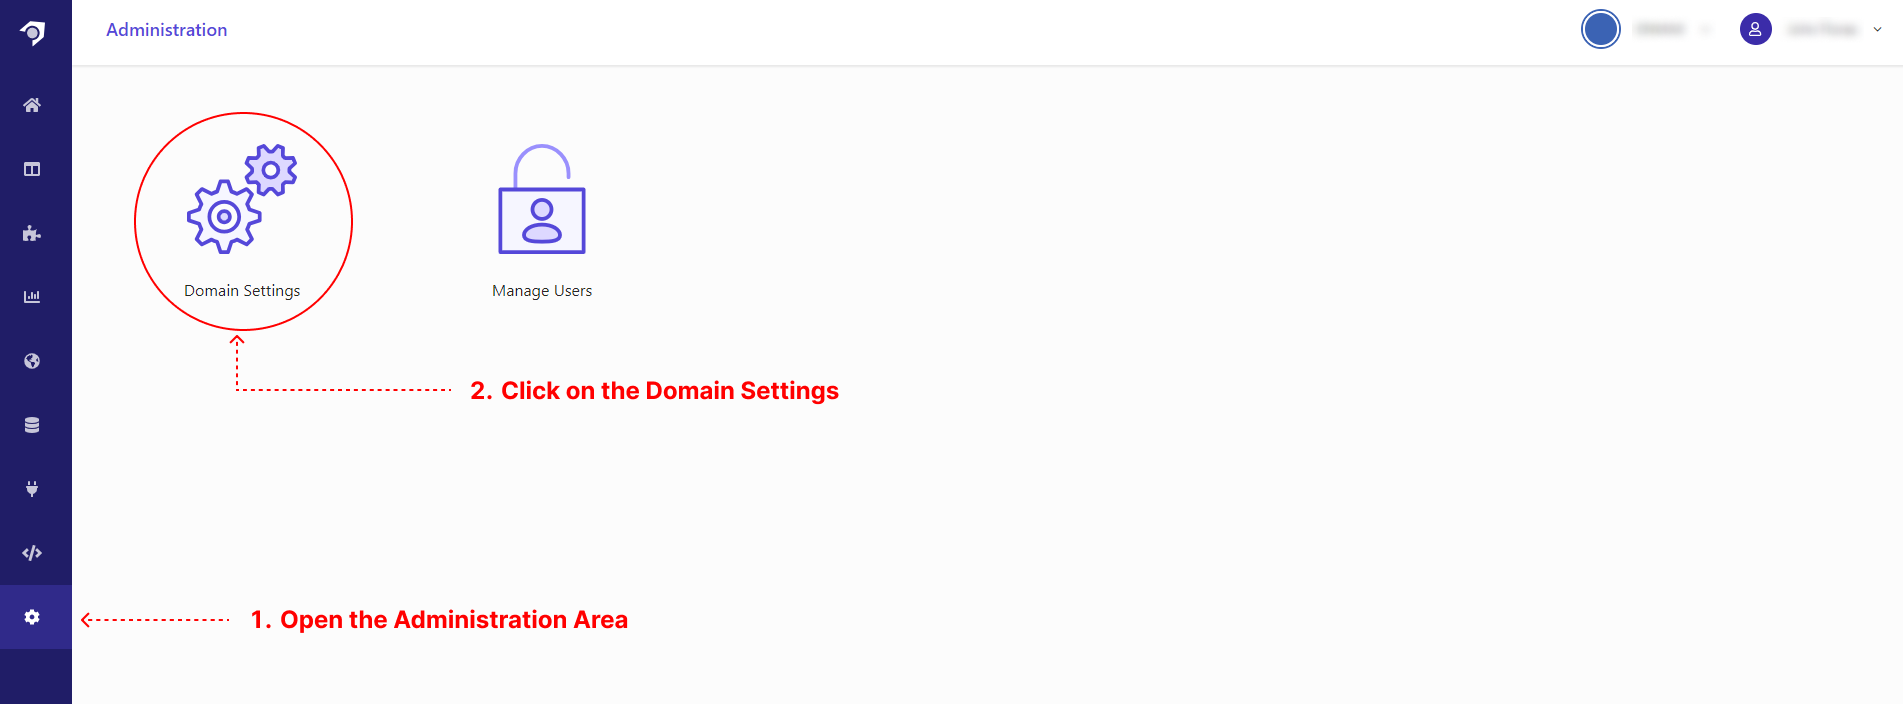
Next, you will need to click on Feature Configuration and you will see a couple of different accordions. You will need to open the Sorting Options one.

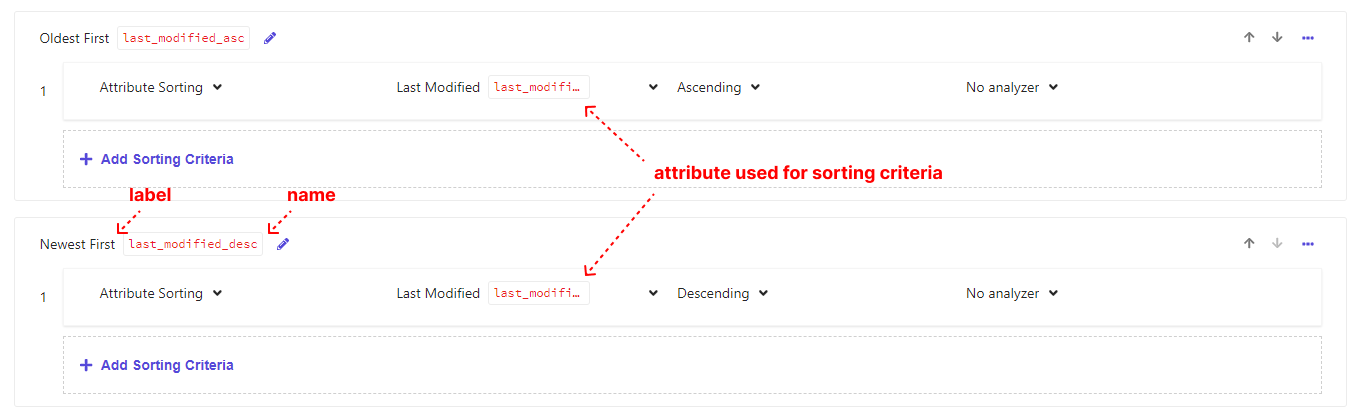
You will see the view below with all the different Sorting Options available for all our widgets. You have two options, one being based on AI and automatically sorts, examples of these are featured_desc and featured_asc . We can also manually create the sort critera using Attribute Sorting which are based on specific fields of our source.

You can see specifically how these look like below. Take note of these two different values. You will need these when we try and apply the sort in our widgets on the front end.
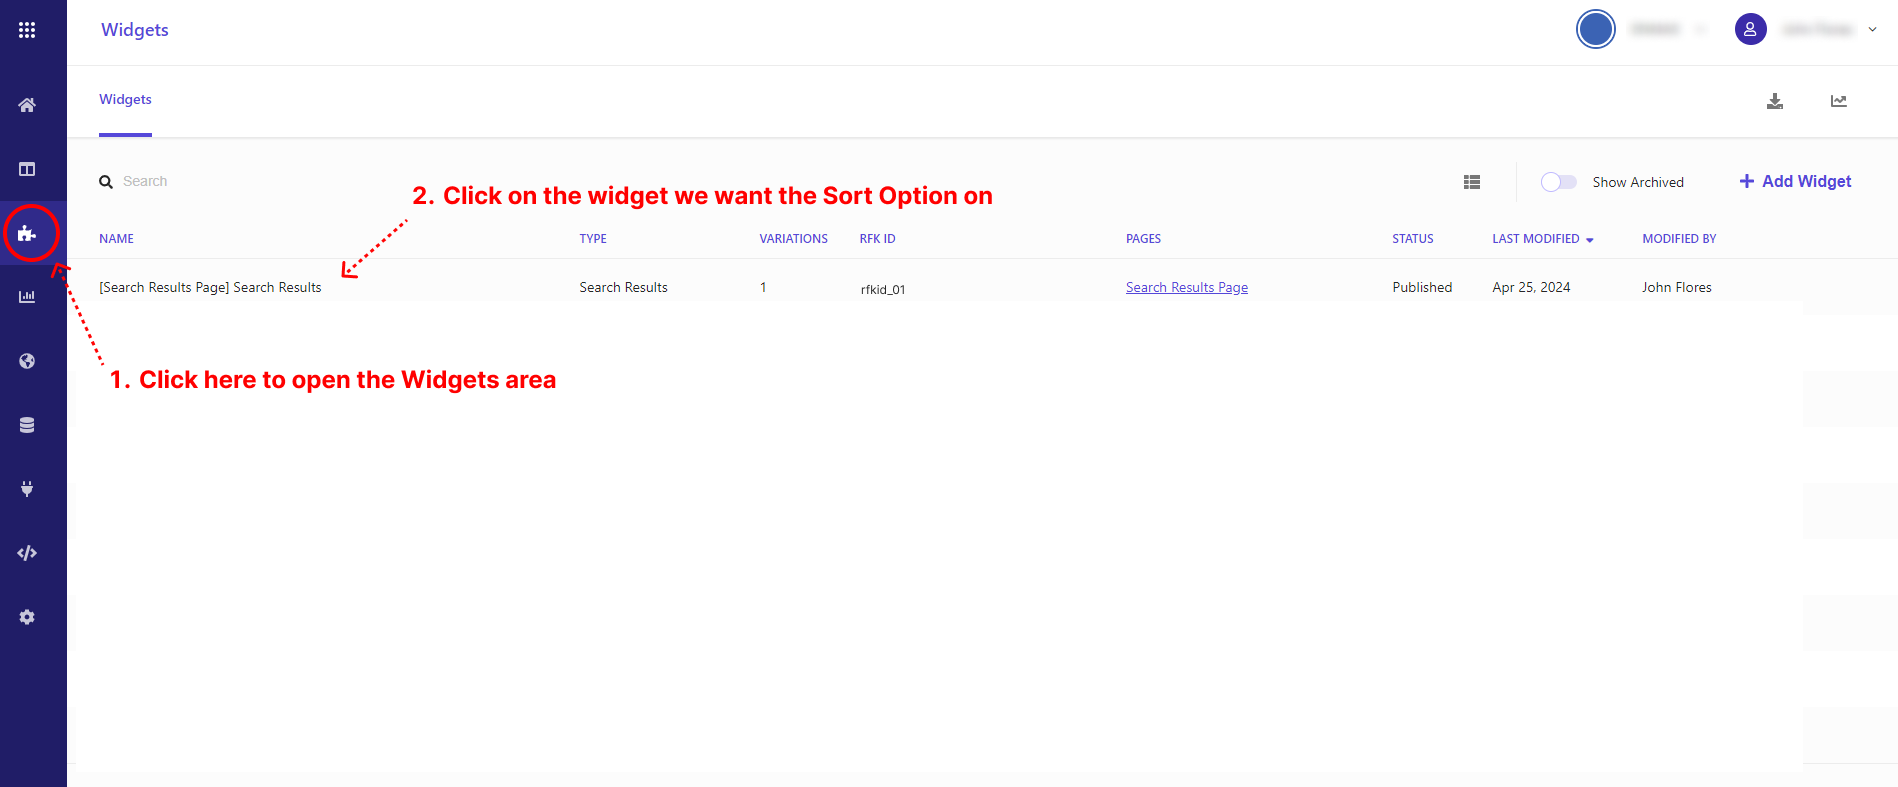
Next we will need to configure our widget. You will need to open the Widgets area and select the widget we want our Sort on. Here we want our sort inside the Search Results widget.
You will see a view of all the different variations available for your widget. Let’s select one

Here you will see the Sort Options that we’ve already added on the widget. Let’s go in and see how these were configured and how we can add more.
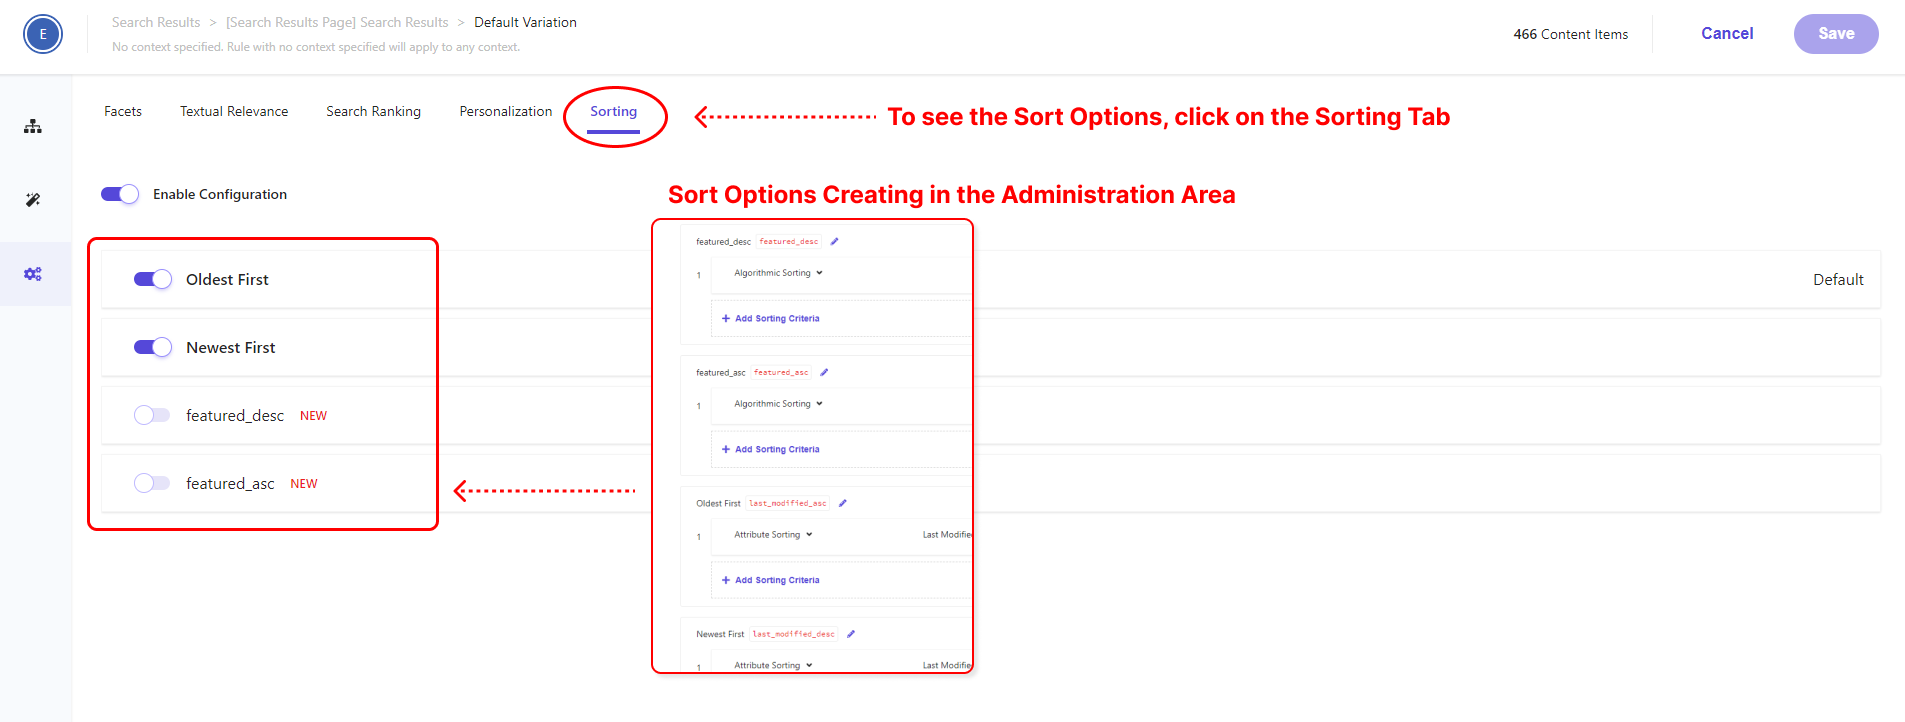
You will see some toggles for all the Sort Options you can use on your widget. As you can see both the Older First and Newest First are active. Let’s keep them active and we can apply them in our front end code. From here we follow the usual process of saving and making sure we publish the changes. Next, we will now be looking at our code and configure the Sort.
Let’s go directly to the SearchResults widget and make sure we’ve added the necessary code to get the Sort working. The first thing we’ll need to configure is the big piece of code that is configured using the useSearchResults . You will need to make sure you have added 3 pieces of code that will be used in our sort.
// IMPORT YOU WILL NEED TO GRAB DATA AND ADD YOUR SORT
import { useSearchResults } from '@sitecore-search/react';

// THE MASSIVE CONFIGURATION FOR SITECORE SEARCH
  const {
    widgetRef,
    actions: { onSortChange }, // YOU WILL NEED THIS ACTION
    state: { sortType },
    queryResult: {
      isLoading,
      isFetching,
      data: {
        sort: { choices: sortChoices = [] } = {}, // CONTAINS THE SORT CHOICES
        content: articles = [],
      } = {},
    },
  } = useSearchResults({
    query: (query) => {
      query.getRequest();
    },
    state: {
      sortType: defaultSortType, // YOU CAN MANUALLY SELECT THE DEFAULT SORT
    },
  });

 // We have a variable that holds the selected sort.
 const selectedSortIndex = sortChoices.findIndex((s) => s.name === sortType);
You have the action needed for the Sort to work, the data that has all the list of Sort Options and the default state of our Sort if you plan to configure it. I’ve added an additional line of code also to get the index of the currently selected Sort if anyone needs it.
Next we will have to import SortSelect which is provided by Sitecore Search to setup the widget.
import { SortSelect } from '@sitecore-search/ui';

<SortSelect.Root
  defaultValue={sortChoices[selectedSortIndex]?.name}
  onValueChange={onSortChange}
>
  <SortSelect.Trigger className="py-2 px-2.5">
    <SortSelect.SelectValue>
      {selectedSortIndex > -1 ? sortChoices[selectedSortIndex].label : ''}
    </SortSelect.SelectValue>
  </SortSelect.Trigger>
  <SortSelect.Content className="w-full shadow-zero">
    <SortSelect.Viewport>
      {sortChoices.map((option) => (
        <SortSelect.Option value={option} key={`${option.label}`}>
          <SortSelect.OptionText>
            {option.label}
          </SortSelect.OptionText>
        </SortSelect.Option>
      ))}
    </SortSelect.Viewport>
  </SortSelect.Content>
</SortSelect.Root>
SortSelect will contain all the subcomponents that we’ll need. Here we use the onSortChange action as the value for onValueChange on the Root component. All these components can also be styled using className and you also have the option to use styled-components as well.
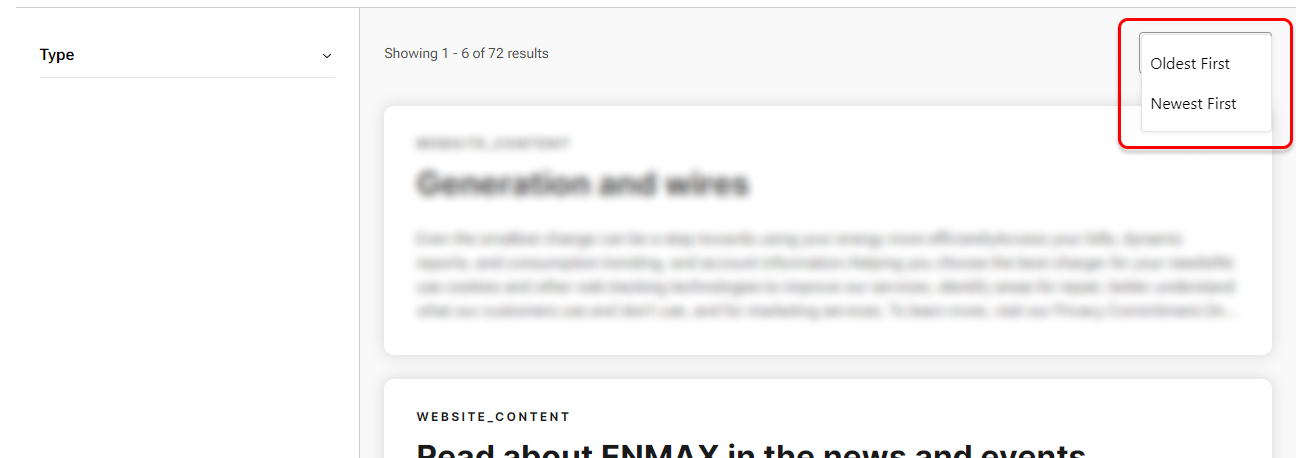
SortSelect.Trigger will hold the onClick for the dropdown and will also contain the currently selected sort. SortSelect.Content will have the list of the Sort Options available. You will see here that the label is used to show the visual value of the Sort Option. This is the value we can set inside the Administration area in CEC.
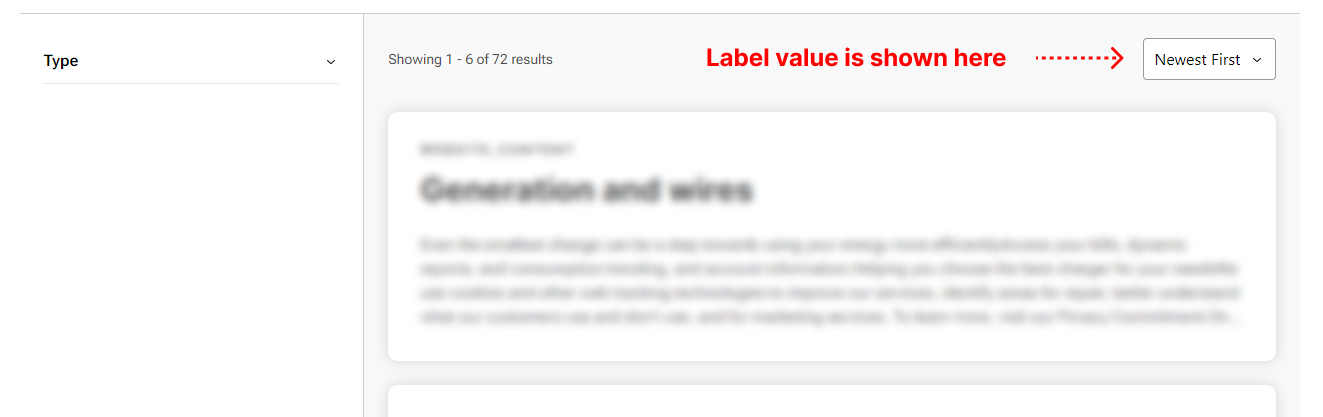
Finally we can check our rendering host to see how it’ll turn out. Below you will see some screenshots of something I am making and here you will see where the sort is being added as well as toggling the Sort list.
Sitecore Search is a powerful search solution which can be a great option especially if you’re accustomed to the Sitecore space. I’ve been cutting apart the different functionalities it has to offer and been discussing them more in detail. Sorting is a great feature to add to your Search Results widget and can help the user’s search experience be flexible and easier to digest.

