Reading time: 6 min read
Customizing Page View Events with Extension Data in Headless Next.js (CloudSDK)
Learn how to embed custom data into CloudSDK’s page view events for richer insights and enhanced personalization.
Start typing to search...
Learn how to embed custom data into CloudSDK’s page view events for richer insights and enhanced personalization.
In the world of modern web development, capturing meaningful user behavior data is crucial for personalization, analytics, and understanding your audience. When building a Headless Next.js application powered by CloudSDK, the pageView event is your foundational tool for tracking user interactions with your content. But what if the standard page URL and referrer aren't enough? What if you need to capture deeper, more contextual insights?
This blog post will guide you through customizing the pageView event within your Headless Next.js application using CloudSDK. Our specific focus will be on leveraging extension data to enrich your web analytics with custom, business-specific information, empowering a more robust Sitecore DXP integration and advanced personalization strategies.
While the default pageView event provides essential baseline information, modern business logic and intricate user journeys demand a richer data set. Here are compelling scenarios where custom page view data, delivered via extension data, becomes invaluable:
By adding extension data, you empower your analytics and marketing teams with crucial, application-specific information alongside standard page view events, leading to a significantly richer data set for informed decision-making.
We’ll go straight to looking at the pageView function that is available from the package @sitecore-cloudsdk/events/browser . Before we can dive into the code, let’s ensure you have:
@sitecore-cloudsdk/events/browser) installed and initialized in your project. If you're using a JSS or Content SDK app, pageView events are often automatically captured, but we'll focus on explicitly customizing them.useEffect hook, which is key for triggering side effects like tracking events in a React component's lifecycle.The CloudSDK's browser events module exposes the pageView function, which is central to our customization efforts. Its core signature is:
pageView(eventData?: PageViewData)
The eventData object allows you to include standard page view information such as language, page (the page path), channel, and currency. An excellent example of this out-of-the-box usage can be found in a default JSS or Content SDK application's src/components/CdpPageView.tsx file, where you might see code like:
pageView({
   channel: 'WEB',
   currency: 'USD',
   page: route.name,
   pageVariantId,
   language,
}).catch((e) => console.debug(e));
The critical piece for our enhanced tracking lies in the optional extensionData parameter. This is a dedicated object where you can pass any custom key-value pairs you require. The CloudSDK documentation confirms that this object can contain up to 50 custom attributes, providing ample flexibility for your data needs.
Let's walk through an example of how to implement this in a Next.js component.
First, let’s determine what data we want to track. Some examples of what kind of data we can track are page categories, author IDs and even tags. Let’s use tags as a good example in our tutorial.
CloudSDK recommends starting your modification with an OOTB component usually located at src\components\CdpPageView.tsx . Above you’ll see a snippet of this component. To easily leverage the existing code, one way of passing down these information are by having these authored content on the page template. Below you will see the useEffect on that file.
  useEffect(() => {
    // Do not create events in editing or preview mode or if missing route data
    if (pageState !== LayoutServicePageState.Normal || !route?.itemId) {
      return;
    }
    // Do not create events if disabled (e.g. we don't have consent)
    if (disabled()) {
      return;
    }
    const language = route.itemLanguage || config.defaultLanguage;
    const scope = process.env.NEXT_PUBLIC_PERSONALIZE_SCOPE;
    // Extension data
    const pageTags = route?.fields?.tags as Tag[];
    const zone = route?.fields?.zone as ZoneIconFieldType;
    const pageVariantId = CdpHelper.getPageVariantId(
      route.itemId,
      language,
      variantId as string,
      scope
    );
    // there can be cases where Events are not initialized which are expected to reject
    pageView({
      channel: 'WEB',
      currency: 'CAD',
      page: route.name,
      pageVariantId,
      language
    }).catch((e) => console.debug(e));
  }, [pageState, route, variantId, site]);
On the pageView function, just add in the object with the key extensionData and you will have the flexibility of adding your custom data points.
const pageTags = route?.fields?.tags;
pageView({
   channel: 'WEB',
   currency: 'CAD',
   page: route.name,
   pageVariantId,
   language,
   extensionData: {
      tags: tags?.map((tag) => tag.name).join(',') || '',
   },
}).catch((e) => console.debug(e));
Look for a file named Scripts.tsx and by default CdpPageView.tsx is imported here. If you are handling some old code or by chance someone has commented this out. A quick note as well, make sure you are using either Engage or CloudSDK but not both or it might cause issues.
After implementing your custom extension data, the crucial next step is to verify that your data is being sent correctly to CloudSDK.
ext object (which represents your extensionData) containing all the custom properties you defined and passed in your code.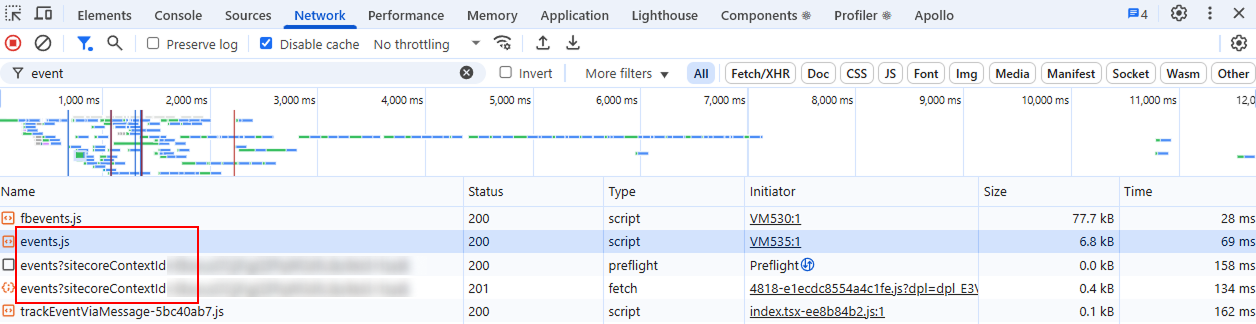
Customizing the pageView event with extension data in your Headless Next.js application, powered by CloudSDK, is a powerful way to capture a richer, more nuanced understanding of user behavior. By thoughtfully defining and implementing your custom data points, you unlock:
Start experimenting with enriching your page view events today and leverage the full potential of your CloudSDK integration for superior digital experiences!

