What Is An Auto-Responder Email?
An auto-responder email is an email that is sent in an automated fashion, triggered by a user action.
They serve a very important purpose for marketers, allowing them to engage with their users and make their users feel heard and interacted with.
Auto-responder emails can also be used to send your internal team details about the person who submitted the form, so that you can get back in contact with them.
In this case, we’re going to be looking at setting up auto-responder emails for forms in Sitecore.
We’ll look at:
- Setting up an auto-responder email for the form submitter
- Setting up an auto-responder email for your internal team
- How to add the auto-responder emails to forms
Let’s get started.
Creating The Auto-Responder Emails
Setting Up The Auto-Responder Email For The Form Submitter
Sending an auto-responder email to someone after they complete a form on your site reassures the person that you've received their enquiry and will be in touch soon. It can also be a way to keep your audience engaged, by providing them with links to some of your other content or social media accounts to discover in the meantime.
To be able to add an auto-responder email as a form submission action, you first need to create the emails in Sitecore.
Let’s start with the email for the person who completed the form.
Setting The Email Details
From the Sitecore launchpad, click on Email Experience Manager.
Click ‘Create’ and select ‘Automated email campaign’.
Choose the template you’d like to use for this email. I recommend using a simple HTML message to reduce the chances of it going to spam, however if you’d like to have your organization’s branding/styling on it, you can ask your developer to set the right template up for you. Select Create.
In the General tab, choose a descriptive name for your email such as ‘Contact Us Visitor Form Auto-responder’. Remember to add who the recipient is into the name, because you’ll also be creating an auto-responder email that sends a notification to your team when this form is completed.
Under Description, add a description of the email such as “This email is sent to website visitors if they complete the Contact Us form.”
If you have a campaign group you’d like to add this email to, add it under ‘Campaign group’, otherwise you can leave this field empty.
In the section ‘Sender details’ fill in the email ‘From name’, ‘From email’ and ‘Reply to’ email. The from name is the name that the recipient is going to see as the sender name. This is usually the name of your organization or business.
The from email is the email address that you’d like this auto-responder email to be sent from. I recommend choosing your company’s generic/public email address for this. You can leave the reply to field blank if you’d like to use the same email address for users when they click reply on your email. If you’d like the reply email address to be different, you can specify that here.
Setting The Email Copy
Under the Message tab, enter the subject of your email, for example “Thank you for your inquiry.
You can then enter the copy you’d like this email to contain, and any tokens you’d like use to merge form fields into the email. We will configure these merge tokens later on the form itself. These can be anything within dollar signs. To keep them consistent, use form_[formfield], like in this example email below.
Some example copy could be:
“Hi $form_firstName$,
Thanks for your enquiry.
We've received your request and will get back to you as soon as we can.
In the meantime, please connect with us on:
Facebook
Twitter
LinkedIn
Instagram
YouTube
Or check out our latest blogs.”
When you’ve finished editing the email copy, click Save and close.
Copy and paste the same copy into the Alternative text field.
The alternative text field sends a plain text version of the email if someone’s mailbox cannot receive the HTML version.
Click Delivery in the top navigation ribbon.
Choose to Activate the message now, and select the checkbox for Service email campaign. This checkbox ensures that the recipient will receive the email, even if they have unsubscribed from receiving emails from you.
Click Save & Activate.
Now let’s create the auto-responder email that will be sent to your internal team to notify them that someone has submitted the form.
Setting Up The Auto-Responder Email For Your Team
The auto-responder email for your team will notify your team that a form was submitted, and will send through the details of the form submitter, so that you can get back to them about their enquiry.
To create this email, you're going to follow the same steps as above with a couple of changes.
When naming your form, choose a name to differentiate it from the email for the recipient, i.e. ‘Contact Us Internal Form Auto-Responder’.
Choose a description that tells someone that the form is an auto-responder for your internal team, i.e. ‘This email is sent to the marketing team when a visitor completes the Contact Us form’.
Choose a unique and descriptive subject for this email to ensure the recipient will know the email is a contact form submission, i.e. “Contact Us Form Submission Notification”.
Next, you want to ensure the email body pulls all the form fields, so you can see exactly who the form submitter is, and the message they left on the form. Remember to use the tokens like you did in the previous email. Here’s an example:
“Hi,
A form submission was recently made on Fishtank's Contact Us form.
Here are the submitter's details:
First name: $form_firstName$
Last name: $form_lastName$
Email: $form_Email$
Message: $form_Message$”
When you’re finished, click Save and Activate, just as you did previously.
Adding The Emails As A Form Submission Action
Now we’re going to add the auto-responders as submission actions to the form.
From the Sitecore launchpad, click Forms.
Select the form you’d like to add the emails as an auto-responder action to.
Click on the submit button field.
In the pane that’s opened on the right side, scroll down to the section called ‘Submit Actions’.
Click on the + button and choose ‘Send Email’.
For the email to send to the form filler:
Choose the email you set up earlier for the form submitter from the Message dropdown list.
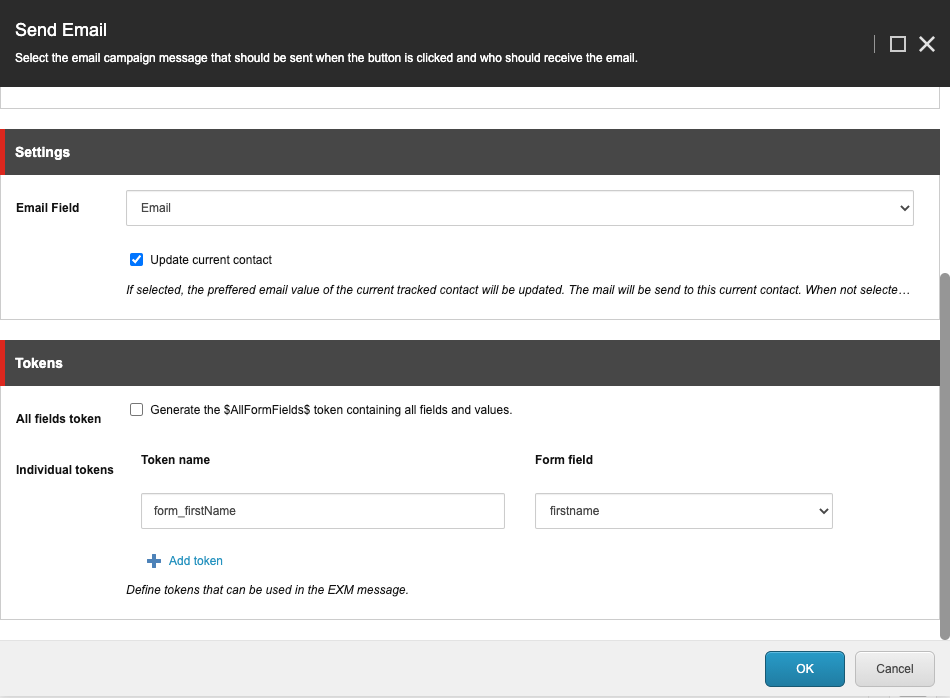
For Mail to, choose ‘Value from field in this form’, and in the Email field select ‘Email’. If you’d like the system to update this contact’s existing details in the database (if they exist), to what they’ve included in the form, select the update current contact checkbox.
Under tokens, set the token you need for this email. Remember to name it what you chose as the token for the email copy (but don’t include the dollar signs here). And under the Form field dropdown, select the field you want it to map to. For our example, we choose to merge the First Name token into the email, so here we’ll name the token ‘form_firstName’, and select the firstname field as the token.

Click Save and Apply, then publish the form by heading back to the Forms area, selecting the checkbox for the form, and clicking the dropdown arrow in the top right corner, and selecting Publish.
Adding The Internal Email As A Form Submission Action
There is a bug in Sitecore that doesn’t let you add more than one email as a submit action on a form in the Form Designer. You can get around this bug by following the instructions in my blog: Sitecore Forms Extensions: Adding Multiple Submit Actions.
Once you’ve got the duplicate of the email as a submit action, you can follow the same steps to edit the form that will be sent to your team.
Here’s what you’ll want to do differently:
Choose the message that you set up for your team from the message dropdown.
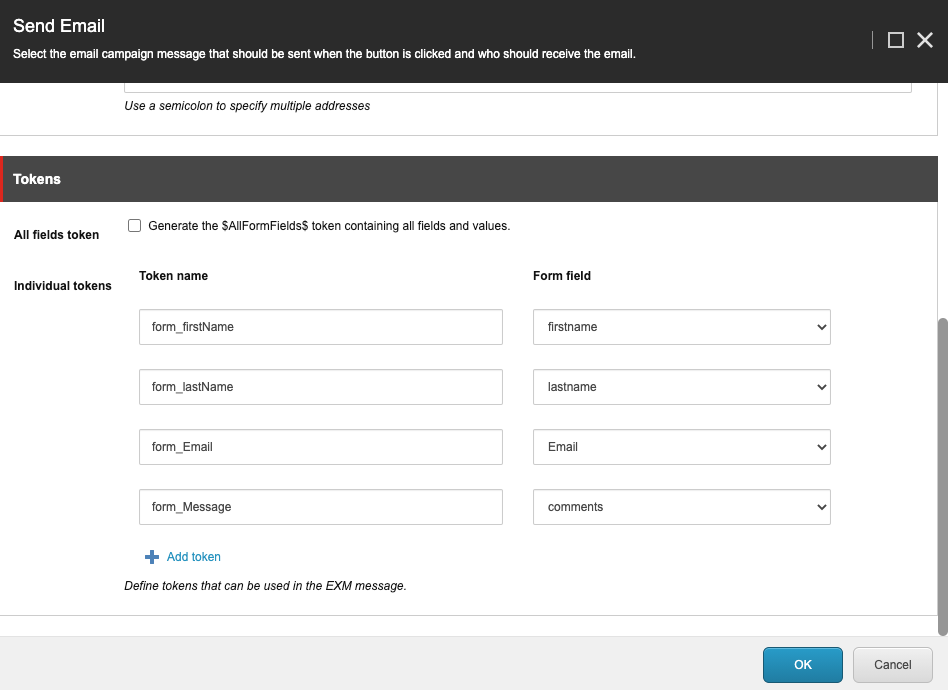
Under Mailto, choose Fixed email address, and under Email, type the internal email address/s that you want to receive the auto-responder email. If you’d like to send it to more than one, separate the emails with a ; without a space in between.
In the tokens section, set up all the tokens the same way you did on the other email, except this time ensure you set up all the tokens you’ll need for each field.

Remember to hit Save and Apply, then Publish your form by going back to the Forms area, selecting the checkbox for the form, and clicking the dropdown arrow in the top right corner, and selecting Publish.
Wrap Up
I hope this blog was helpful in getting your first auto-responder emails set up. Remember to test these emails and forms many times to make sure both the email to your team and form submitter are working as they should be.
If you have any questions, or if there's anything I can help you with, please reach out to me via Twitter @natmankowski, or join my Facebook group for Sitecore marketers and content authors.
