Reading time: 9 min read
Server-Side Integration of Sitecore CDP on a Next.js App
Learn how to do server-side integration using the Engage SDK into your Next.js app.
Start typing to search...
In today’s competitive digital landscape, delivering a personalized customer experience is essential for driving engagement and conversions. Sitecore CDP (Customer Data Platform) empowers businesses with the tools to collect, analyze, and act on customer data, enabling the creation of tailored, data-driven experiences. By integrating Sitecore CDP into modern frameworks like Next.js, developers can tap into these powerful capabilities to build dynamic, personalized websites that adapt to their users' needs.
In a previous blog post, we discussed how to configure Sitecore CDP within a project. In this guide, we’ll take a slightly different approach, focusing on integrating Sitecore CDP via middleware rather than directly within the pages. Specifically, we’ll explore how to integrate Sitecore CDP using server-set cookies, which allow the web server to create and manage cookies, then send them to the client-side application.
This method brings several advantages, such as:
httpOnly attribute to cookies, preventing client-side JavaScript from accessing them and reducing the risk of cross-site scripting (XSS) attacks.Before integrating Sitecore CDP, let's first gather the necessary information. You'll need the Client Key, Stream API Target Endpoint, Point of Sale Name, and optionally, the Cookie Domain. All of these can be found within the Sitecore CDP platform. I'll guide you through locating each one.
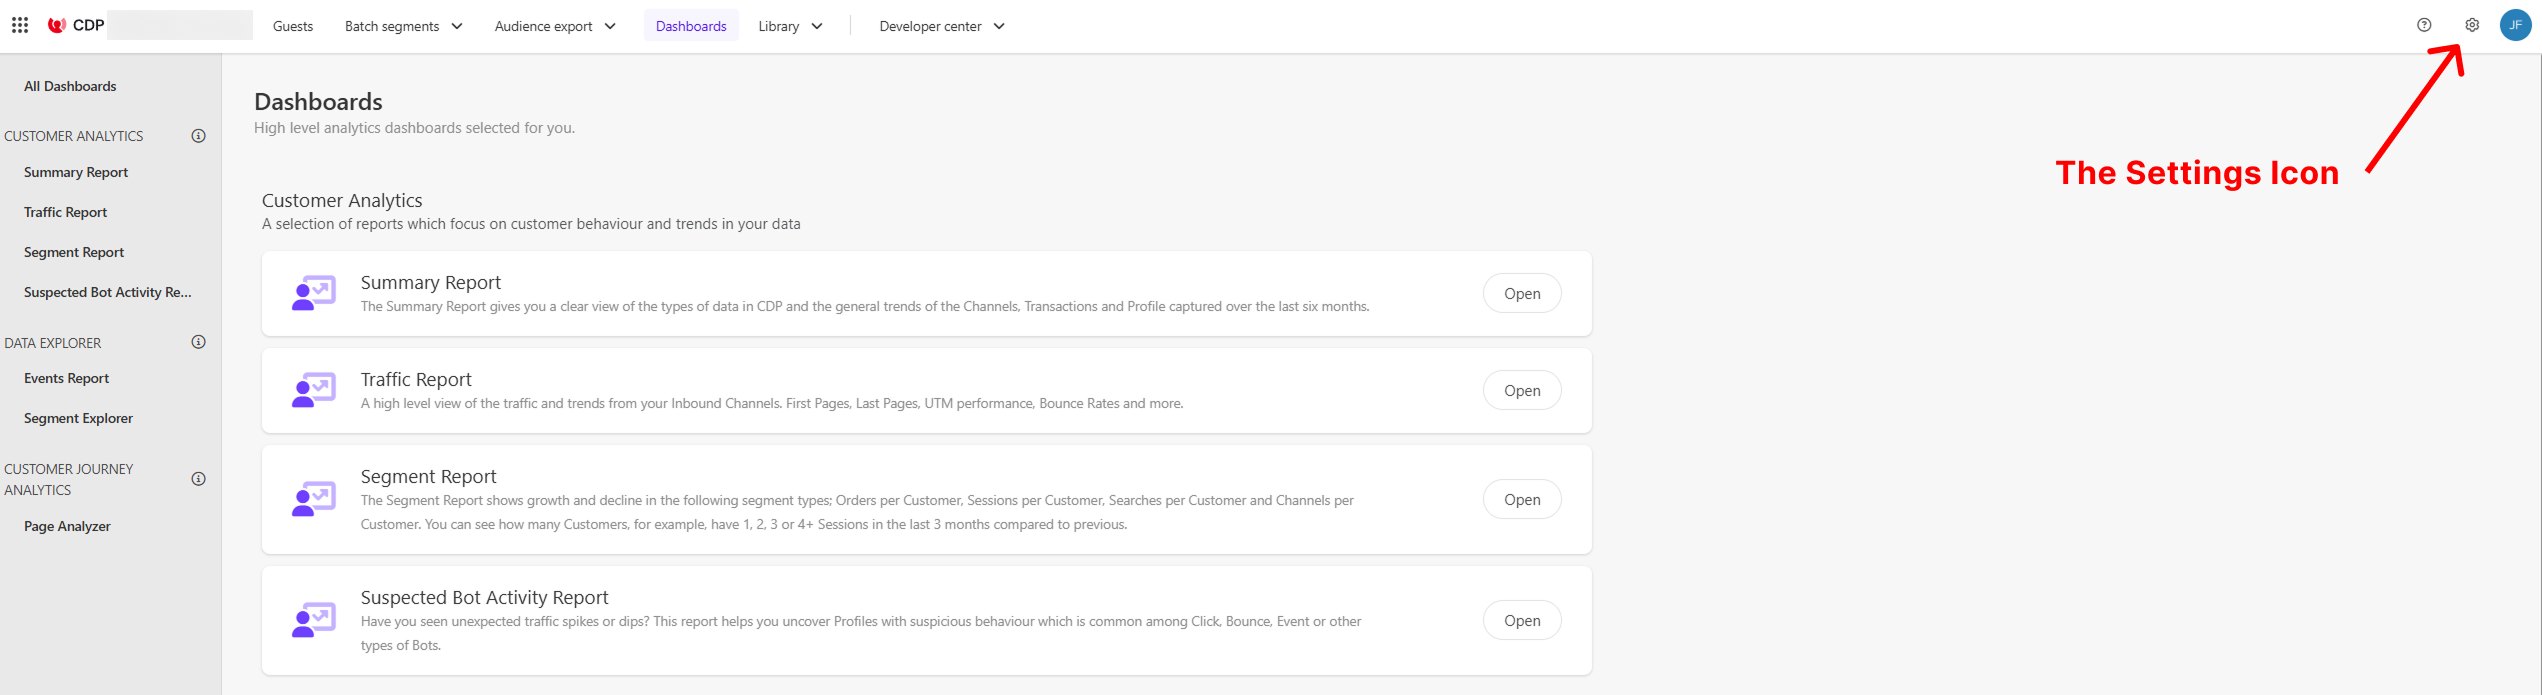
This identifier is unique to your organization and serves as a public identifier. To locate it, navigate to the Sitecore CDP Dashboard and click the Settings icon in the top-right corner. The screenshot below highlights its location within the dashboard:
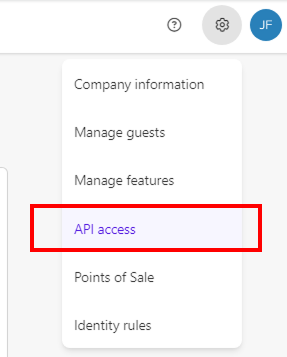
Clicking the Settings icon will open a dropdown menu. As shown in the screenshot below, select API Access:
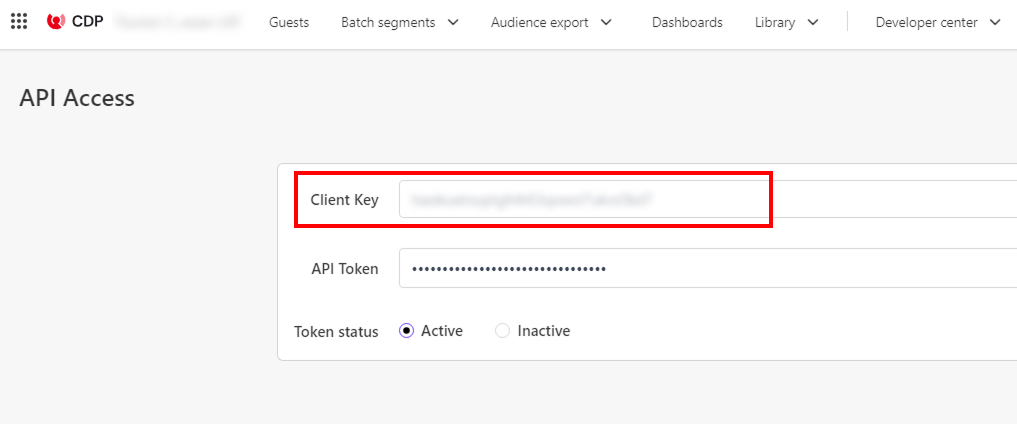
On the API Access page, you'll find the Client Key in the highlighted area. Copy this key and set it aside—we’ll use it later.
Next, let's retrieve the Stream API Target Endpoint.
The Stream API is responsible for transmitting data, and the target endpoint you use depends on your Sitecore CDP environment. First, we need to determine the Environment value, which can be found within the Sitecore CDP platform.
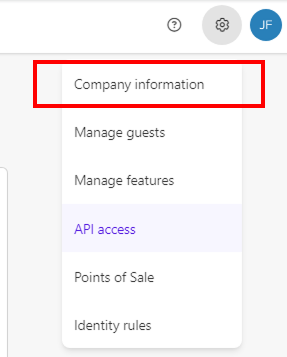
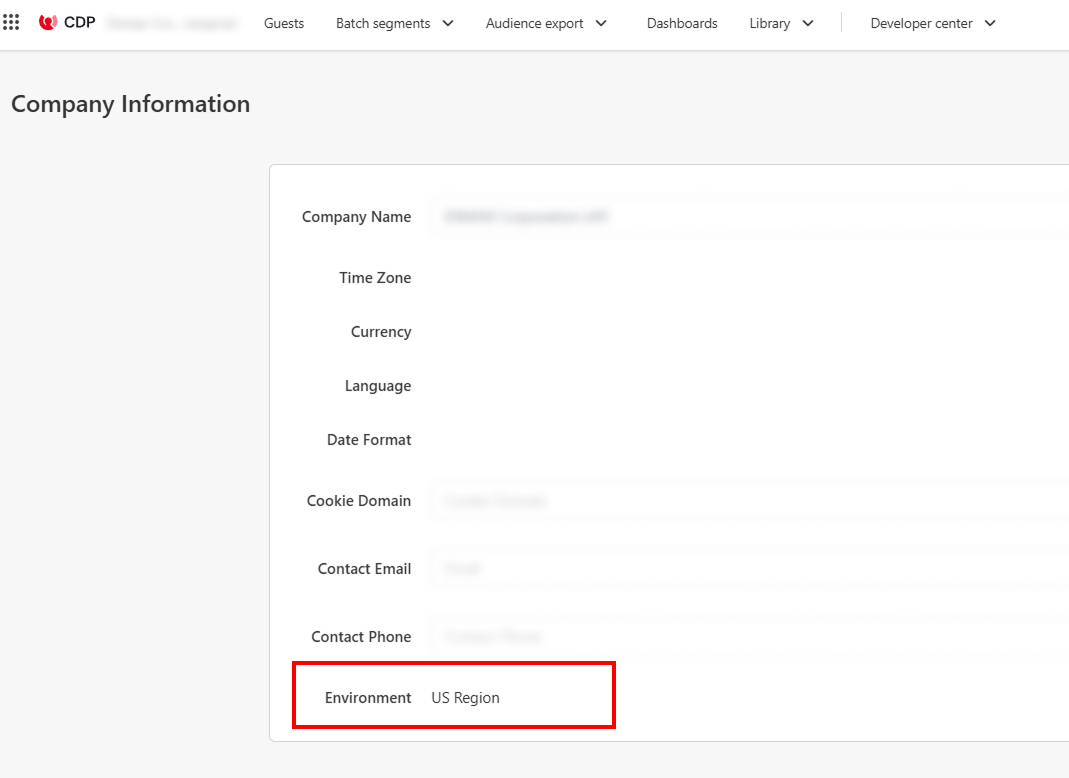
To locate it, navigate to the Settings dropdown and select Company Information:
On the Company Information page, scroll to the bottom to find the Environment value:
Use the table below to determine the correct Stream API Target Endpoint based on your environment. In our case, we’ll be using the US Region.
| Environment | Stream API target endpoint |
|---|---|
| AP Region | https://api-engage-ap.sitecorecloud.io |
| EU Region | https://api-engage-eu.sitecorecloud.io |
| JP Region | https://api-engage-jpe.sitecorecloud.io |
| US Region | https://api-engage-us.sitecorecloud.io |
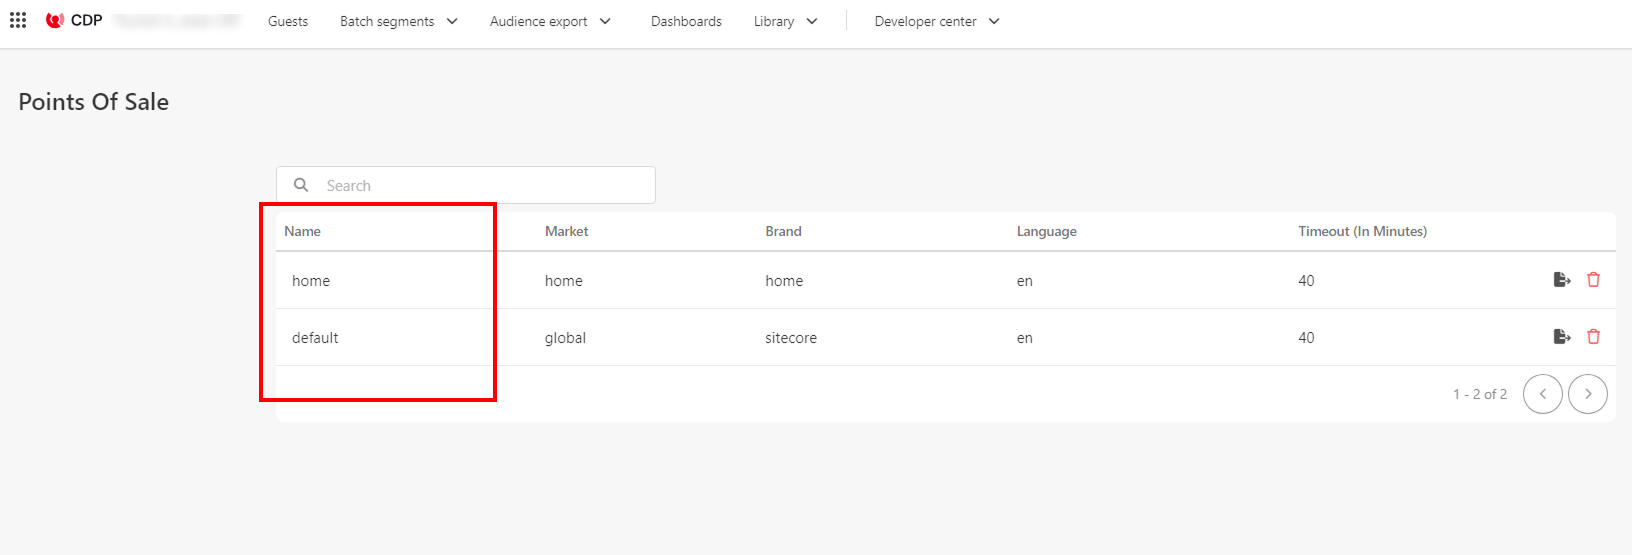
To find it, go to the Settings dropdown and select Point of Sale:

On the Point of Sale page, you'll see a list similar to the screenshot below. Choose one of the Name values, as you'll need it for configuration. This value is not fixed—you can define it based on your needs to help filter and analyze data effectively.
Setting the Cookie Domain is optional. However, if you choose to configure it, refer to the table below from Sitecore's documentation to determine the correct setup for your needs.
| Scenario | Example domain | Cookie domain |
|---|---|---|
| Integrating the main domain, including all subdomains. | www.myretailsite.com | ".myretailsite.com" |
| Integrating a subdomain only. | beta.myretailsite.com | ".beta.myretailsite.com" |
| Integrating a website on localhost. | localhost | "localhost" |
Now that we have all the necessary information, we can proceed with integrating it into our Next.js app.
Navigate to your frontend build directory: src/lib/middleware/plugins. Inside this folder, create a new file for the CDP Integration—I named mine cdp.ts.
The following code should be sufficient to get it working. However, if you already have other plugins set up, ensure that the order value (located before the constructor()) is set correctly.
If you're following the Sitecore documentation, note that the code below differs from their approach, as it is implemented as a plugin rather than being added directly to middleware.js.
import { NextRequest, NextResponse } from 'next/server';
import { initServer } from '@sitecore/engage';
import { MiddlewarePlugin } from '..';

/**
 * This is the CDP middleware plugin for Next.js.
 * It is used to enable Sitecore CDP tracking in Next.js.
 *
 * The CDP middleware will:
 *  1. Initialize the Sitecore Engage server with the provided settings.
 *  2. Handle the CDP cookie on the request and response.
 */
class CDPPlugin implements MiddlewarePlugin {
  private engageServer: ReturnType<typeof initServer>;

  // CDP middleware should run after multisite and personalize
  order = 2;

  constructor() {
    const engageSettings = {
      clientKey: 'CLIENT_KEY_VALUE',
      targetURL: 'STREAM_API_TARGET_URL_PLACEHOLDER_VALUE',
      pointOfSale: 'TARGET_URL_PLACEHOLDER_VALUE',
      cookieDomain: 'COOKIE_DOMAIN_VALUE',
      cookieExpiryDays: 365,
      forceServerCookieMode: true,
    };

    this.engageServer = initServer(engageSettings);
  }

  async exec(req: NextRequest, res?: NextResponse): Promise<NextResponse> {
    const response = res || NextResponse.next();
    await this.engageServer.handleCookie(req, response);
    return response;
  }
}

export const cdpPlugin = new CDPPlugin();
The code above initializes the Engage SDK as a middleware plugin, running alongside the other plugins. All the information we gathered is used within the engageSettings variable, which is initialized using initServer() and utilized in the handleCookie() function. This function ensures that the cookie is set directly from the server.
With server-set cookies in place, we can now add a trigger. The simplest trigger to start with is a Page View event.
This requires setting up and initializing the @sitecore/engage package on the client side, which will handle receiving cookies from the server and storing them in the browser.
First, locate the Layout.tsx file in your frontend build. Since we want to trigger a Page View event on all pages, this is the best place to integrate the functionality. Once you've found the file, we can proceed with the code integration.
The integration requires minimal imports—just React's useEffect hook and the init function from @sitecore/engage. Add the following at the top of your file:
import { useEffect } from "react";
import { init } from "@sitecore/engage";
Next, define the engageSettings variable outside of the Layout functional component. This will store the required configuration for initializing Sitecore Engage.
const engageSettings = {
  clientKey: 'CLIENT_KEY_VALUE',
  targetURL: 'STREAM_API_TARGET_URL_PLACEHOLDER_VALUE',
  pointOfSale: 'POINT_OF_SALE_PLACEHOLDER',
  forceServerCookieMode: true,
  includeUTMParameters: true,
  webPersonalization:
    false /* boolean or object. See Settings object for all options. Default: false */,
};
Inside the Layout functional component, add a function called loadEngage. This function initializes Sitecore Engage and sends a Page View event.
To assist with debugging, we’ve included console.log statements that print the browser ID, which will be useful for validation later.
  const loadEngage = async () => {
    const engage = await init(engageSettings);
    // Send VIEW events
    engage.pageView({
      channel: '<channel_PLACEHOLDER>',
      currency: '<currency_PLACEHOLDER>',
    });

    console.log('Copy-paste the following line into Sitecore CDP > Guests > Search field:');
    console.log('bid:', engage.getBrowserId());
  };
Finally, invoke loadEngage inside a useEffect hook to ensure it runs when the component mounts.
  useEffect(() => {
    loadEngage();
  }, []);
Now that the trigger is set up, we can proceed to validate whether it's working as expected.
To verify that Sitecore CDP has successfully captured the VIEW event, follow these steps:
Open your browser’s developer console and look for the log messages. You should see output similar to the screenshot below. Pay close attention to the second line, as we’ll use this Browser ID to search in Sitecore CDP.

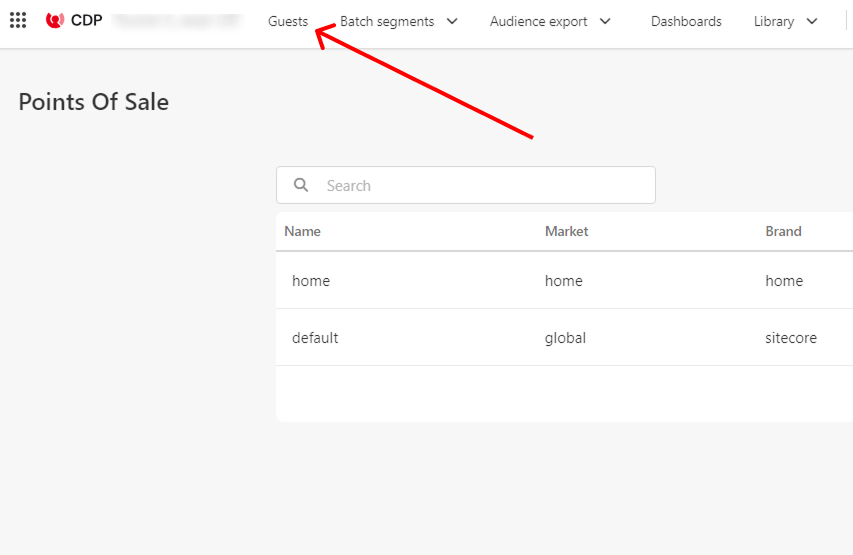
Open the Sitecore CDP Platform and go to the Guests page. You can find this in the Top Navigation, as shown below:
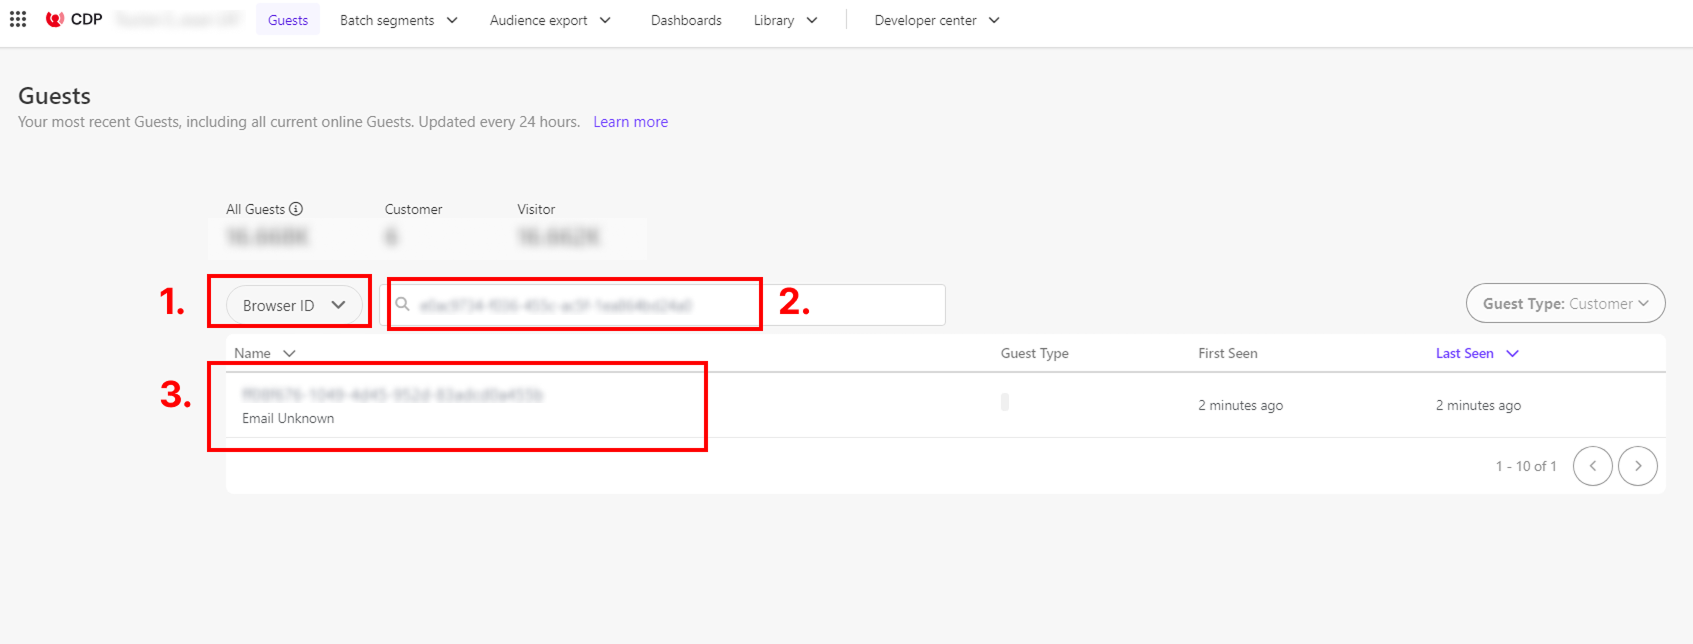
If you see the entry—great! Your VIEW event trigger is working successfully.
This is just the beginning of what Sitecore CDP can do. So far, we’ve only set up an event trigger for a Page View, but the possibilities extend far beyond that. In fact, there are several other triggers you can leverage. One key trigger is behavioral data, which you can explore further in Sitecore’s Documentation. Another important trigger is transactional data, which tracks interactions with products and shopping activities on your site. Check out the Sitecore Documentation here.
Sitecore offers a wealth of tools to enhance user experience, and I believe it’s crucial not to miss out on fully utilizing these capabilities to their maximum potential.

