Reading time: 13 min read
Custom Domains in Sitecore XM Cloud: Use-Cases, Setup & Troubleshooting
Taming your Edge URLs & why custom domains matter.
Start typing to search...
As developers, we’ve all been there—staring at an integration that almost works, only to be blocked by CORS policies, third-party cookie restrictions, or brand managers demanding “Why are we sending traffic to a weird Sitecore URL?” If you’re building on Sitecore XM Cloud, it’s time you got comfortable with custom hostnames—because this one capability can smooth over branding, analytics, SEO, and integration headaches all at once.
Let’s talk about what custom domains are, how they work in XM Cloud, and why they’re more than just a “nice-to-have.”
Out of the box, Sitecore XM Cloud gives you access to your content and rendering hosts using a default domain like:
https://edge.sitecorecloud.io
This works great during prototyping, QA, business testing or when everything is internal. But in a production environment, when the world is visiting your site, sharing your links to LinkedIn or Facebook, sending your users—or bots, crawlers, and cookies—through a shared, generic domain causes real-world problems.
Custom hostnames let you bring your own domain name into the equation. Want to serve your app from https://api.mysite.com or https://media.mybrand.com? With XM Cloud’s Custom Hostname API or Cloud Portal, you can register and verify your domain, route traffic to the right content site, and ensure your domain behaves like a first-class citizen in your digital architecture.
There’s a number of good reasons for why you want to use custom domains, but I’m going to go over perhaps the most important.
Search engines favor URLs tied to your domain. Custom domains make all your content—whether it’s media, structured JSON, or content APIs—show up as “yours.” That helps with crawlability, content authority, and user trust. And in today’s world, trust is everything. It’s also a small but critical detail for enterprise brand teams who demand domain consistency across every touchpoint. If a search engine is coming across edge.sitecorecloud.io when looking at links to say PDFs, or images, they’re not going to relate those to “your” site.
Sitecore's media endpoints use security headers that prevent indexing (e.g. X-Robots-Tag: noindex)—unless you're using a custom hostname. Once in place, those headers are omitted, allowing search engines to index images and other assets. This is essential if you want your product images or downloadable PDFs to show up in Google Search or Image results. We’ll go into how custom domains can get past this and solve a number of other concerning issues that can be the result of using *edge.sitecorecloud.io* on your site.
Cross-origin requests create friction, from pre-flight headaches to cookie loss. When your frontend and backend are both served from the same custom domain or subdomain, you’re in the clear—no need for hacky CORS headers or client-side workarounds. Your requests just work. Security officers love this because it’s one less third-party they have to grant access to.
Search engines favor URLs tied to your domain. Custom domains make all your content—whether it’s media, structured JSON, or content APIs—show up as “yours.” That helps with crawlability, content authority, and user trust. It’s also a small but critical detail for enterprise brand teams who demand domain consistency across every touchpoint.
If I didn’t sell you on all the positives, perhaps I can sell you on the simplicity that’s required to set them up. I myself had my doubts.
If you head on into Sitecore Portal, click on Admin and then in the left navigation click Custom hostnames, you’ll find all you need.
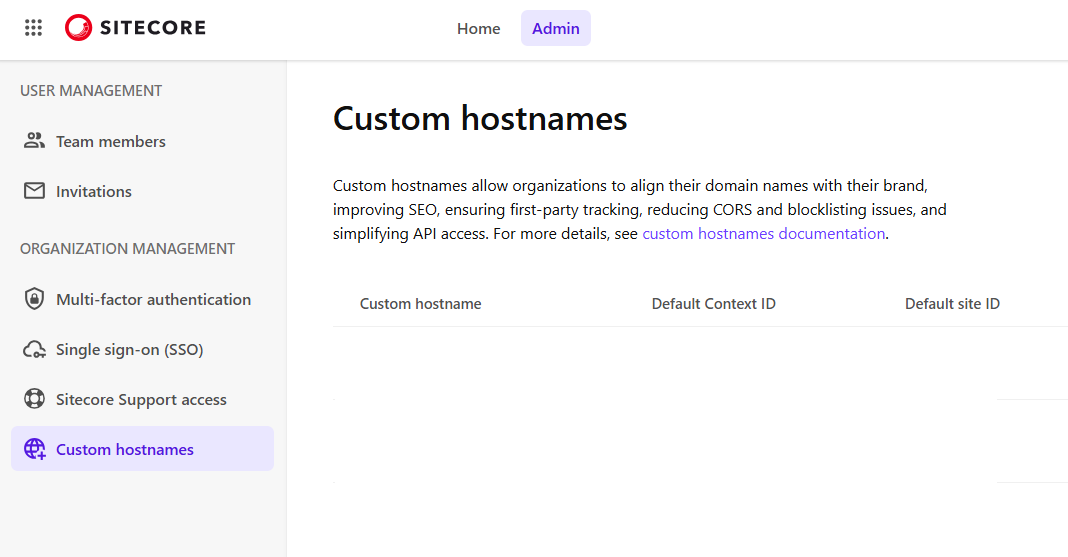
Simply click on Create custom hostname on the right-side and a modal will open with the details that you need to enter.
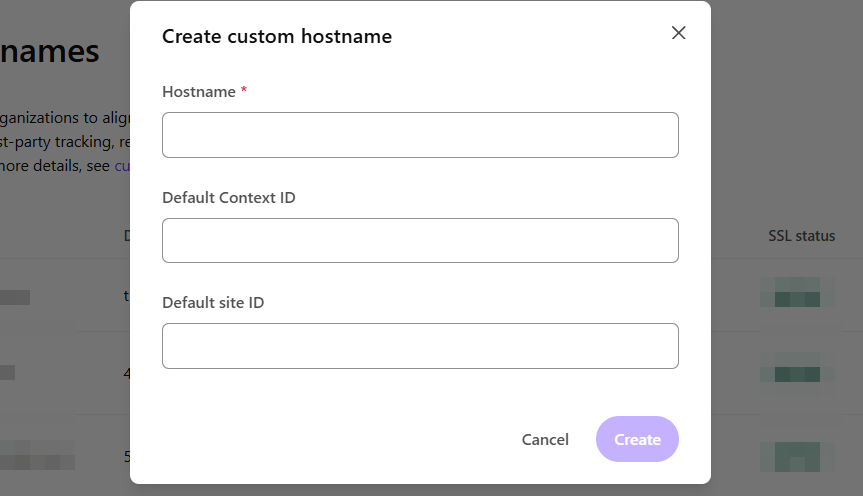
You are required, obviously, to give a valid hostname. One that either you have already create or have the ability to create. e.g. media.abccompany.com. You’re not limited to just one though. Because you have the option to enter in the Default Context ID and Default site ID, technically if you have two non-prod and one prod environment, you can create one for each. e.g. media-qa.abccompany.com and media-staging.abccompany.com. You don’t have to though, you can route all queries through a single custom domain for things like images and files, but honestly, it’s far better to just create three.
If you didn’t provide these values, you’d need to provide contextId and siteId as query string variables on the URL, similar to how you’ll often see h and w for the height and width of an image. This isn’t good because it exposes your Sitecore Context ID and Site Name to the world. So just don’t do it. If you’re restricted to only one, for whatever reason, create a custom domain for your production environment and then modify the front end to provide query strings only for non-production environments.
After hitting Create, you’ll be prompted with a second modal that provides you the DNS details you need to add to make everything work.
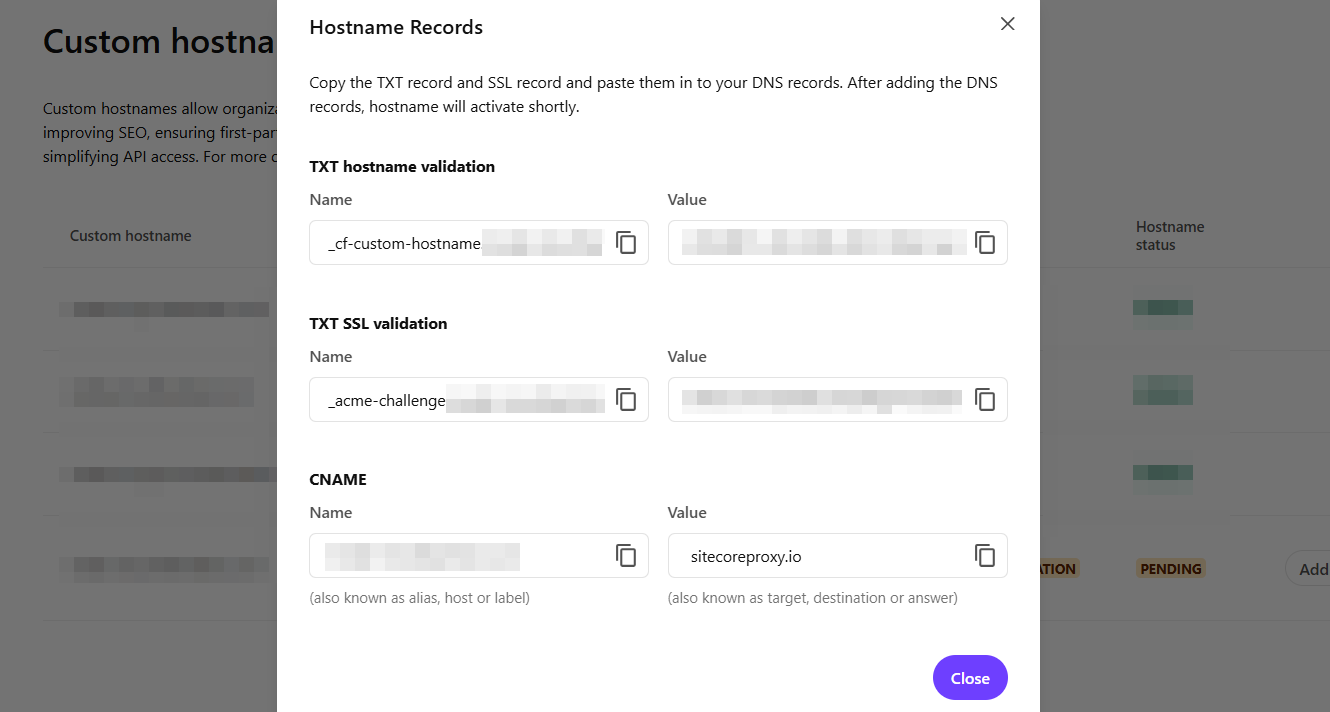
It’s then up to you and your DNS provider to update all the TXT and CNAME values. And it’s at this point you could encounter issues, was I have. Here’s a couple issues and how to resolve them.
In the perfect world, you update your DNS and things just run tickety-boo and you get green lights and both your SSL status and Hostname status show Active. But that doesn’t always happen. In fact, for me, the Hostname status typically goes Active within 15 - 20 minutes of updating our DNS. Setting your TTL (Time To Live) to something low, like 300ms or 5 min, not only reduces the wait time, but improves the likelihood you’ll achieve success. Why you ask? Well, the values you copy in the modal above, with respect to the TXT values, change. That’s right, they aren’t set in stone. In my experience they time out in somewhere between 4 - 12 hours. And if you have extended validation issues the domain itself will just become unverified and you have to start all over. There are no notifications when the TXT value changes so if you haven’t seen the hostname validation change to Active within the a few hours it’s likely because the value has changed on you.
When it comes to the SSL Validation, this is where the majority of challenges and issues can occur. A lot of that has to do with who runs the DNS and perhaps what restrictions have been placed on your domain. For whatever reason, our SSL Validation would not work and the value would time out and we’d have a new value provided to us. It turned out, the issue was the result of a CAA certificate restriction put on the domain. The value on the domain was restricted to 0 issue digicert.com.
What are the reasons for this? Well, it’s good practice amongst information security professionals for a variety of reasons, such as:
The solution? Working with Sitecore Support we found that adding the CAA value below allowed the SSL validation to proceed. The process to do so, may still require you to chat with your information security team, but this is the only way to get past that in an approved manner.
0 issue "pki.goog"
Now if you’re doing this on a subdomain, say media.abccompany.com then you’d have to add the CAA value on the root domain. But if say you wanted to use media.www.abccompany.com then you’d need that CAA value on www.abccompany.com for it to work.
One of my favorite tools to validate that DNS has been entered correctly is Google Dig DNS. You can access it here: https://toolbox.googleapps.com/apps/dig/
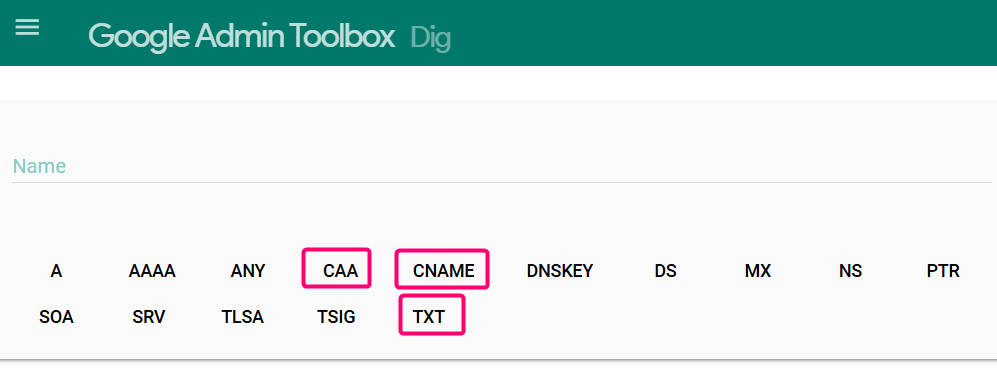
It allows you to quickly check the three most important areas:
If you care about SEO—and you should—custom domains aren’t just a branding luxury. They’re a critical requirement for proper indexing of your content and media in Sitecore XM Cloud. Here’s why it matters, and what can go wrong if you skip this step.
By default, Sitecore XM Cloud serves your content and media via shared domains like edge.sitecorecloud.io. While that works for basic delivery, it’s actively hostile to indexing by search engines, API crawlers, even Sitecore Search itself for a few key reasons:
X-Robots-Tag: noindex: Sitecore adds this header to all media responses served from its default Edge domain. That means:
So how do XM Cloud Custom Domains help?
When you use a custom hostname (e.g., media.abccompany.com or api.abccompany.com), Sitecore disables the noindex header for media and API responses when you structure the URL properly. This allows:
When it comes to delivering images or files, like PDFS, via a custom domain rather than the default Edge provider, there’s a specific structure you have to follow to allow no-index to be removed. If you don’t, it’s still there.
By default, an image hosted on Edge might resemble the following:
https://edge.sitecorecloud.io/<org>-<env>/media/image.jpg?h=318&iar=0&w=528
A custom domain version, that will work just fine, will look like this, but this still has a no-index header.
https://media.abccompany.com/<org>-<env>/media/image.jpg?h=318&iar=0&w=528
If you opened up the Developer Tools Network tab, you could see that in the headers.

To achieve a URL that can be indexed, we have to modify it accordingly by adding /v1/media/edge/images to the end of the new host name. The result now resembles this.
https://media.abccompany.com/v1/media/edge/images/<org>-<env>/media/image.jpg?h=318&iar=0&w=528
But how do we achieve this in our front-end?
Once you have all the domains active, the next step is to integrate them in your front-end solution. There’s a debate on when to setup your custom domain, do you do it right away or wait until you’re in the roll out phase. My recommendation? Set it up as soon as you know what the domain of your media url will be. The process of setting up the domain could take a few hours but it could take longer.
It’s also easier to integrate the custom domain into the front-end from the start, rather than retroactively. There are three field types that are largely affected by the use of Custom Domains.
Image and Link field types are fairly obvious, but folks tend to forget about RichText. The good news is we can integrate both of these in a similar fashion.
Let’s first create a function to help us transform all media URLs.
export const getTransformedMediaUrl = (url: string): string => {
  const oldBaseUrl = 'https://edge.sitecorecloud.io';
  const newBaseUrl = process.env.NEXT_PUBLIC_MEDIA_URL_HOST || 'https://media-url-default-value.com';
  // If the URL starts with the old base URL, replace it with the new one
  if (url.startsWith(oldBaseUrl)) {
    // Extract the path after the old base URL
    const pathAfterBase = url.replace(oldBaseUrl, '');
    // Transform the URL structure: add /v1/media/edge/images before the tenant path
    return `${newBaseUrl}/v1/media/edge/images${pathAfterBase}`;
  }

  return url;
};
You’ll need to ensure that your front-end host, e.g. Vercel, has an ENV variable, appropriate for the environment, with the new hostname. For example:
NEXT_PUBLIC_MEDIA_URL_HOST=https://media.abccompany.com
You could further bullet proof the above code to verify that the ENV variable exists. If it doesn’t, don’t transform the URL. This way, if say your DNS provider failed verify or provide an SSL cert for whatever reason, you could disable the transformation code for a particular environment.
If we need to adjust an Image field then, inside of a component, we can present to the user the new URL. We have to remember the layout service is providing us Image URLS stored inside of XM Cloud URLS containing edge.sitecorecloud.io.
const { image } = fields;
const { sitecoreContext } = useSitecoreContext();
const isEditMode = sitecoreContext.pageEditing;
const transformedImageUrl = getTransformedMediaUrl(image.value?.src ?? '');
const modifiedImage = {
  ...image,
  value: {
    ...image.value,
    src: transformedImageUrl,
  },
};
Then inside of the return statement, we can check to ensure the user is not in edit mode when we deliver the modifiedImage.
{isEditMode && (
  <NextImage
    field={image}
  />
)}
{!isEditMode && (
  <NextImage
    field={modifiedImage}
  />
)}
You can achieve something similar for the Link field. Be sure to always check if the user is in edit mode.
While this above solutions work, they can be cumbersome if you have several dozen components each with their own use of an image or NextImage component. My recommendation is to create a NextImage wrapper and provide the transformation there. Then you only have to modify a single component and then update all uses of NextImage to say ABCNextImage.
Inside of a RichText field, it can be a tad more complicated. What we’ve found is creating a wrapper for <RichText>, say <CompanyRichText> and then adding the URL transformation inside that allows for easier re-use across components that may use a RichTextField type rather than replicating the process in a hundred components.
// Helper function to transform media URLs in HTML content
const transformMediaUrlsInHtml = (html: string): string => {
  // Replace URLs in src attributes
  const srcRegex = /(src=["'])(https:\/\/edge\.sitecorecloud\.io[^"']*)(["'])/g;
  let transformedHtml = html.replace(srcRegex, (_match, prefix, url, suffix) => {
    return prefix + getTransformedMediaUrl(url) + suffix;
  });
  // Replace URLs in href attributes (for links to media)
  const hrefRegex = /(href=["'])(https:\/\/edge\.sitecorecloud\.io[^"']*)(["'])/g;
  transformedHtml = transformedHtml.replace(hrefRegex, (_match, prefix, url, suffix) => {
    return prefix + getTransformedMediaUrl(url) + suffix;
  });
  return transformedHtml;
};
It’s then a matter of, just like before, presenting the user the transformed field at the right time.
One often overlooked area of the site, outside of Image fields, Link fields and RichText fields are Metadata elements. Perfect example is the following.
<meta property="og:image" content=""/>
This field, should, contain an image at all times. Even if it’s just the logo for the site. You should not be pointing to a URL of an image in Vercel or Netlify (i.e. hosted directly within your front-end app) as this can be costly. And with a custom domain, you should be pointing that URL through there and not Sitecore’s Edge service.
If you're preparing a Sitecore XM Cloud site for production, setting up Custom Domains isn't optional — it's essential. Too often, teams focus solely on functionality and performance benchmarks, overlooking the invisible impact of domain configuration. But from SEO indexing and media visibility to brand trust and crawlability, the absence of a custom domain can quietly undermine your entire launch.
Don't let your carefully crafted content live under a shared, generic hostname like edge.sitecorecloud.io, where it can’t be indexed and builds zero authority for your brand. Instead, make Custom Domains a formal part of your go-live checklist — right alongside CDN validation, analytics integration, and accessibility audits. Your content deserves to be discovered, trusted, and ranked—and that all starts with your domain.