Reading time: 7 min read
Sitecore Development 101: Creating an Interactive PowerShell Script
A step by step guide to creating, configuring and executing an interactive PowerShell script directly from the Context Menu
Start typing to search...
As many of you may already know, Sitecore comes with its own PowerShell ISE (Integrated Scripting Environment) out of the box in the Sitecore Launchpad menu. This PowerShell ISE can routinely come in handy when wanting to move items, update them or even delete them in mass quantities. However if you’re working directly from the ISE itself, it can quickly become tedious to constantly be hardcoding any ID’s or paths of items or folders that you are trying to access.
Luckily, Sitecore allows for both the creation of PowerShell scripts that can be run directly in the Content Tree and a slew of interactive dialog options to let you interact with items within the Content Tree in various ways within your script’s logic. This blog will walk you through how to set up and execute this type of script.
In order to run a script from the context menu, we first need a script to run. To do this:

On the next menu, configure the following
Click Proceed

When this process finishes, you will have the following structure:
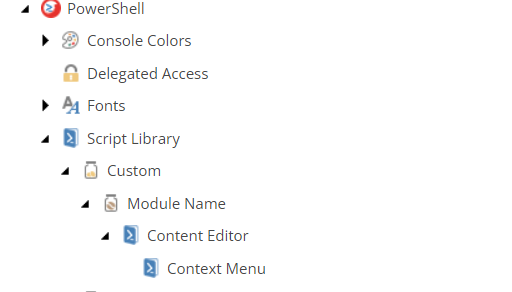
Note: Any script created or moved into the Context Menu item can be accessed from the Context Menu.
If you already have a script created, move it under the Context Menu you just created. If not, you can create one by right clicking the Context Menu Item and selecting PowerShell Script from the options.
To ensure this worked correctly, you would be able to right click any item in the Content Tree, select Scripts and be able to see and click the script you created inside the Context Menu Module item

At this point, if everything worked as expected, you should have a script that is executable from any item in the Content Tree. Now we will open this empty script in the PowerShell ISE and begin scripting. To do that

When executing a script on an item in the Content Tree, you can right click the item, navigate to scripts and run the script from the options available. In that script, getting the item you ran the script on is very simple
# Get the current item the script is run on
$contextItem= Get-Item .
This line calls the Sitecore PowerShell function Get-Item ** and passes it “ . “ referring to the item the script was run on.
Running a script on a Content Tree item and having access to that item is great and can be very useful, additionally, Sitecore also provides some Out of the Box functionality to interact with the Content Tree via Interactive Dialog **functions.
They have many different functions for various types of dialog, which can be found here in their official documentation but for this blog we are going to focus on the one that can interact with the Content Tree via dropdown selection.
In order to set up an interactive dialog that allows you to select an item from a certain path in the Content Tree, you will need the following code:
$dialogParams = @{
Title = "Example Item Selector"
Description = "Choose any item in the content tree under the specified path"
OkButtonName = "Execute"
CancelButtonName = "Close"
ShowHints = $true
Parameters = @(
    @{
        Name = "exampleSelector"
        Title = "Choose an item"
        Editor = "droptree"
        Source = "/sitecore/content/Example Folder"
        Tooltip = "Choose any item"
    }
)
}

$dialogResult = Read-Variable @dialogParams

if ($dialogResult -ne "ok") {
    Exit
}
Most fields in the above code, such as title or description, are pretty self explanatory but for those ones that are not, here is an inside on what they mean:
Running this dialog will result in the following to pop up:

And selecting the dropdown arrow will show the contents you can choose from based on your source path in the configuration code above

Finally, running this script on the Example Folder ** and selecting the Example Item **item in the dropdown and writing both item paths will give you the following:

That is it, you are now fully equipped to create, configure and run an interactive script directly from the Context Menu as well as use the Content Tree items withing your script using Sitecore’s Interactive Dialog feature. If you have not yet checked out my previous blog on “Creating a Custom Rendering Contents Resolver” you should, and stay tuned for more Sitecore Development 101!
Until next time…
Full script:
# Get the current item the script is run on
$originalSite = Get-Item .

#initialize dialog parameters
$dialogParams = @{
Title = "Example Item Selector"
Description = "Choose any item in the content tree under the specified path"
OkButtonName = "Execute"
CancelButtonName = "Close"
ShowHints = $true
Parameters = @(
    @{
        Name = "exampleSelector"
        Title = "Choose an item"
        Editor = "droptree"
        Source = "/sitecore/content/Example Folder"
        Tooltip = "Choose any item"
    }
)
}

#invoke the Read-Variable function to show dialog
$dialogResult = Read-Variable @dialogParams

#closes the dialog on non confirming button click
if ($dialogResult -ne "ok") {
    Exit
}

# Writes script item and selected item paths
Write-Host Item path you ran the script on: $originalSite.FullPath
Write-Host Item path you selected from the dialog: $exampleSelector.FullPath