More than a few times now I've been asked to create a report to display a set of information on a set of data in Sitecore. This might have been showing a list of articles that meet specific criteria, or showing when things were last modified. The list is varied. And while there are out-of-the-box reports that do quite a number of the things we need, I wanted to do something a bit more customized.
The Problem
The challenge this time was to generate a report of a list of articles that had dates between specific dates.
Seems easy enough and it is, but I wanted to have that report look a lot more professional than just listing things out in the PowerShell ISE. I wanted to have a bit of an interface that allowed people to select two dates properly before listing the data out and not have to update a script each time.
The Solution
The first thing that needed to happen was to prompt the user for two sets of dates.
Building the Interface
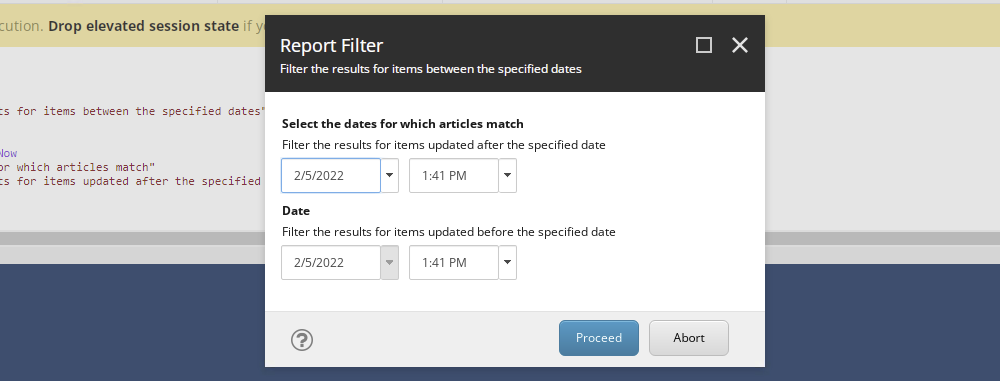
In PowerShell it's remarkably simple to build an interface that allows for user input. The following bit of code is able to produce this great looking interface to the user.

$settings = @{
    Title = "Report Filter"
    OkButtonName = "Proceed"
    CancelButtonName = "Abort"
    Description = "Filter the results for items between the specified dates"
    Parameters = @{
        Name = "selectedAfterDate"
        Value = [System.DateTime]::Now
        Title = "Select the dates for which articles match"
        Tooltip = "Filter the results for items updated after the specified date"
        Editor = "date time"
    }, @{
        Name = "selectedBeforeDate"
        Value = [System.DateTime]::Now
        Title = "Date"
        Tooltip = "Filter the results for items updated before the specified date"
        Editor = "date time"
    }
    Icon = [regex]::Replace($PSScript.Appearance.Icon, "Office", "OfficeWhite", [System.Text.RegularExpressions.RegexOptions]::IgnoreCase)
    ShowHints = $true
}
$result = Read-Variable @settings
if($result -ne "ok") {
    Exit
}
The Query
With the largest hurdle complete, now all I needed to do was to take those inputs and inject them into a query that delivered me the information I was after.
Now your query can be as complicated or as simple as it needs to be. For me, the following performed the best. Take note at the second line where I use the parameter names from above and cast them as DateTime to make the comparison. i.e. $selectedAfterDate and $selectedBeforeDate.
$articlesContainer = Get-Item -Path "master:\sitecore\content\common\articles"
$items = $articlesContainer.Axes.GetDescendants() |
        Where-Object { $_.Fields["Date"] -ne $null -and [Sitecore.DateUtil]::IsoDateToDateTime($_.Fields["Date"]) -ge [DateTime]$selectedAfterDate -and [Sitecore.DateUtil]::IsoDateToDateTime($_.Fields["Date"]) -le [DateTime]$selectedBeforeDate}
With the items captured, now I just had to display them in a meaniful and good-looking way. For that, we turn to Show-ListView.
The Results
Displaying the results in a good-looking report, one that can then be exported and used in whatever way the user wants is something I love about the OOTB reports. The majority of them use Show-ListView in some way or another.
First step is to create the report properties.
$reportProps = @{
    Title = "Articles in Date Range"
    InfoTitle = "Articles in Date Range"
    InfoDescription = "Articles found  after $($selectedAfterDate) and before $($selectedBeforeDate)"
    Property = @(@{ Label="Title"; Expression={$_.Fields["Title"]}; },
                  @{ Label="URL"; Expression={Get-ItemUrl -SiteContext $siteContext -Item $_};},
                  @{ Label="Authors"; Expression={Get-Authors -ListOfGuids $_.Fields["Authors"]}; } ,
                  @{ Label="Date"; Expression={[datetime]::ParseExact($_.Fields["Date"],'yyyyMMddTHHmmssZ',$null)}; } ,
                  "ID")
So as you can see above, we have all the fields that make up the report view itself along with the Property field that lists out all the columns in the report.
Each "property" is made up of the Label and an Expression which displays the value. You can, as you can see, call functions in that Expression field to improve the quality of the data. In our case, the authors of the article were from a multi-list so I had to extract their names and display them as comma-delimited.
If you're curious, I've added those function calls below.
function Get-ItemUrl {
    param(
        [item]$Item,
        [Sitecore.Sites.SiteContext]$SiteContext
    )
    $result = New-UsingBlock(New-Object Sitecore.Sites.SiteContextSwitcher $siteContext) {
        New-UsingBlock(New-Object Sitecore.Data.DatabaseSwitcher $item.Database) {
            [Sitecore.Links.LinkManager]::GetItemUrl($item)
        }
    }
    $result[0][0].Replace("://", "https://").Replace("cm.abccompany.com/en/sitecore/content/common/articles", "www.abccompany.com/articles")
}

function Get-Authors {
    param(
        [String]$ListOfGuids
    )
    [String[]]$authorNames = @()
    [String[]]$authorGuids = $ListOfGuids -split "\|:"
    foreach($x in $authorGuids) {
        if ($x -ne ""){
           $item = Get-Item -Path "master:" -ID $x
           $firstName = $item.Fields["First Name"]
           $lastName = $item.Fields["Last Name"]
           $y = "$firstName $lastName"
           $authorNames += $y
        }
    }
    $result = $authorNames -join '', '
    $result
}
Using Show-ListView, now only does the user have the ability to export in a variety of formats, but they can also sort the data by the appropriate column. It's just handy all around. Your clients will appreciate it.


