Reading time: 12 min read
Building Your API Driven Integration Ecosystem for Sitecore XM Cloud
Seamlessly connect your existing APIs to your Headless XM Cloud Frontend with Vercel & Fastify
Start typing to search...
Seamlessly connect your existing APIs to your Headless XM Cloud Frontend with Vercel & Fastify
An API Driven Integration Ecosystem is a very common approach to XM Cloud & SXA Headless development. It allows lots of clients to more easily bridge the gap between their SQL Databases and their new Sitecore JSS Front end. You can also build out a “Data Layer” or “Middle Layer” that aggregates all of your existing API’s into a collection of accessible endpoints, allowing you to build out a strong ecosystem without needing to rebuild or refactor your existing APIs - Which is not only a complex, but also an expensive task.
The concept is to allow your headless frontend to call APIs for all the data it needs from the client; whether this is done via an aggregate Data Layer or if you call multiple APIs directly will both provide you with the same results - The website feels faster as the initial pages will load immediately. Your users won't need to wait for your server to make long API calls before they are returned any data - The front end will load immediately and display a “skeleton” or “ghost screen” and hydrate the data as each API endpoint returns its content.
The skeleton placeholder approach is extremely common across the majority of the web, since it's a great way to provide the feeling of a faster website while under the restrictions of long & slow API calls. If you open any major social media site like LinkedIn or Instagram, you will immediately see this approach taking place. This is one of the major reasons that using a Server Side Rendering only approach for all your page is a negative, and where a Client side Front end API Driven Integration Ecosystem really starts to show its benefits. It's all about providing the user with the fastest interface as possible - even if you're ‘tricking them’ into thinking your website is faster than it actually is.
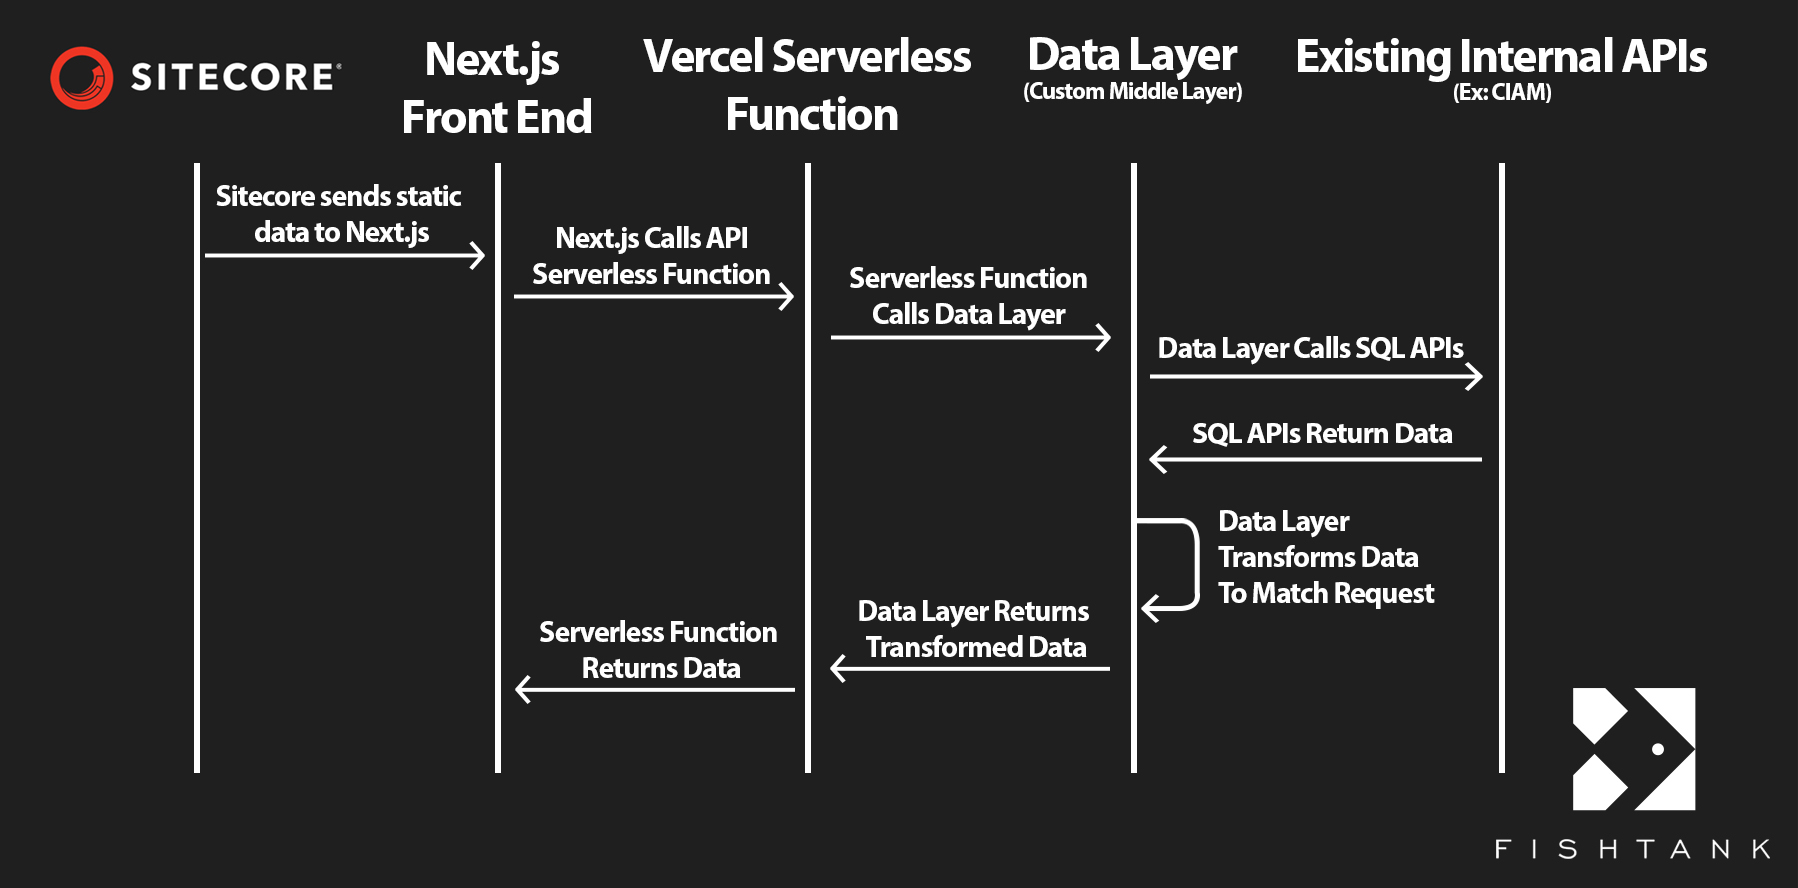
The goal here is to help you understand how the data will get to your users. Most businesses will already have an existing Customer Identity and Access Management (CIAM) or equivalent API system in place, so a great approach would be to create an aggregate “Data Layer” to manage all the data transfer between your front end and existing APIs.
Your Sitecore JSS front end will load for the user, then their browser will make a request to the Data Layer. The most secure way to do this with a Next.js JSS Front end is through the Next.js Serverless Functions, which will allow you to lock down the IP’s that can connect to your Data Layer, increasing security. If you are hosting on Vercel you can utilize Vercel’s Secure Compute to help achieve this. The Next.js Serverless Function can then talk directly to your Data Layer and await a response.
Once the connection to the Data Layer via the Front End is complete, the next step is connecting your Data Layer to each of your existing CIAM APIs. One of the big benefits of using a Data Layer is it allows the Front end to only make one or two API calls, and have the Data Layer hit as many of your existing APIs as needed. This reduces the amount of calls the user's client browser needs to make, which will in turn speed up their overall website experience, since total outgoing connections plays a big part in initial site load speeds.
As soon as your existing APIs have returned all the requested information to the Middle/Data Layer, that data can be transformed & manipulated inside the Data Layer before returning it to your Front end. This allows you to ensure that only the needed data is returned to the Front End, reducing the total size of the returning payload while also improving security by only sending the required data. The Idea of manipulating your existing API responses in the Data Layer allows you to reuse the same existing APIs for multiple specific responses, since you can easily remove the unneeded data before returning it to the Front end. Your CIAM endpoint for /account can be used for 2 different Data Layer endpoints that both call /account, but only need some of the data.
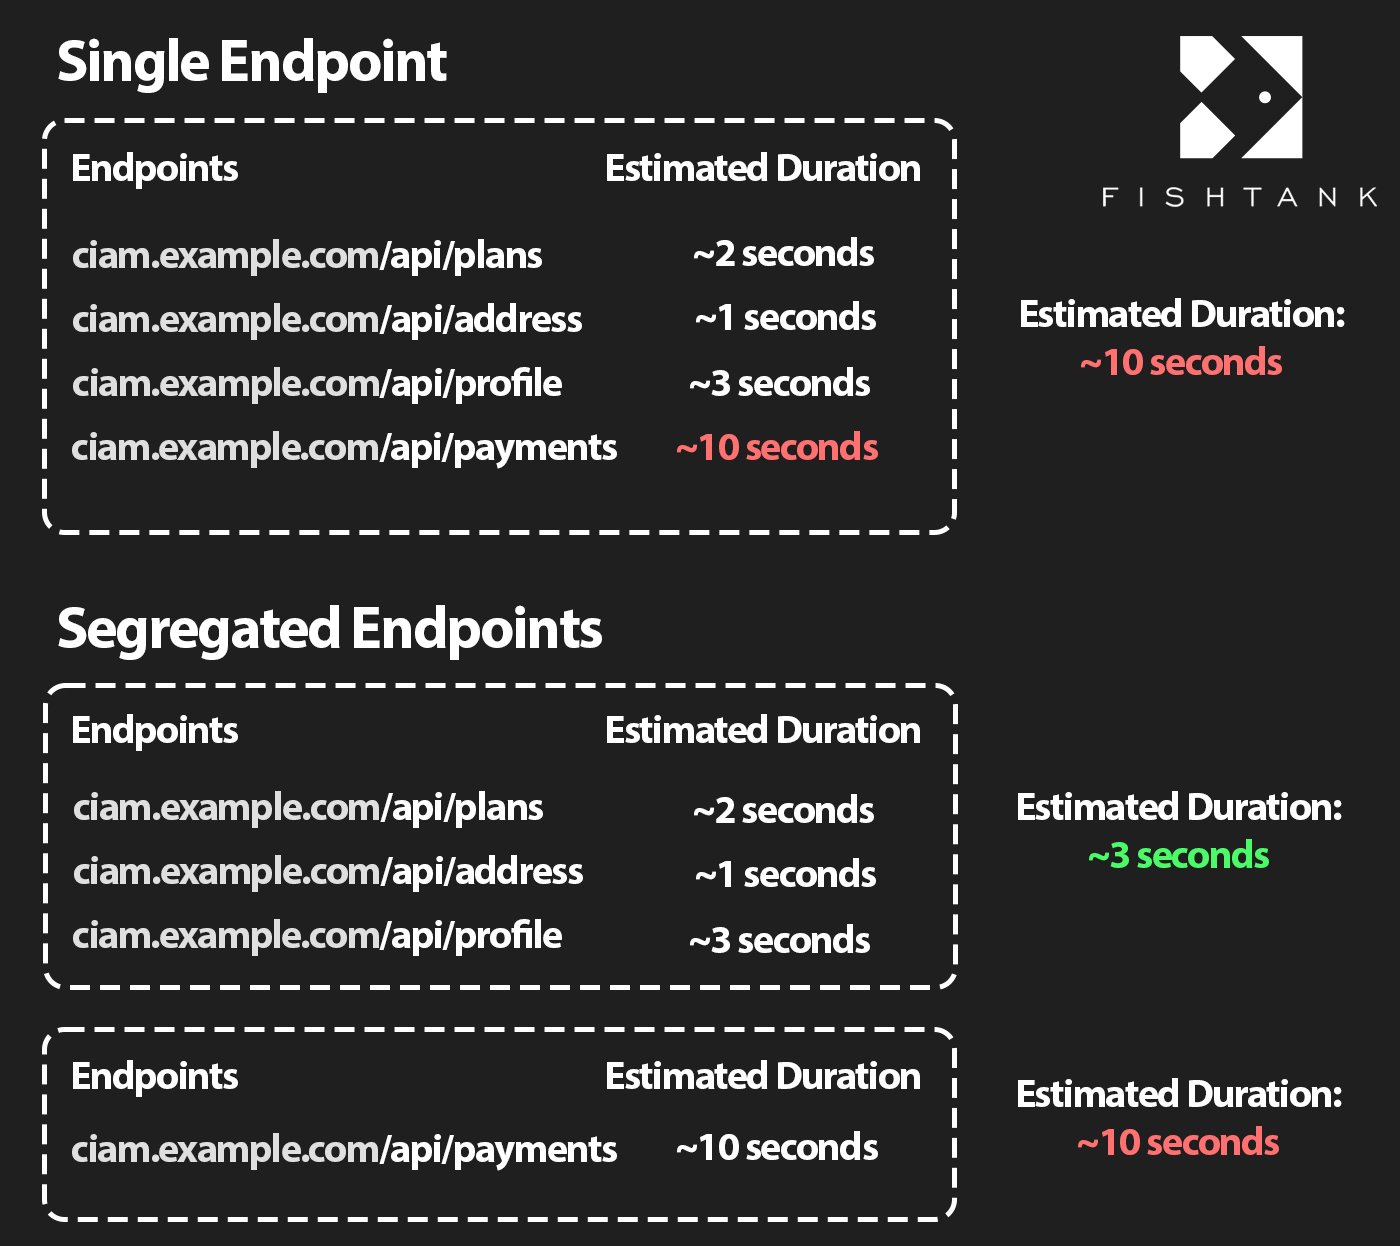
It's a good idea to think about which of your API Endpoints are the slowest and segregate them away from your faster endpoints. If you have 3 endpoints that will return in less than 3 seconds, and 2 endpoints that you know takes 6+ seconds to return their data, you should build out 2 Data Layer endpoints; 1 for the faster endpoints, and another for the slower endpoints.
This will allow your Data Layer to return data faster, since the faster endpoints don't need to wait for the slower ones before returning data to the client. An example of endpoints you know will take a longer amount of time could be a Payment endpoint, since you already know your existing API needs to connect to an external service like Worldline or SAP to get any needed data. This external connection will add a significant hang time to your Payment endpoints, so it makes sense to isolate this call with any others that call the same external source.
There are almost too many locations that you could deploy your “middle layer”, but only a few make sense when working with Headless XM Cloud. If you're building your Sitecore Frontend with Next.js then it would be foolish to not deploy your API onto Vercel alongside your JSS Next.js app.
Deploying API frameworks to Vercel is generally a pretty seamless thing to do, as long as your selected framework is compatible with Serverless Functions. When you push your code, Vercel sets up both static hosting and API routes as Serverless Functions which will run on Vercel’s Edge Network; The goals of Vercel’s Edge Network is to attempt to put the computing as close to the user as possible, which would reduce your global latency! Vercel also provides automatic scaling, region selection and secret management out of the box. This tight integration usually means faster responses for end users with minimal configuration. Vercel is our recommendation for both your XM Cloud Front end and for any Node.js API layer. If you want to learn more about Vercel, you can read about it here.
If you're still not sold on Vercel, then you might want to look into some of the alternatives like Azure Functions, AWS Lambda, Google Cloud/Firebase Functions, or Cloudflare Workers. Every platform has its strengths, however we’ve done detailed research on the benefits of Vercel and found it's the best option for almost all our clients.
There are lots of amazing frameworks that you could choose for your middle layer. The ones that stand out most to me, and most other developers, are the new kids on the block: Deno & Bun. However, while they might sound amazing and do actually provide faster processing they don’t have the backbone support of the community - meaning they might fail, forcing you to make the migration to a Node.js framework. I love Deno and Bun, but they’re impossible to recommend until they have more concrete adoption and support across the industry.
Out of all the Node.js frameworks, and there is A LOT, Fastify stands out as one of the fastest with native Typescript support. It is optimized to handle 30,000 requests a second because of its HTTP router and precompiled serialization engine. It also has schema-based validation using JSON that helps support data integrity and allows Fastify to precompile validation and serialization for next to no runtime overhead. Unlike Deno and Bun, Fastify also has concrete support from the community since its built with a plug-in first approach, allowing you to easily install official or community plugins to only get the feature you need, while removing any unneeded bloat.
We recommend, and actively use, Fastify for our data processing layers, but if you want a better view of what some of the alternatives are - you can look at this table. Every option has its strengths.
| Framework | Runtime | Key Feature | Why Use It |
|---|---|---|---|
| Fastify | Node.js | Schema-based, plugin architecture | Ultra-fast JSON validation and routing; handles high throughput with low overhead |
| Express | Node.js | Minimal, unopinionated | Quick to start; huge ecosystem of middleware; easy to learn |
| Koa | Node.js | Async/await middleware | Lightweight core; fine-grained control over middleware flow |
| Hapi | Node.js | Integrated auth and security plugins | Built-in validation, caching, and auth patterns for secure APIs |
| NestJS | Node.js | Decorators, DI, modular architecture | Enterprise-grade structure; TypeScript-driven; easy to scale |
| Oak | Deno | Koa-style middleware router | Native support in Deno; works across Bun & Cloudflare Workers |
| Bun HTTP | Bun | High-performance server API | Fast startup and request handling via JavaScriptCore optimizations |
| uWebSockets.js | Node.js | Native C++ backend | Extremely low latency & high throughput; ideal for WebSockets & HTTP |
| AdonisJS | Node.js | MVC, ORM, validation built-in | Opinionated full-stack framework; great for teams wanting convention over config |
Fastify is a great option for a middle layer, but you need to convert the Fastify server to run serverless functions for it to be compatible with Vercel. The default Fastify configuration has you start the server with fastify.listen(). This works great, and if you didn’t know you could only use serverless functions on Vercel - you wouldn’t see any problems until you tried to deploy. fastify.listen() runs the server as your standard server, this causes problems if you want to deploy on AWS Lambda, Google Cloud/Firebase Functions, or in our case Vercel. These platforms require you to run your backend servers as serverless functions.
There are multiple different ways to setup serverless Fastify depending on what service you are using to host; since Vercel makes the most sense if you also have a Next.js Headless XM Cloud project that’s what I’ll cover here! You can install the Vercel CLI by running npm i -g vercel@latest however, this is entirely optional and not needed to get your server up and running or to deploy to Vercel. If you already use the Vercel CLI on your other projects, then it makes sense for you to use it here.
Almost all of your Fastify Server will remain the same, you just need to replace the traditional fastify.listen() with a serverless export. To do this we can register our routes and initialize the server prior to exporting it as a serverless function, then create the export function for Vercel to handle.
/* Server.ts */

// Initialize Routes and prepare server
(async () => {
  await registerRoutes();
  await fastify.ready(); //This initializes the server
})();

// Export the serverless handler for Vercel
export default async (req: any, res: any) => {
  try {
    // Handle the request (fastify server is already initialized)
    const response = await fastify.inject({
      method: req.method,
      url: req.url,
      headers: req.headers,
      body: req.body,
      query: req.query,
    });

    // Set response headers and status
    res.statusCode = response.statusCode;
    Object.entries(response.headers).forEach(([key, value]) => {
      res.setHeader(key, value);
    });

    // Send response
    res.end(response.body);
  } catch (error) {
    console.error('Serverless handler error:', error);
    res.statusCode = 500;
    res.end(JSON.stringify({ error: 'Internal Server Error' }));
  }
};
The easiest way to get your local environment running entirely independent from Vercel is to create a new dev-server.ts file and update your package.json with a new npm script. To do this you first want to export your Fastify server from your server.ts file so we can access it in our new developer specific server. To do this you just need to add an export about the serverless handler you added for Vercel.
/* Server.ts */

(async () => {
  await registerRoutes();
  await fastify.ready(); //This initializes the server
})();

// Export the server instance for local development
export { fastify }; // NEW EXPORT CODE

// Export the serverless handler for Vercel
export default async (req: any, res: any) => {
  try {
//... rest of code
After exporting exporting the server, we can create our new dev-server.ts and create an async server inside it that listens to the Fastify instance exported from server.ts.
/* dev-server.ts */

import { server } from './server';

const start = async () => {
  try {
    await server.listen({
      //We are pulling the port from the ENV file to allow us to easily adjust the port
      //while the XM Cloud FE is also running
      port: parseInt(process.env.PORT || '3000'),
      host: '0.0.0.0',
    });
    console.log(`Server is running on port ${process.env.PORT || '3000'}`);
  } catch (err) {
    server.log.error(err);
    process.exit(1);
  }
};

start();
Then the final step is updating your package.json scripts with a new command that runs the dev server. Once this is updated, you can run the local development server, that is fully disconnected from Vercel with the command npm run dev .
/* package.json */

"scripts": {
    "build": "tsc",
    "start": "node dist/server.js",

    "dev": "ts-node src/dev-server.ts", //THIS IS THE NEW ITEM

    "vercel:dev": "vercel dev",
    "vercel:deploy": "vercel deploy"
  },
Vercel and Fastify are an ideal technical foundation for XM Cloud implementations that requires your Frontend to communicate with a plethora of pre-existing APIs. Fastify is a high performance, developer-friendly ecosystem that maximizes speed and scalability. If you are building your Front end with JSS Next.js, then Vercel creates a seamless integration that allows you to create secure API serverless functions to call your middle layer from, which not only utilizes its Edge Network to optimize performance for each user, but also increases security allowing you to lock down which IPs can connect to your data layer by utilizing Vercel’s Secure Compute. Together Vercel and Fastify create a strong and maintainable foundation that complements Sitecore’s Headless approach within XM Cloud.