Reading time: 11 min read
A Beginner's Guide to Decisioning in Sitecore Personalize
Everything you need to know to start creating decision models and decision model variants in Sitecore Personalize.
Start typing to search...
Everything you need to know to start creating decision models and decision model variants in Sitecore Personalize.
The impact personalized content and experiences have on user engagement and conversion rates can’t be overstated. What’s more?
Decision models form the foundation of the decisioning process in Sitecore Personalize, driving personalized content and experiences for users. Effective decisioning allows for a better understanding of user behaviour, more accurate segmentation, and delivering the right content at the right time. By mastering the intricacies of decision modelling, marketers can create highly targeted and engaging content, improving user satisfaction and business outcomes.
In this practical guide, we'll cover everything from decision model components to creating decision models and decision model variants, as well as best practices for managing the decision model lifecycle in Sitecore Personalize.
Decisioning combines data, rules, and predictive analytics to decide what to say to customers, what channel, and when. It's a technique that marketers have been using for a while, but there's so much untapped potential. With AI and machine learning advancements, decisioning can do so much more. It stretches beyond channel boundaries to deliver smarter interactions across every touchpoint.
There are some great benefits to decisioning, too:
Decisioning involves designing processes driven by customer behaviour or data. This can be visualized as a flowchart, which uses boxes and arrows to represent the connections and relationships between various stages. For instance, a business professional might analyze visitor session information to develop logical rules that direct customers to a suggested product. This entire flowchart representation is known as a decision model.
In Sitecore Personalize, decisioning is an interactive canvas where you can drag and drop rules-based business logic. You can add data sources, triggers, and programmable decisions that send offers to customers based on their actions.
Leveraging decisioning allows businesses to adopt an iterative method for refining decision models and optimizing decision-making processes. This empowers companies to swiftly adapt to emerging opportunities, regulatory changes, and competitive pressures by developing and evaluating new decision models to identify the most effective approaches for boosting conversions.
At its core, decisioning facilitates the delivery of personalized content and experiences at every touchpoint, harnessing data and insights to present the appropriate message to customers at the ideal time via the most suitable channel. By continuously monitoring customer feedback and promoting swift evaluation and enhancements, decisioning enables businesses to strike a balance between their objectives and customer expectations, ultimately resulting in improved customer experiences and driving business success.
Understanding how to create decision models in Sitecore Personalize is essential for marketers looking to optimize their customer engagement strategy.
To create a decision model in Sitecore Personalize, follow these steps:
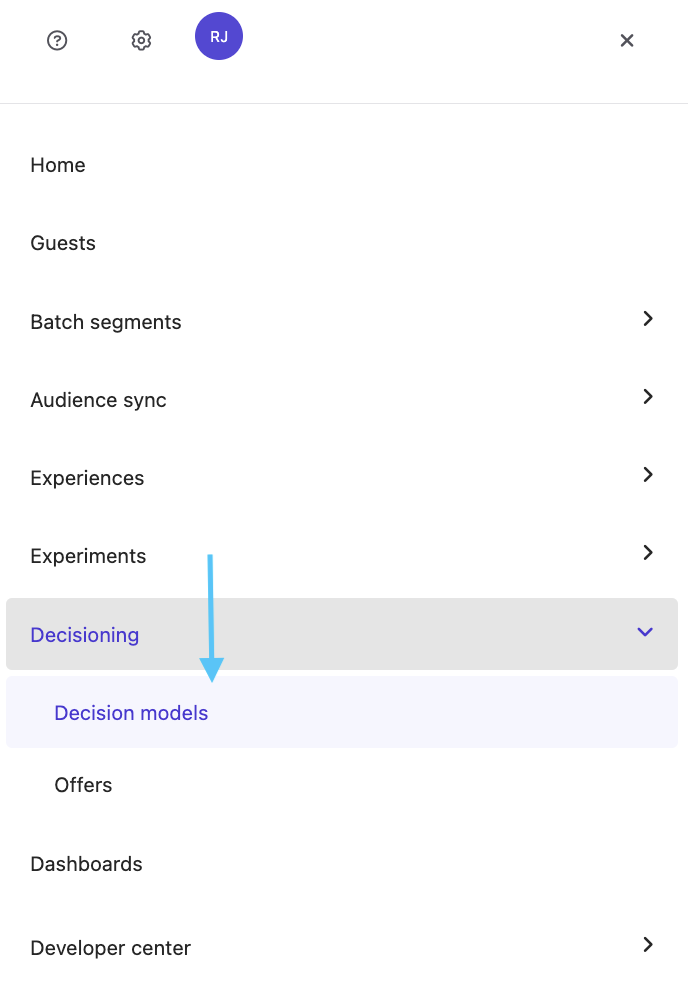
Navigate to Decision Models under Decisioning, located in the main navigation.
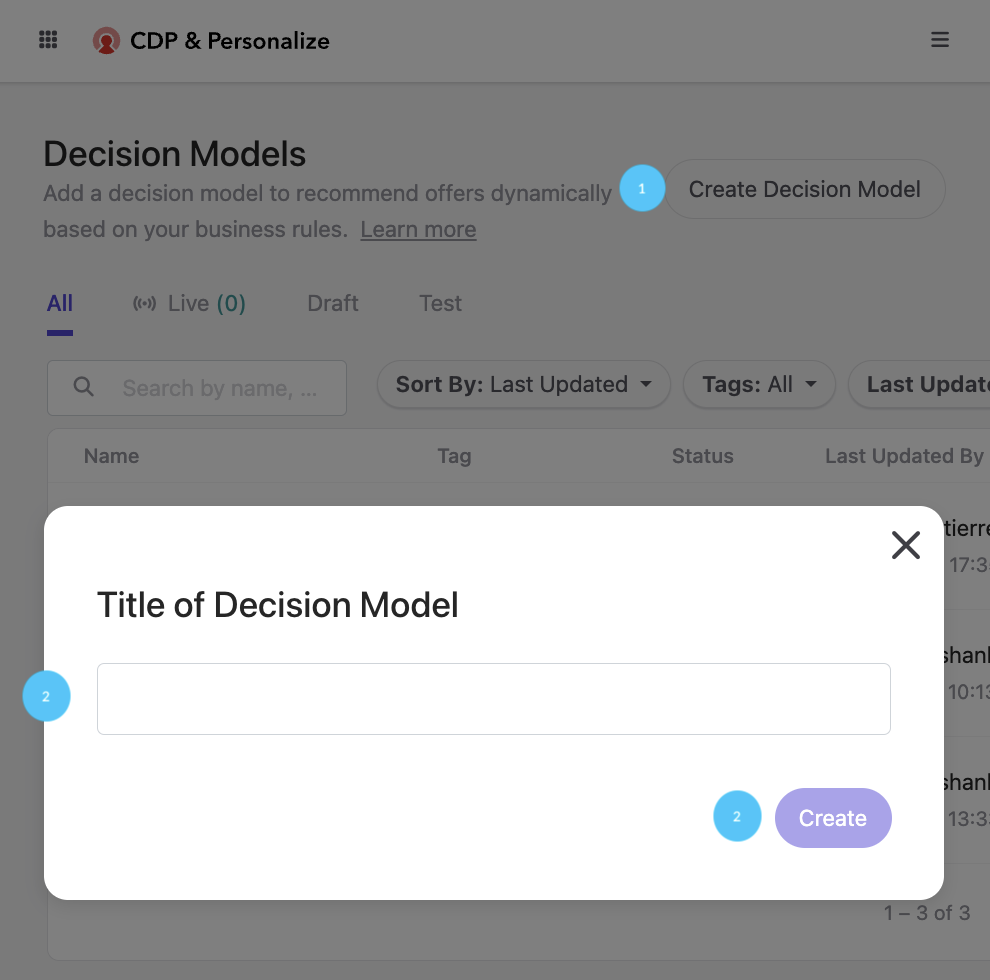
Click on Create Decision Model and enter a title in the pop-up box. Click Create.
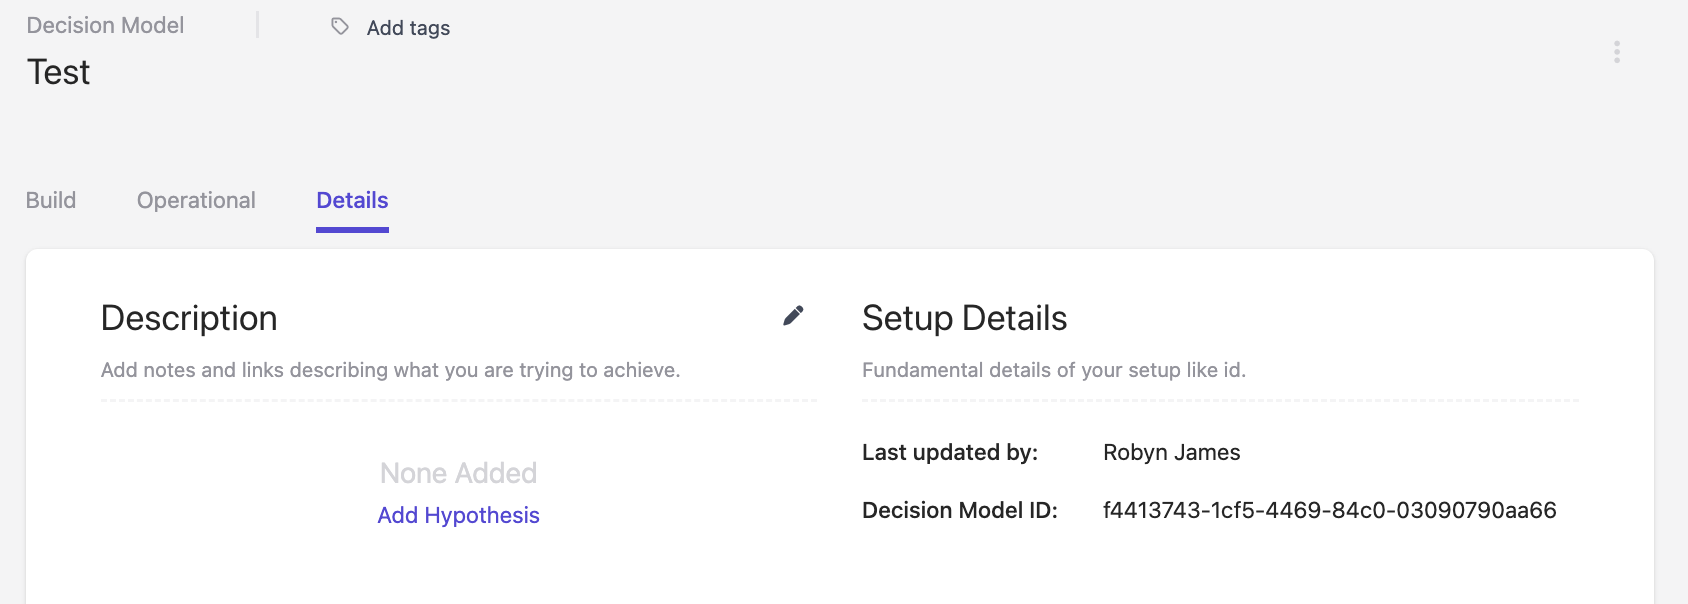
If you’d like, you can navigate to the Details tab of the decision model profile page and add a description and/or hypothesis (notes and links describing what you are trying to achieve). This optional step will help keep you organized.
Creating a decision model variant is a powerful tool that allows you to take an iterative approach to decision modelling and optimize decisioning in Sitecore Personalize. If you want to stay ahead of your competitors and quickly respond to new business opportunities or regulation changes, creating and testing a new decision model variant is a great way to do it.
If you've already created a decision model, you're ready to create a decision model variant in Sitecore Personalize. With this tool, you can make up to eight decision model variants (excluding archived variants) within one decision model.
To create a new decision model variant, you'll need to start by deciding whether to use an existing decision model variant as a base or start from a blank canvas. Then, follow these steps:
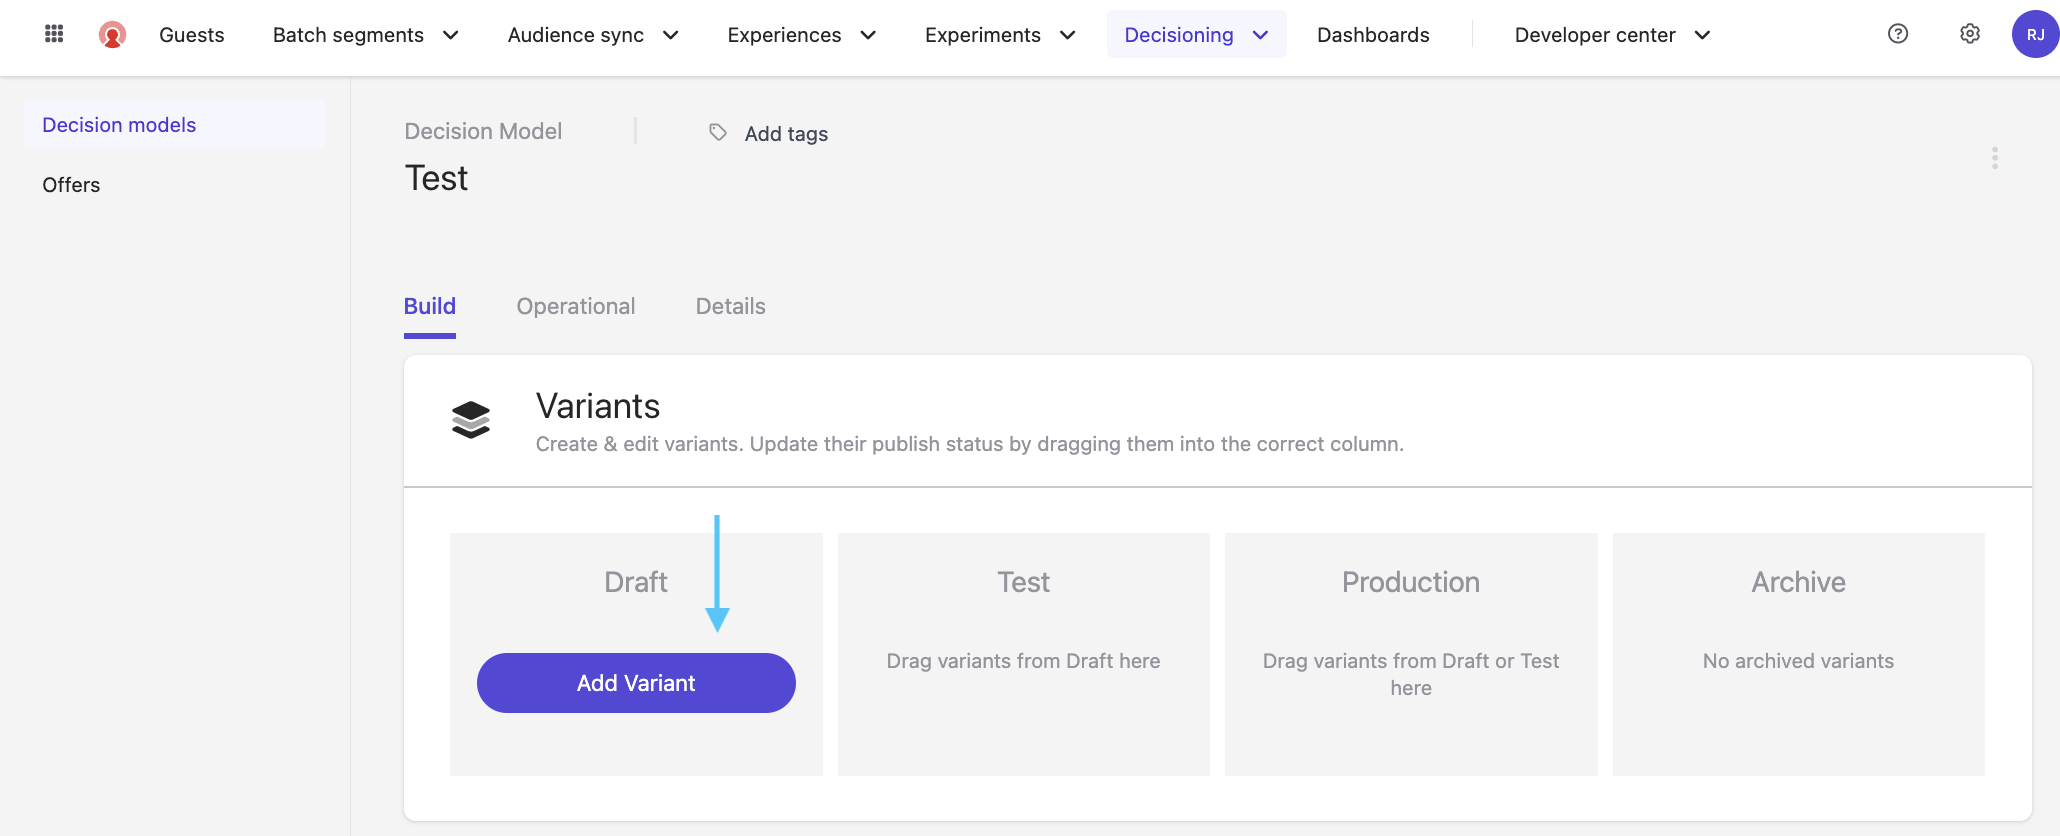
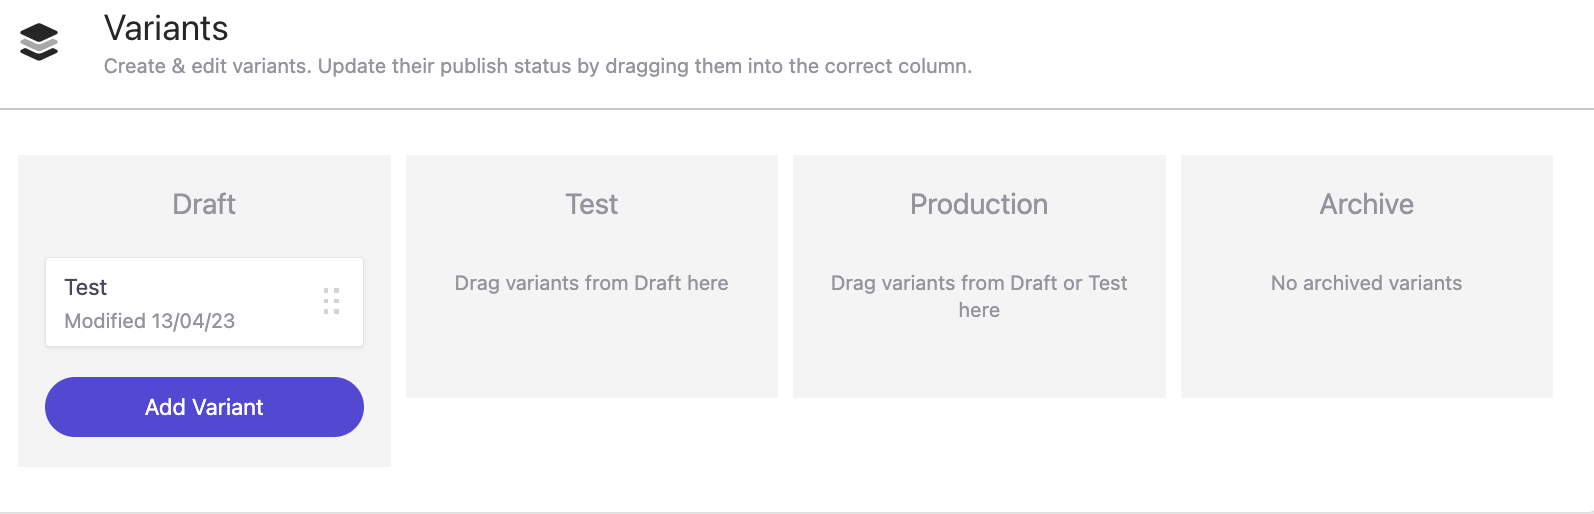
Navigate to the select decision model profile page, and in the Draft panel, click Add Variant.
Choose one of the following radio buttons: No Base to create a new model from scratch or an existing decision model variant as a base. If there are no variants currently in the draft panel, you will be prompted to write a title instead (vs. radio buttons). Click on Get Started.
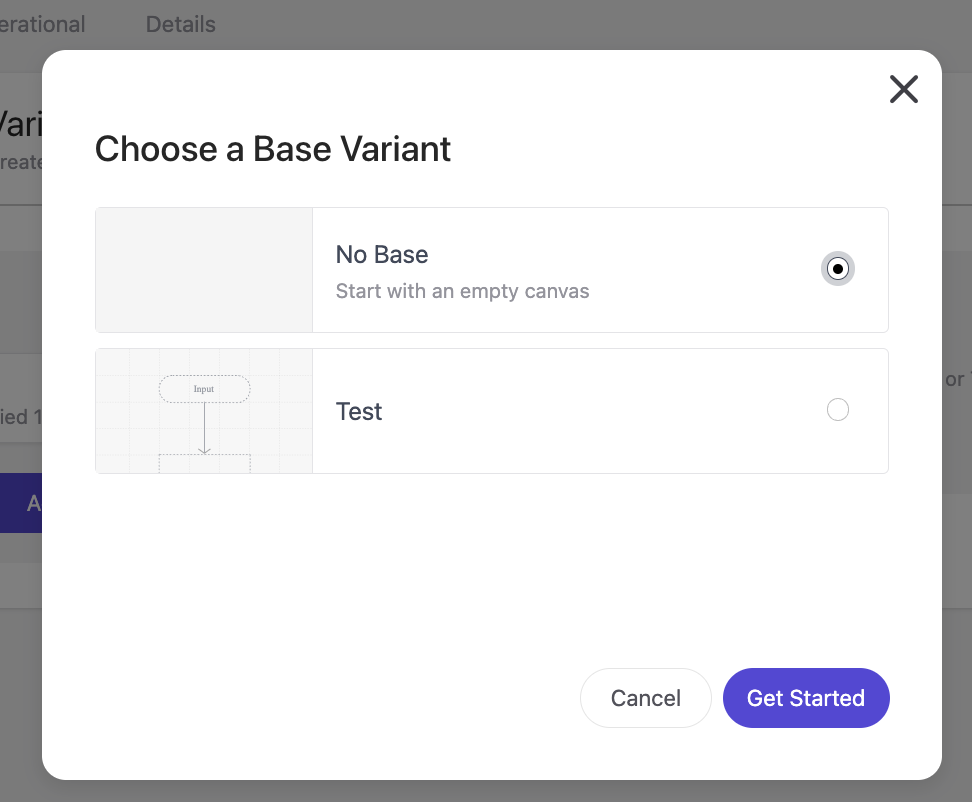
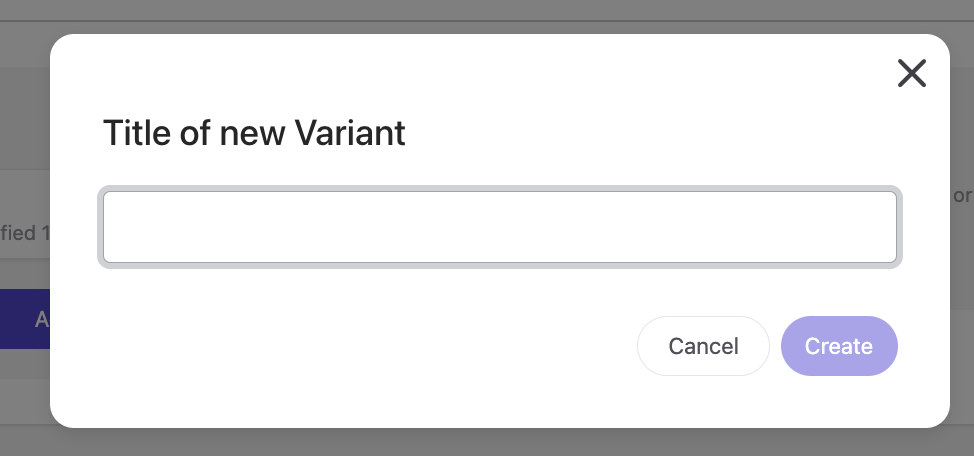
Enter a name for the decision model variant in the Title of new variant field. Click Create. The new decision model variant tile will display in the draft panel.
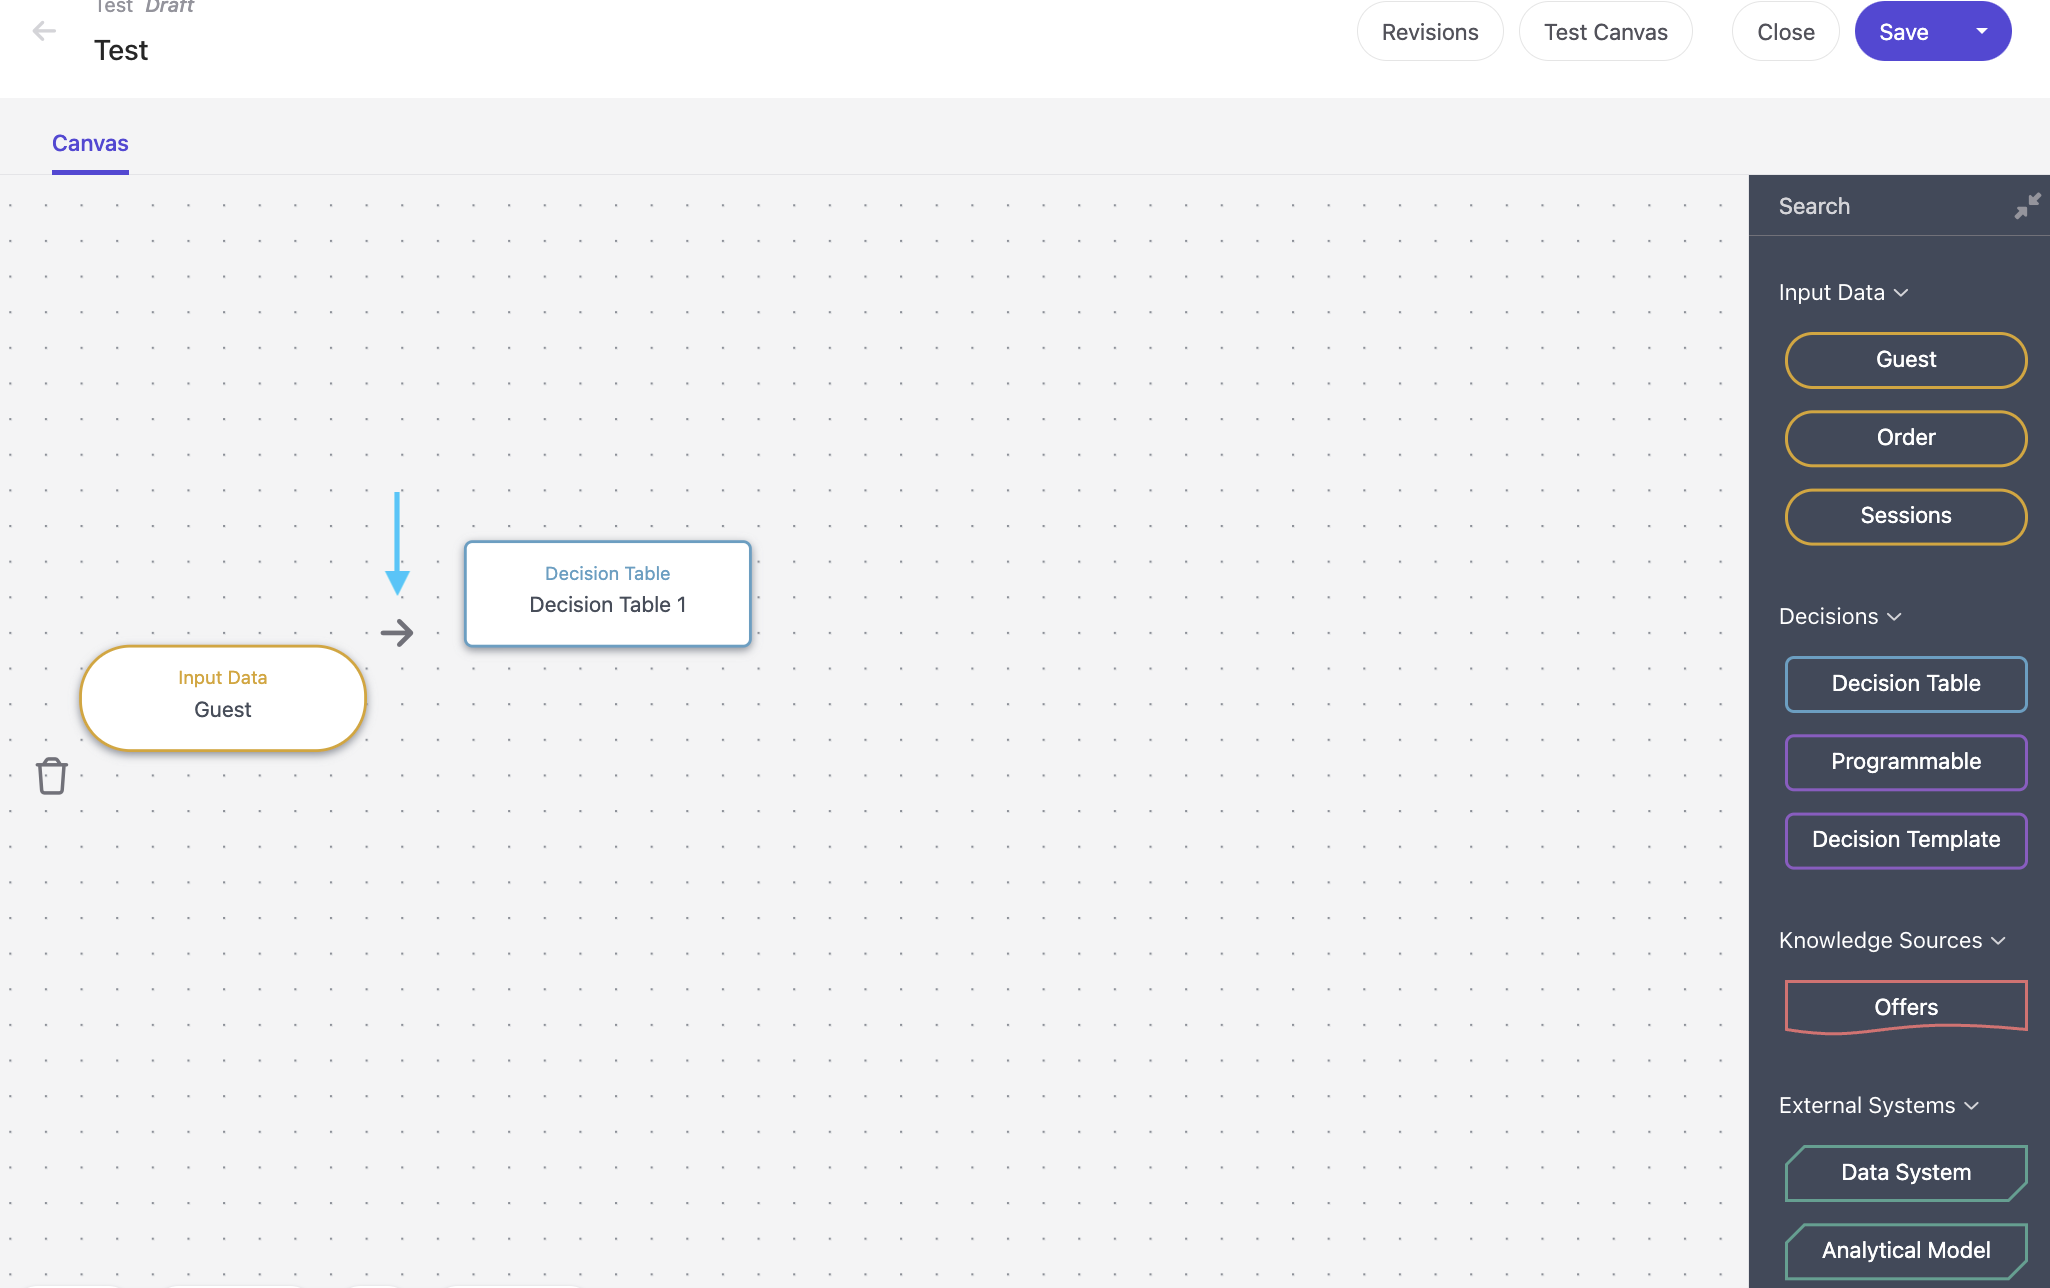
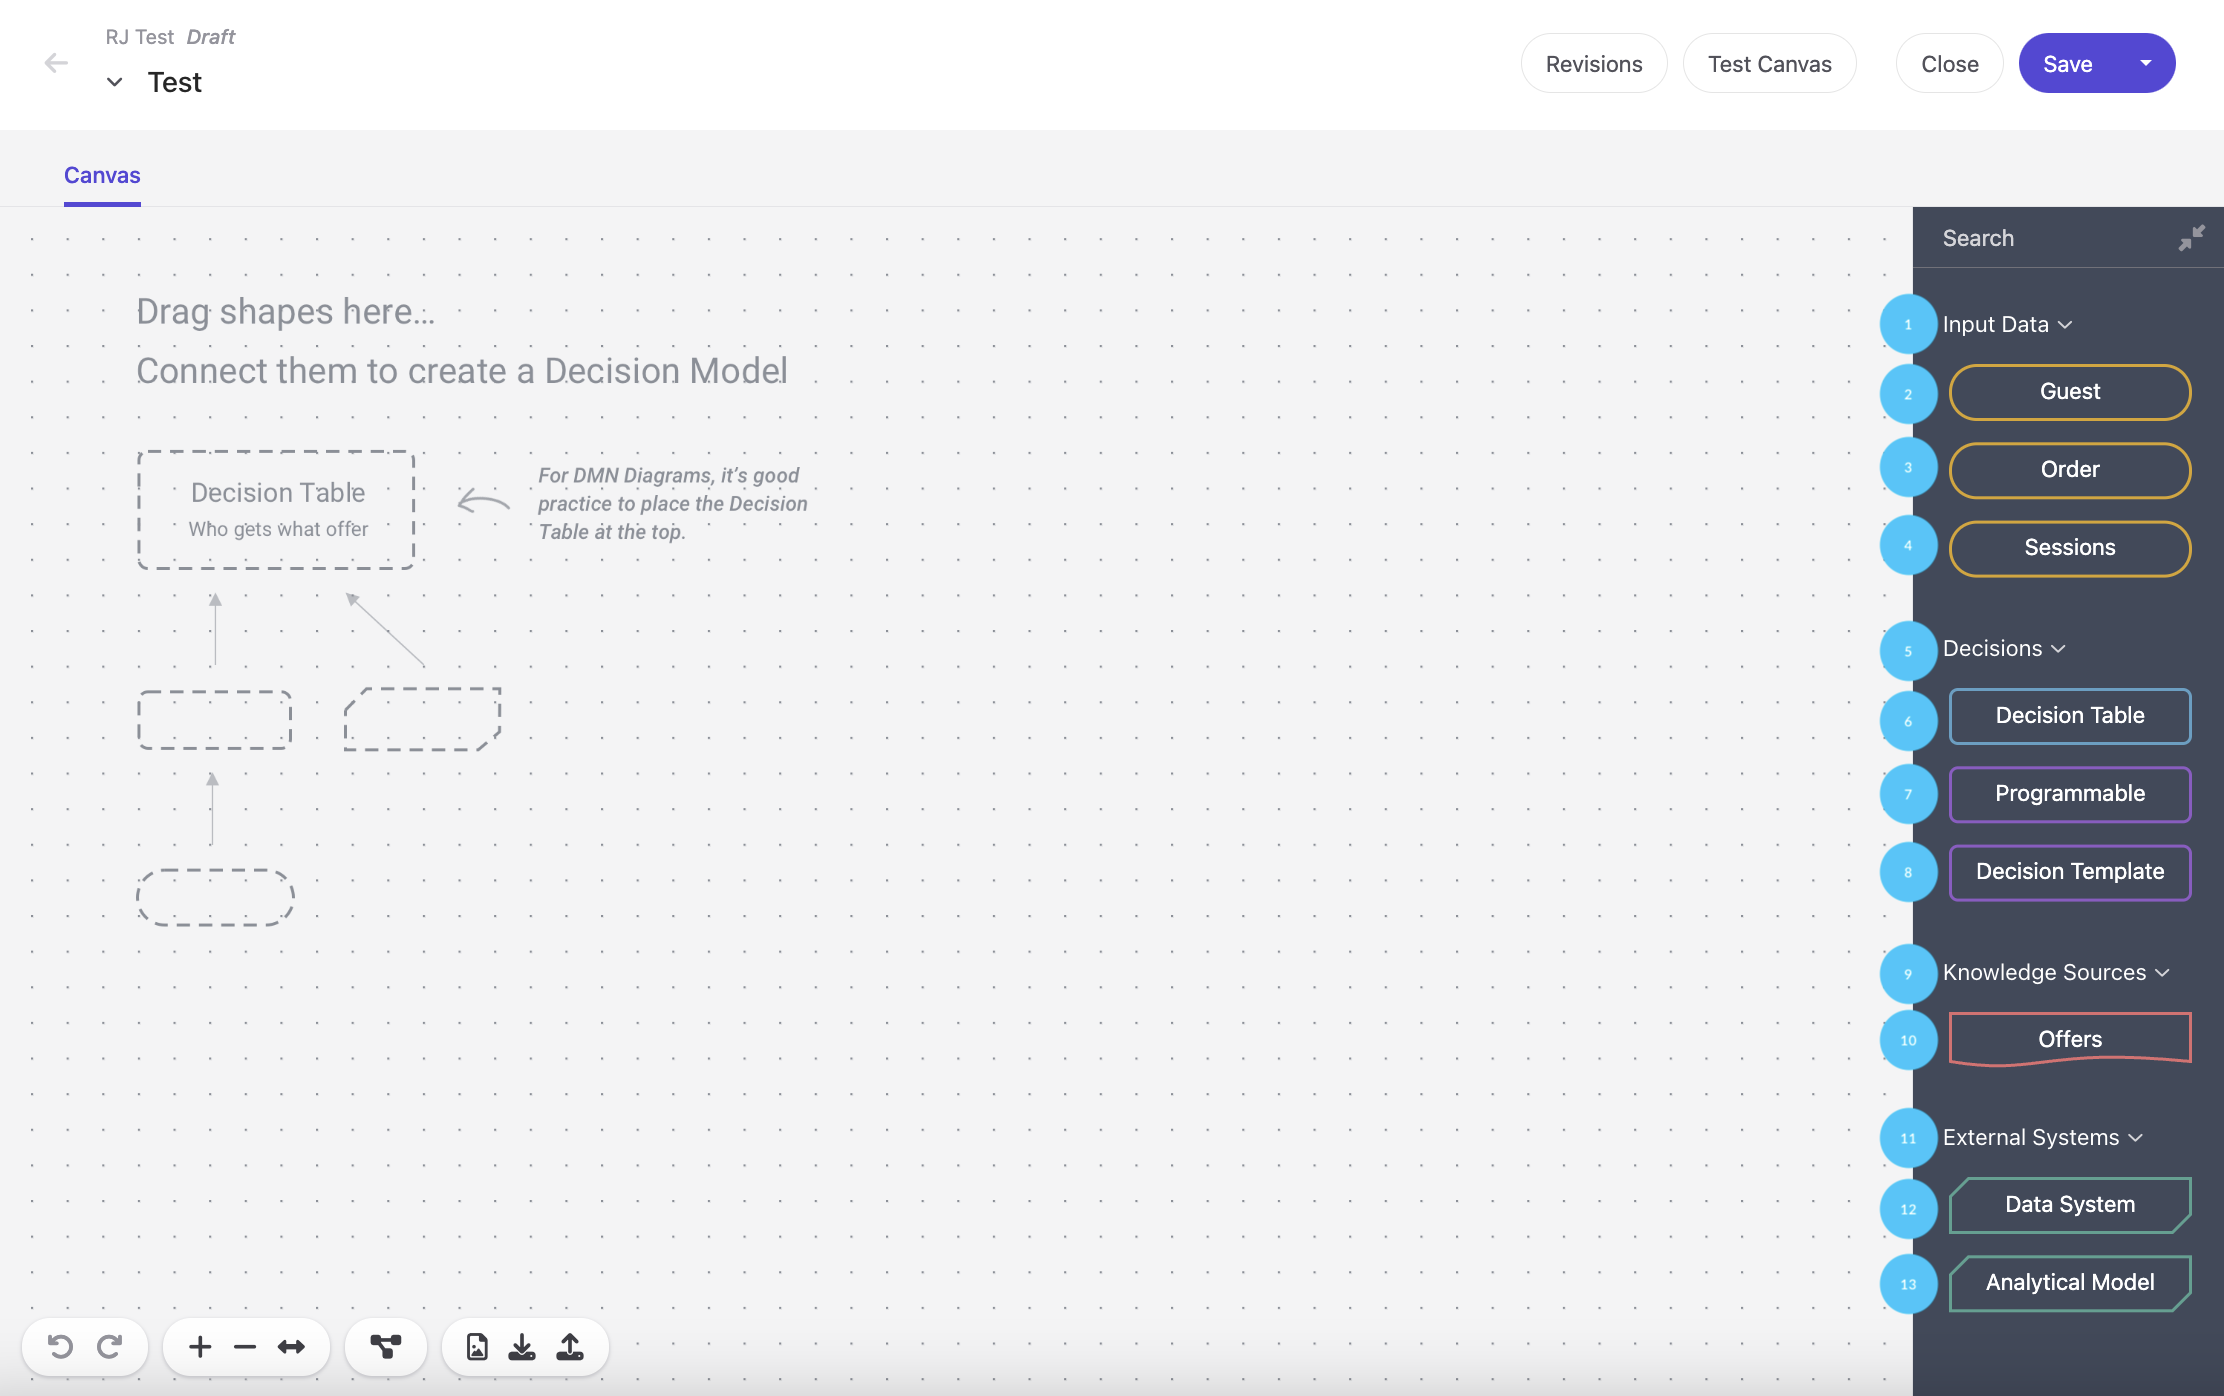
Click on your new decision model variant tile to open the decision canvas.

Drag and drop the required components, such as Input Data, Decisions, and Knowledge Sources, onto the canvas (see the section below for more information on decision model components).
Connect the components on the canvas by hovering over the component and then clicking and dragging the arrow to the component you want to connect it to.
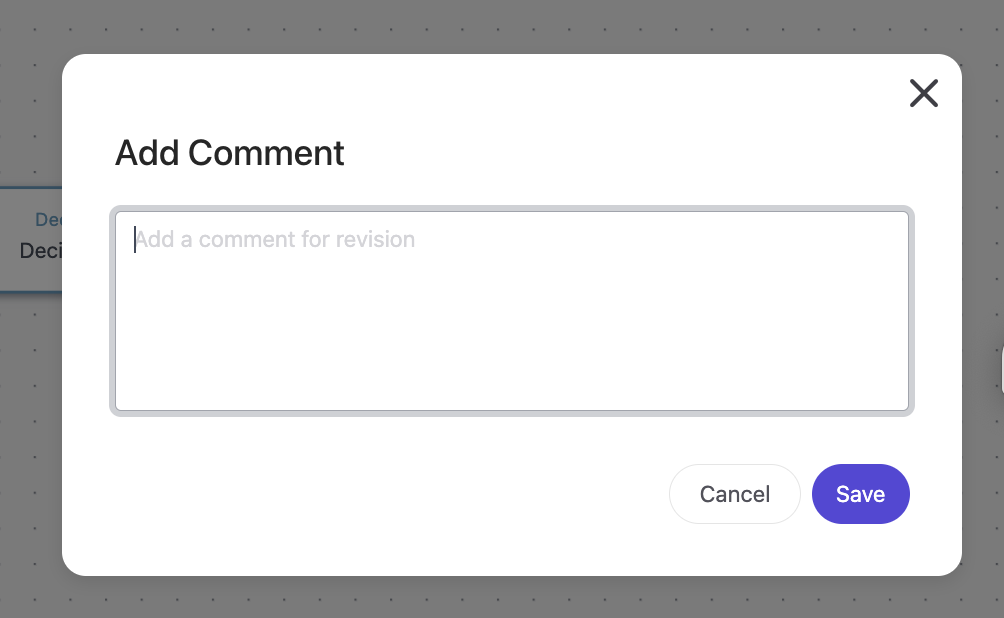
When you’re finished, hover over Save to bring up the Save and Comment window.
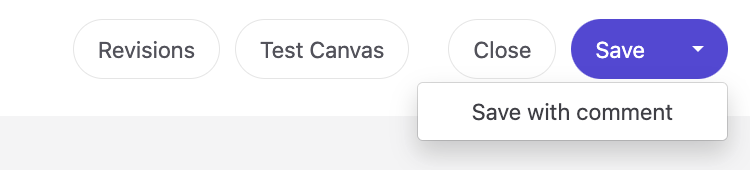
In the Add a comment text box, provide details of the changes made to the decision model variant and click Save to save the variant.
Decisioning model components are the building blocks you use to create decision model variants to power personalized content and experiences.
 Here's a quick rundown of each element and what it does:
When you create a decision model variant in Sitecore Personalize, it's important to know its assigned state. The state of a variant determines what you can do with it at any given time, like editing it or showing it to guests. Understanding these states is crucial to effectively managing your decision model variants in Sitecore Personalize.
There are four potential states that a variant can belong to:
Test: When you want to test a decision model variant without impacting your guests, you can move it to a Test state. This starts a silent test that runs on all decision model variants in a Test state as long as you add the decision model to the experiment.
The silent test does not affect guests, but it gathers results for every guest that visits the targeted page. There's no allocation of audience size for decision model variants in a Test state. This means that you can analyze the results of the silent test to determine which variant provides the best outcomes.
Production: Sitecore Personalize allows up to six decision model variants in a Production state simultaneously. Characteristics of the production state include:
Archive: Archiving is the way to go when you need to remove a decision model variant from an experiment. This action may be necessary when you have to edit a decision model variant already in the Production state or when you need to place a seventh decision model variant in the Production state.
After archiving a decision model variant, it enters an Archived state. Here are its properties:
Archiving a variant deletes any test data, and you can no longer edit it. To reinstate the variant, you must create a clone.
Managing the lifecycle of a decision model can be a complex process, involving everything from identifying the outcome and designing the structure to testing and placing decision model variants into production. To make things easier, follow these guidelines:
These steps ensure that your decision model variants are properly tested and placed into production, driving effective and personalized content delivery.
Decisioning is a powerful tool that can transform how you engage with your customers. Sitecore Personalize's interactive canvas makes it easy for anyone to create and implement decision models, regardless of their technical background. As a result, businesses can stay agile and responsive to customer needs, leading to stronger customer relationships and increased revenue.
Happy decisioning!
