Reading time: 23 min read
CMS Clash: Why Payload Might Just Be Better Than WordPress
Discover why the up-and-coming Payload, with over 22,000 GitHub stars, is challenging the established WordPress.
Start typing to search...
Discover why the up-and-coming Payload, with over 22,000 GitHub stars, is challenging the established WordPress.
Welcome to our deep dive into Payload, a cutting-edge open source Content Management System designed for developers who crave flexibility, performance, and an exceptional development experience. If you’ve been working with traditional CMS platforms like WordPress, you might find Payload’s headless architecture and modern tooling a breath of fresh air. In this blog post, we'll explore what makes Payload stand out, especially its v3 Beta features, and compare it to WordPress to help you decide which CMS is right for your next project.
Payload is a headless CMS, meaning it decouples content management from content delivery. Instead of serving both the backend and frontend like traditional CMSs, Payload focuses on managing and delivering content via APIs, leaving the frontend to be built with any technology you choose. This approach provides unparalleled flexibility, allowing developers to create highly performant and scalable applications.
One of the standout features of Payload is its seamless integration with modern frontend frameworks like Next.js. This headless setup provides several benefits:
With Payload managing your content and Next.js handling the frontend, you get a modular and scalable architecture that excels in performance and developer experience.
Late in 2023, Payload set out to achieve an ambitious goal: building Payload on Next.js. This dream turned to a
reality not that the v3 beta is available. The big takeaway? You can now install the entirety of Payload into any
Next.js app. That’s right, an entire CMS thats powerful, intuitive, and ready to customize with a simple
one-line command: npx create-payload-app@beta .
This setup results in a seamless combination where Payload CMS's admin panel and APIs are directly within your Next.js application, reducing technical complexity and improving engineering quality.
Other highlights of the v3 beta include:
Payload and WordPress are two popular Content Management Systems (CMS), each with its own strengths and weaknesses. This comparison will delve into their architecture, language, admin panel, content delivery methods, hosting options, plugins and extensions, performance, security, developer experience, and use cases. Understanding these aspects will help you decide which CMS is the best fit for your project.
| Feature | Payload | WordPress |
|---|---|---|
| Architecture | Headless CMS, API-first | Monolithic CMS |
| Language | TypeScript | PHP |
| Admin Panel | React-based, customizable | PHP-based, customizable through themes |
| Content Delivery | API-driven (REST and GraphQL) | Primarily server-rendered, API optional |
| Hosting | Self-hosted or Payload Cloud | Self-hosted or WordPress.com |
| Plugins and Extension | Rich plugin system, developer-focused | Extensive plugin ecosystem |
| Performance | High performance, optimized for headless | Often slow without extensive optimization |
| Developer Experience | Type-safe, modern tooling | PHP-based, extensive documentation |
| Use Cases | Ideal for website, custom applications, APIs, Digital Asset Managers, etc. | Broad website use, from simple blogs to complex sites |
Payload:
WordPress:
Payload:
WordPress:
Payload:
WordPress:
Payload:
WordPress:
Payload:
WordPress:
Payload:
WordPress:
Payload:
WordPress:
Payload:
WordPress:
WordPress has long been a staple in the CMS world, but for developers aiming for modernity and efficiency, Payload is the clear winner. With its flexible headless architecture, robust TypeScript foundation, and sleek React-based admin panel, Payload is perfectly equipped to handle the complexities of contemporary web applications.
Make the leap to a more powerful and versatile platform. Discover why Payload is gaining traction among developers and see how it can revolutionize your approach to content management and application development. For those seeking to build award winning websites, next-generation applications, APIs, and digital asset managers, Payload offers the tools and flexibility required to succeed. Don’t settle for outdated solutions—explore Payload today and experience the future of content management.
Now that we've compared Payload and WordPress, let's dive deeper into the components that make Payload a powerful and flexible platform. We'll explore creating a new project and the code base structure, the Payload configuration file, and provide examples of creating our own custom collections and blocks.
To get started with Payload, you need to initialize a new project but let’s talk about a few things first…
Payload by default uses PNPM as a package manager, don’t be alarmed if you’re a NPM fanatic as these steps should work the exact same. Also, I’m on a Mac but these steps should still be compatible with any Windows or Linux system.
We’re going to be creating a new project with Payload, Next.js, Tailwind CSS, and Postgres for our database, ensure that you have a database available to connect to the CMS - I use a local dev database via docker-compose. We’re also going to be using Node Version v18.20.4.
npx create-payload-app@beta (Side note, we’re going to use the website template to
quickly get started.
postgres-data directory within your project.
You will also need to add POSTGRES_USER, POSTGRES_PASSWORD, and
POSTGRES_DB to your environment variables within .env and then run
docker-compose up -d to start up the databaseservices:
db:
image: postgres
restart: always
environment:
# Set the PostgreSQL user
POSTGRES_USER: ${POSTGRES_USER}
# Set the PostgreSQL password
POSTGRES_PASSWORD: ${POSTGRES_PASSWORD}
# Set the PostgreSQL database name
POSTGRES_DB: ${POSTGRES_DB}
volumes:
- ./postgres-data:/var/lib/postgresql/data
ports:
- '5432:5432'
volumes:
postgres-data:
driver: local
DATABSE_URI connection string within .env , and start your dev server. You
can navigate to localhost:3000 to see the frontend of the site,
and localhost:3000/admin to access the Payload admin
panel, the first time that you log in you will be prompted to create your first CMS user
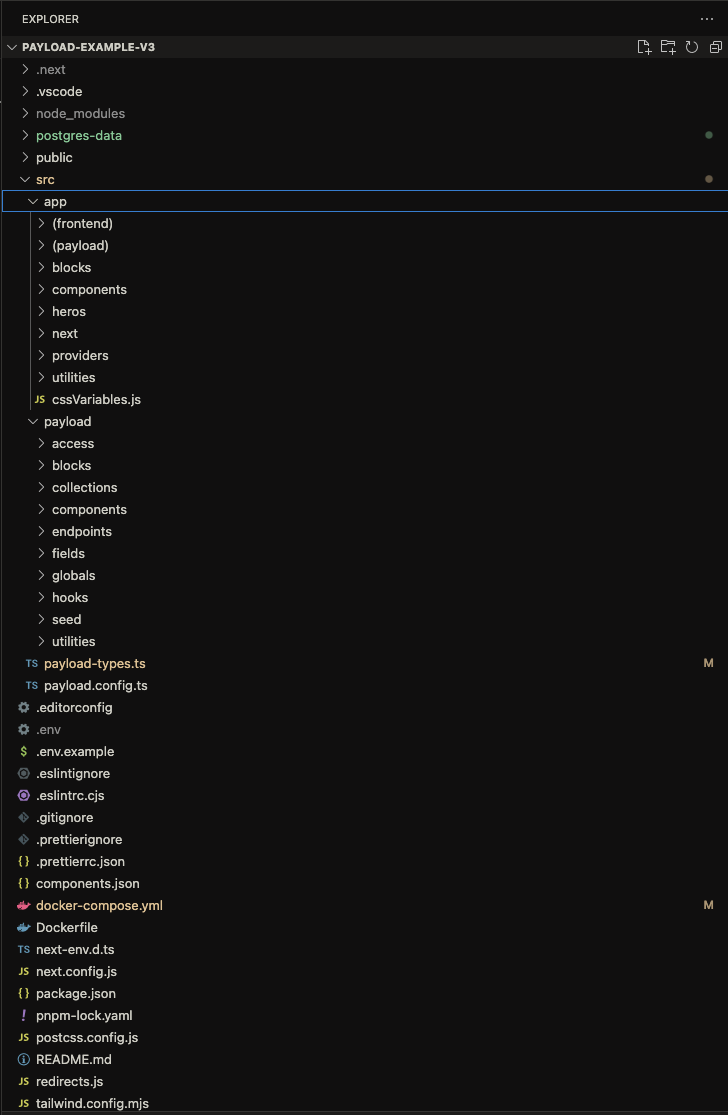
Now that we’re up and running, let’s take a look at some of the files that make up our codebase. The website template comes set with a bunch of awesome utilities and components for both the Payload admin panel, and our Next.js frontend. The important sections are:
src/app/(frontend) - This is our Next.js application that defines our frontendsrc/app/(payload) - This is the Payload admin interface, we won’t touch this much unless we
want to customize/override any OOTB features/ui/etc.src/payload - This is our CMS instance…where all the magic happens! Here we will be
defining our sites components such as: Globals, Collections, and Blocks.
The payload.config.ts file is the cornerstone of your Payload CMS setup, defining the overall settings,
including collections, globals, blocks, and more. This file is highly modular, allowing you to import and organize
different aspects of your CMS efficiently. Below is an in-depth example and explanation of a comprehensive Payload
CMS configuration:
Key Components and Features:
admin section configures components like
BeforeLogin and BeforeDashboard to customize the admin interface. It also sets up user
management and live preview breakpoints.lexicalEditor, you can define rich text editor
features such as bold, italic, underline, and link functionalities, with custom fields for internal and external
links.db section configures the database adapter, in this case,
postgresAdapter, to connect to a PostgreSQL database using environment variables for the connection
string.collections array includes different content types like
Pages, Posts, Media, Categories, and Users.
Each collection is imported and configured separately.seed endpoint allow for additional API
functionality, such as populating the database with example data.globals array includes global settings like Header and
Footer, which are accessible site-wide.Plugins: Payload plugins extend functionality, including:
Payload Cloud Plugin: Integrates with Payload Cloud for managed hosting.
Secret Management: The secret key ensures that sensitive information is
securely managed using environment variables.
sharp library is included for efficient image processing.
typescript section specifies the output file for
generated TypeScript types, ensuring type safety throughout the project.This in-depth configuration example demonstrates the flexibility and power of Payload CMS, allowing you to customize and extend your CMS to meet specific project needs.
//payload.config.ts

// storage-adapter-import-placeholder
import { postgresAdapter } from "@payloadcms/db-postgres";

// Importing Payload plugins
import { payloadCloudPlugin } from "@payloadcms/plugin-cloud";
import { formBuilderPlugin } from "@payloadcms/plugin-form-builder";
import { nestedDocsPlugin } from "@payloadcms/plugin-nested-docs";
import { redirectsPlugin } from "@payloadcms/plugin-redirects";
import { seoPlugin } from "@payloadcms/plugin-seo";
import {
  BoldFeature,
  FixedToolbarFeature,
  HeadingFeature,
  ItalicFeature,
  LinkFeature,
  lexicalEditor,
} from "@payloadcms/richtext-lexical";
import sharp from "sharp"; // editor-import
import { UnderlineFeature } from "@payloadcms/richtext-lexical";
import path from "path";
import { buildConfig } from "payload";
import { fileURLToPath } from "url";

// Importing collections, globals, and components
import Categories from "./payload/collections/Categories";
import { Media } from "./payload/collections/Media";
import { Pages } from "./payload/collections/Pages";
import { Posts } from "./payload/collections/Posts";
import Users from "./payload/collections/Users";
import BeforeDashboard from "./payload/components/BeforeDashboard";
import BeforeLogin from "./payload/components/BeforeLogin";
import { seed } from "./payload/endpoints/seed";
import { Footer } from "./payload/globals/Footer/Footer";
import { Header } from "./payload/globals/Header/Header";
import { revalidateRedirects } from "./payload/hooks/revalidateRedirects";
import { GenerateTitle, GenerateURL } from "@payloadcms/plugin-seo/types";
import { Page, Post } from "src/payload-types";

// Setting up file paths
const filename = fileURLToPath(import.meta.url);
const dirname = path.dirname(filename);

// SEO plugin functions
const generateTitle: GenerateTitle<Post | Page> = ({ doc }) => {
  return doc?.title
    ? `${doc.title} | Payload Website Template`
    : "Payload Website Template";
};

const generateURL: GenerateURL<Post | Page> = ({ doc }) => {
  return doc?.slug
    ? `${process.env.NEXT_PUBLIC_SERVER_URL}/${doc.slug}`
    : process.env.NEXT_PUBLIC_SERVER_URL;
};

export default buildConfig({
  admin: {
    components: {
      // The `BeforeLogin` component renders a message that you see while logging into your admin panel.
      // Feel free to delete this at any time. Simply remove the line below and the import `BeforeLogin` statement on line 15.
      beforeLogin: [BeforeLogin],
      // The `BeforeDashboard` component renders the 'welcome' block that you see after logging into your admin panel.
      // Feel free to delete this at any time. Simply remove the line below and the import `BeforeDashboard` statement on line 15.
      beforeDashboard: [BeforeDashboard],
    },
    user: Users.slug,
    livePreview: {
      breakpoints: [
        {
          label: "Mobile",
          name: "mobile",
          width: 375,
          height: 667,
        },
        {
          label: "Tablet",
          name: "tablet",
          width: 768,
          height: 1024,
        },
        {
          label: "Desktop",
          name: "desktop",
          width: 1440,
          height: 900,
        },
      ],
    },
  },
  // This config helps us configure global or default features that the other editors can inherit
  editor: lexicalEditor({
    features: () => {
      return [
        UnderlineFeature(),
        BoldFeature(),
        ItalicFeature(),
        LinkFeature({
          enabledCollections: ["pages", "posts"],
          fields: ({ defaultFields }) => {
            const defaultFieldsWithoutUrl = defaultFields.filter((field) => {
              if ("name" in field && field.name === "url") return false;
              return true;
            });

            return [
              ...defaultFieldsWithoutUrl,
              {
                name: "url",
                type: "text",
                admin: {
                  condition: ({ linkType }) => linkType !== "internal",
                },
                label: ({ t }) => t("fields:enterURL"),
                required: true,
              },
            ];
          },
        }),
      ];
    },
  }),
  db: postgresAdapter({
    pool: {
      connectionString: process.env.DATABASE_URI || "",
    },
  }),
  collections: [Pages, Posts, Media, Categories, Users],
  cors: [process.env.PAYLOAD_PUBLIC_SERVER_URL || ""].filter(Boolean),
  csrf: [process.env.PAYLOAD_PUBLIC_SERVER_URL || ""].filter(Boolean),
  endpoints: [
    // The seed endpoint is used to populate the database with some example data
    // You should delete this endpoint before deploying your site to production
    {
      handler: seed,
      method: "get",
      path: "/seed",
    },
  ],
  globals: [Header, Footer],
  plugins: [
    redirectsPlugin({
      collections: ["pages", "posts"],
      overrides: {
        // @ts-expect-error
        fields: ({ defaultFields }) => {
          return defaultFields.map((field) => {
            if ("name" in field && field.name === "from") {
              return {
                ...field,
                admin: {
                  description:
                    "You will need to rebuild the website when changing this field.",
                },
              };
            }
            return field;
          });
        },
        hooks: {
          afterChange: [revalidateRedirects],
        },
      },
    }),
    nestedDocsPlugin({
      collections: ["categories"],
    }),
    seoPlugin({
      generateTitle,
      generateURL,
    }),
    formBuilderPlugin({
      fields: {
        payment: false,
      },
      formOverrides: {
        fields: ({ defaultFields }) => {
          return defaultFields.map((field) => {
            if ("name" in field && field.name === "confirmationMessage") {
              return {
                ...field,
                editor: lexicalEditor({
                  features: ({ rootFeatures }) => {
                    return [
                      ...rootFeatures,
                      FixedToolbarFeature(),
                      HeadingFeature({
                        enabledHeadingSizes: ["h1", "h2", "h3", "h4"],
                      }),
                    ];
                  },
                }),
              };
            }
            return field;
          });
        },
      },
    }),
    payloadCloudPlugin(), // storage-adapter-placeholder
  ],
  secret: process.env.PAYLOAD_SECRET,
  sharp,
  typescript: {
    outputFile: path.resolve(dirname, "payload-types.ts"),
  },
});
In Payload, collections, blocks, and globals are fundamental components that enable you to structure, manage, and display your content efficiently. Let's look at each of these components to understand what they are, and how they work together to help define your website.
Collections in Payload define the types of content you want to manage. Each collection represents a content model with customizable fields and relationships, providing a powerful way to structure your data.
This Media collection is used to manage and store various media files like images, videos, and documents:
import { CollectionConfig } from 'payload/types';

const Media: CollectionConfig = {
  slug: 'media', // Unique identifier for the collection
  labels: {
    singular: 'Media', // Singular label for the admin panel
    plural: 'Media', // Plural label for the admin panel
  },
  upload: {
    staticURL: '/media', // URL path where media files are served
    staticDir: 'media', // Directory where media files are stored
    imageSizes: [
      {
        name: 'thumbnail', // Name of the image size
        width: 300, // Width in pixels
        height: 300, // Height in pixels
      },
      {
        name: 'medium',
        width: 800,
        height: 600,
      },
    ],
    adminThumbnail: 'thumbnail', // Thumbnail size used in the admin panel
  },
  fields: [
    {
      name: 'altText', // Field name
      type: 'text', // Field type
      label: 'Alt Text', // Label in the admin panel
      required: true, // Field is required
    },
    {
      name: 'caption',
      type: 'textarea',
      label: 'Caption',
    },
  ],
};

export default Media;
Blocks in Payload are modular, reusable content components that can be embedded within other fields. They enable you to create flexible and repeatable content structures.
The Accordion block is a reusable content structure that allows you to create collapsible sections within your content. Here’s a super simple example of an accordion:
import { Block } from 'payload/types';

const Accordion: Block = {
  slug: 'accordion', // Unique identifier for the block
  labels: {
    singular: 'Accordion', // Singular label for the admin panel
    plural: 'Accordions', // Plural label for the admin panel
  },
  fields: [
    {
      name: 'title', // Field name
      type: 'text', // Field type
      label: 'Title', // Label in the admin panel
      required: true, // Field is required
    },
    {
      name: 'items', // Field name
      type: 'array', // Field type for a list of items
      label: 'Items', // Label in the admin panel
      fields: [
        {
          name: 'label', // Field name
          type: 'text', // Field type
          label: 'Label', // Label in the admin panel
          required: true, // Field is required
        },
        {
          name: 'content',
          type: 'richText',
          label: 'Content',
          required: true,
        },
      ],
    },
  ],
};

export default Accordion;
Globals in Payload are used to define site-wide settings or content that needs to be accessed globally across the site. This modularity ensures that global settings can be easily managed and updated.
Site settings are a common use case for globals, providing a central place to manage settings like site metadata, contact information, or global content sections like headers and footers.
import { GlobalConfig } from 'payload/types';

const SiteSettings: GlobalConfig = {
  slug: 'site-settings', // Unique identifier for the global configuration
  label: 'Site Settings', // Human-readable name for the global configuration
  fields: [
    {
      name: 'siteName', // Field name
      type: 'text', // Field type
      label: 'Site Name', // Label in the admin panel
      required: true, // Field is required
    },
    {
      name: 'description',
      type: 'textarea',
      label: 'Description',
    },
    {
      name: 'logo',
      type: 'upload',
      relationTo: 'media', // Reference to the Media collection for file uploads
      label: 'Site Logo',
    },
  ],
};

export default SiteSettings;
Payload components are defined in the src/payload/* directory, and they map to the frontend components
in src/app/blocks and src/app/components. Here’s how they work together:
src/payload/collections. Each collection can be accessed via the Payload
API for CRUD operations. For example, a Posts collection might be used to store blog posts.src/payload/blocks and used in the frontend components. For instance,
an Accordion block might be used within a page layout to create collapsible content sections.src/payload/globals. For example, global settings like Header and Footer
can be used across multiple pages for consistent styling and content.To connect Payload CMS data with your frontend, you can use the payload.find method to fetch data and
render it within your React components.
For example our website template uses this method to fetch posts within
src/app/(frontend)/posts/page/[pageNumber]/page.tsx
import type { Metadata } from 'next/types'

import { CollectionArchive } from '@/components/CollectionArchive'
import { PageRange } from '@/components/PageRange'
import { Pagination } from '@/components/Pagination'
import configPromise from '@payload-config'
import { getPayloadHMR } from '@payloadcms/next/utilities'
import React from 'react'

export const dynamic = 'force-static'
export const revalidate = 600

export default async function Page({ params: { pageNumber = 2 } }) {
  const payload = await getPayloadHMR({ config: configPromise })

  const posts = await payload.find({
    collection: 'posts',
    depth: 1,
    limit: 12,
    page: pageNumber,
  })

  return (
    <div className="pt-24 pb-24">
      <div className="container mb-16">
        <div className="prose dark:prose-invert max-w-none">
          <h1>Posts</h1>
        </div>
      </div>

      <div className="container mb-8">
        <PageRange
          collection="posts"
          currentPage={posts.page}
          limit={12}
          totalDocs={posts.totalDocs}
        />
      </div>

      <CollectionArchive posts={posts.docs} />

      <div className="container">
        {posts.totalPages > 1 && <Pagination page={posts.page} totalPages={posts.totalPages} />}
      </div>
    </div>
  )
}

export function generateMetadata({ params: { pageNumber = 2 } }): Metadata {
  return {
    title: `Payload Website Template Posts Page ${pageNumber}`,
  }
}

export async function generateStaticParams() {
  const payload = await getPayloadHMR({ config: configPromise })
  const posts = await payload.find({
    collection: 'posts',
    depth: 0,
    limit: 10,
  })

  const pages = []

  for (let i = 1; i <= posts.totalPages; i++) {
    pages.push(i)
  }

  return pages
}
Stay tuned for more blogs where we'll dive deeper into leveraging Payload as a CMS, including deploying to Vercel, using Coolify for self-hosting and deployments, and in-depth tutorials on leveraging Payload with Next.js to create powerful, dynamic modern websites and applications. In the meantime, I highly recommend checking out some of the online resources available, including the Payload repo (trendingwith 22k + stars), and spinning up an instance of your own locally to tinker and explore!
Some other great resources include:
