Reading time: 9 min read
Push Data Into Coveo In Batches
For Faster & More Efficient Indexing
Start typing to search...
With the Coveo PUSH API, there are two ways to get an item into an index. Of course, each of those two ways has slight variations depending on the content you want to get into Coveo, but as a whole, there are two ways. And these ways can be accomplished programmatically or using tools such as Postman.
If you remember from our article, Setting Up Query Ranking Expressions And Functions For Search, we pushed a set of data one at a time. There's nothing wrong with that when you have a couple of items you want to add. But once you get into the hundreds or thousands, you'll quickly discover you've either a) hit your limit with Coveo or b) realize if you don't have it automated some way, it's terribly inefficient.
The real purpose for this is really only when you need to update a single indexed item's information. Perhaps the metadata on a date field is wrong, or there is a spelling mistake—those kinds of updates. Or if you need to do a spot delete on a particular item. Outside of that, you should be using the Bulk Push method.
Just as the title says, pushing items in bulk, means we're are pushing more than one item at a time. While pushing a single item into Coveo is as simple as a single API call, the same cannot be said for pushing items as a batch. It's actually done in three calls. The first to get the URL to where the file container is located. The second to push data into the file. And the third, to push the file into Coveo. It seems complicated, but it's really not, and we'll go into the process shortly.
Regardless of the method you choose, getting items into Coveo comes with rules you need to play by. There aren't many limits and you really have to be moving a fair amount of information into Coveo to hit them. They're ultimately broken into two categories: Size and Items Per Hour.
Request Size Limits - Even when it comes to requesting size limits, it depends on what you're trying to do. And if you breach these limits, you'll know as you'll get a 413 Request Entity Too Large error message.
Number of Items Per Hour - Coveo is amazingly powerful, but even it can't handle an unlimited amount of information. When it comes to Pushing items, the limitations will fall under two categories.
It's also important to understand that pushing the item doesn't mean it's instantly available. The item itself needs to be "consumed" and "indexed". This varies depending on if you are on a production organization that can handle 300,000 items per hour or a trial that can handle 10,000.
Limits are also different when it comes to Security Identity and Relationships. I won't be covering them here as they can get quite granular, but if you are interested, check out the Push API Limits article on Security Identities.
So you've got many items, and the last thing you want to do is move them one by one. So let's go through the three steps to get that data into Coveo.
As with all things API, you need an Access Token that has the rights to push data. What are those right? Quite simply, your API access token needs Privileges / Organization / Organization = View.
With that in place, you're now able to setup the File Container. In addition to the access token, you'll also need to know the following:
OrganizationId - Found in your Coveo Platform.
useVirtualHostedStyleUrl - The default is currently false, but as this will be deprecated in June, 2021. It will ultimately be "true", so I would suggest using "true" to get used to the change.
POST https://api.cloud.coveo.com/push/v1/organizations/<OrganizationId>/files?useVirtualHostedStyleUrl=<true|false>

Content-Type: application/json
Accept: application/json
Authorization: Bearer <Access Token>
What you're going to get back, if done correctly, is something that looks like the following. It's a JSON object containing three pieces of information.
{
    "uploadUri": "https://coveo-nprod-customerdata.s3.amazonaws.com/proda/blobstore/myorgloye34d0/dc9e8860-9a75-4a43-b6cf-cd4a0eed52b1?X-Amz-Security-Token=IQoJb3JpZ2luX2VjEJf%2F%2F%2F%2F%2F%2F%2F%2F%2F%2FwEaCXVzLWVhc3QtMSJHMEUCIBWBRJF%2FzcixUH6AOWUN7BeFIES3Z8VHEHl6IkOPZ7SZAiEA8VxRGdUT7yOuFQCK78pEyrc8ROJgdT23GirF%2BrE3RAsq2QEI4P%2F%2F%2F%2F%2F%2F%2F%2F%2F%2FARAAGgw1NzE0NTE2MjM5NzUiDIr1%2B3lyGayC49J6SSqtAYqNJee23L%2FjUsYHXhP70augA%2Ban2tos%2BuuETWK5lAUslFxyI%2FGiV5fFyFs5aQU27qK%2FwXBwAY0hWKjk48z4MlmqfT1RPsfPL%2FvtSzye6y7sE7xN8jtFS9puYOD4j36tVsLvl6yqqwa4N7G5tLUP7H7jmLRXbLGkCU6pI2g9%2B4GBTYLcl0lvViSUXLaI%2BtVF4bHsvP%2BeScw4WdGFJuCXtKhB3AdM6hsvY1ZXBpuxML7ko4MGOuABAaelGkn%2BigpbJzbMDS6BdWyAdMcr8tqB3BB1jepPae5nfy8tBuuPwOlkXUgmk31LTogVY4Iu7Tl0AZidanke3NBFlxS4nteqReJdEh9Y%2BRz3ty3ep5Q6Eyh%2BX5ccOSD9HNB2PY2qvB4Yd1x1De8C8mE1k8oikymnuu6MEYTMxMwlCl6PtJ4ZbPPeonex6uKs7IQenP3Aoffy7s%2FIpaKvbcdkfdJMvyiB5g5OuOqvUNHPv7%2FGZh0z3j6s6MPCwlIUKq70EVfuuvRvQMkW5tpqDxTGsYK0M%2B9dh8jBvNE%2BJCA%3D&X-Amz-Algorithm=AWS4-HMAC-SHA256&X-Amz-Date=20210403T225853Z&X-Amz-SignedHeaders=content-type%3Bhost%3Bx-amz-server-side-encryption&X-Amz-Expires=3600&X-Amz-Credential=ASIAYKDJLZITUFXIHJEW%2F20210403%2Fus-east-1%2Fs3%2Faws4_request&X-Amz-Signature=d5bb57b8e75f5e8a83d4e0c0b3d5dd2ba86d21c2b58d71d1503126b2e6771eb0",
    "fileId": "dc9e8860-9a75-4a43-b6cf-cd4a0fed52b1",
    "requiredHeaders": {
        "x-amz-server-side-encryption": "AES256",
        "Content-Type": "application/octet-stream"
    }
}
Let's break down what you've been given. Each piece of data is used across Steps 2 and 3 of the Push process. As such, keep the information handy. It's only good for 1hr. However, once you've pushed the data into the file, it will no longer expire.
uploadUri - This is the URL you will use in Step 2 to PUT the information into the file container.
fileId - This handy ID is the file name that your data will be stored in. You'll reference this in Step 3.
requiredHeaders - These are the ONLY headers you'll need in Step 2.
With the information you've obtained from Step 1, you can now push your data into the file container. But hold on, what data? Well, in our case we wanted to push some interesting data as part of this demonstration, so we pulled down the latest movies from TheMovieDB (TMBD). We then extracted a few fields that we were interested in and created our JSON object. Here's a short sample of what it looks like.
{
    "addOrUpdate": [
        {
        "m_title": "Godzilla vs. Kong",
        "m_overview": "In a time when monsters walk the Earth, humanity’s fight for its future sets Godzilla and Kong on a collision course that will see the two most powerful forces of nature on the planet collide in a spectacular battle for the ages.",
        "m_poster_path": "/pgqgaUx1cJb5oZQQ5v0tNARCeBp.jpg",
        "m_release_date": "2021-03-24",
        "documentId": "http://GodzillavsKong.html",
        "data": "In a time when monsters walk the Earth, humanity’s fight for its future sets Godzilla and Kong on a collision course that will see the two most powerful forces of nature on the planet collide in a spectacular battle for the ages.",
        "fileExtension": ".txt"
        },
        {
        "m_title": "Raya and the Last Dragon",
        "m_overview": "Long ago, in the fantasy world of Kumandra, humans and dragons lived together in harmony. But when an evil force threatened the land, the dragons sacrificed themselves to save humanity. Now, 500 years later, that same evil has returned and it’s up to a lone warrior, Raya, to track down the legendary last dragon to restore the fractured land and its divided people.",
        "m_poster_path": "/lPsD10PP4rgUGiGR4CCXA6iY0QQ.jpg",
        "m_release_date": "2021-03-03",
        "documentId": "http://RayaandtheLastDragon.html",
        "data": "Long ago, in the fantasy world of Kumandra, humans and dragons lived together in harmony. But when an evil force threatened the land, the dragons sacrificed themselves to save humanity. Now, 500 years later, that same evil has returned and it’s up to a lone warrior, Raya, to track down the legendary last dragon to restore the fractured land and its divided people.",
        "fileExtension": ".txt"
        },
        ....
    ]
}
Let's break down this JSON object for a better understanding of what's happening.
addOrUpdate - The other option is "delete". This will identify the array of JSON objects (representing items) being either uploaded, updated or deleted.
m_title - Similarly to the other "m_" attributes, these are my own "custom" metadata. You can only add metadata to which you have mapped to appropriate fields. In our case our fields and corresponding mappings are named the same to keep things straight. We named them all with "m_" simply as a naming convention. But when you're reviewing all the fields in the return result of a query, having them all start with the same character set makes it VERY handy to locate them.
documentId - This is the unique identifier of an item in your Coveo index. Every document ID must be unique and as well, be in a URI format. These aren't used to scan the document so it's not like they have to be accurate. e.g. For ours, we prepended "http://" and appended ".html" to the movie title giving us a unique value.
data | compressedBinaryData | compressedBinaryDataFileId - Depending on what you're pushing, the attribute might not be "data". If you're pushing less than 5MB worth of raw, textual data then yes. If it's more than 5MB you'll need to look into the other two options. A handy breakdown of the data types you can use can be found here.
fileExtension - This is the format of your data. In our case we used the overview as our data source. But it could have been an HTML file. If that was the case, our extension would have been ".html". It's an optional field, but by specifying it you're assisting with the indexing process.
The official formatted body JSON ultimately needs to resemble the following.
{
    "addOrUpdate": [
        {
        <MyItemMetadata>*,
        "documentId": <MyItemToAddOrUpdateURI>,
            <"data"|"compressedBinaryData"|"compressedBinaryDataFileId">: <MyItemDataOrFileId>,
        "compressionType": <"UNCOMPRESSED"|"DEFLATE"|"GZIP"|"LZMA"|"ZLIB">,
        "fileExtension": <MyItemDataFileExtension>,
        "permissions": <MyItemPermissionModel>
        }*
    ],
    "delete": [
        {
        "documentId": <MyItemToDeleteURI>,
        "deleteChildren": <true|false>
        }*
    ]
}
With the data constructed, let's push it into the File Container using the following PUT statement.
PUT <uploadUri - From Step 1>

<requiredHeaders - From Step 1>
After a successful Push, which you'll know by an empty response body and a 200 OK response code; it's time to move onto Step 3.
You've made it! The final step couldn't be easier. Using the access token you used in Step 1 and the fileId you received back as part of Step 1. It's time to put them together as part of a PUT statement. The access token will need additional priviledges for this part, namely Priviledges / Organization / Sources = View/Edit in addition to what you had in Step 1.
PUT https://api.cloud.coveo.com/push/v1/organizations/<MyOrganizationId>/sources/<MySourceId>/documents/batch?fileId=<MyFileId>

Content-Type: application/json
Authorization: Bearer <MyAccessToken>
There is no body for this request and if you have a successful push, the response should be null with a 202 Accepted. But how do you know if everything went according to plan. Well, that's easy.
Open up your Platform Admin and go to Logging. Depending on how much information you've been uploading, and what all else may be going on in your Source / Index, it might take a bit to find. What you're looking for are the Consuming logs. The hope being they're all listed as Completed. Similar to the following:
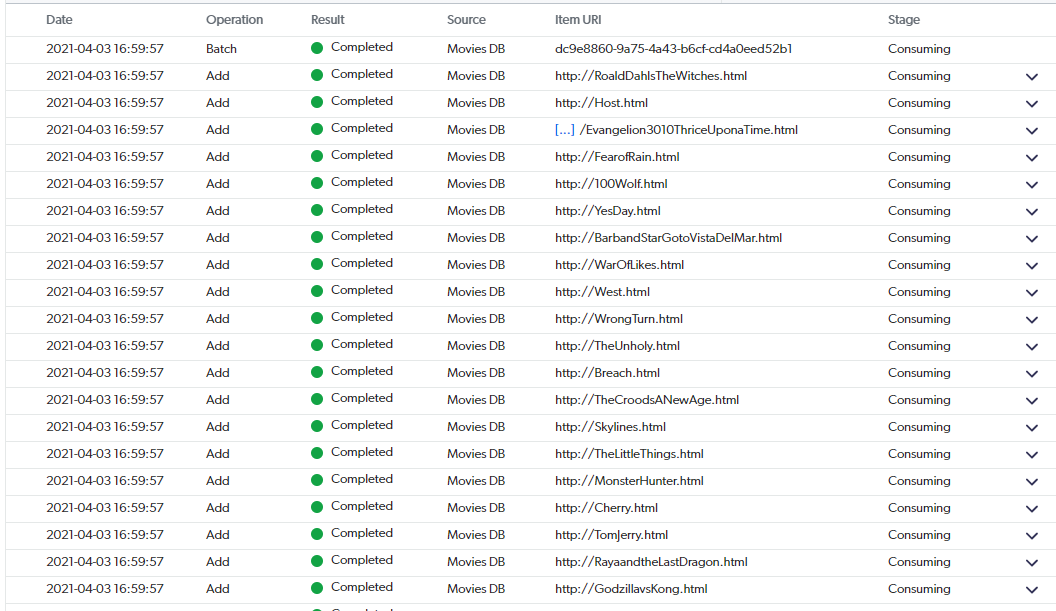
If you're seeing red (i.e. Error) it may be a simple fix. Here's an example of an error where the documentId wasn't in the format of a URI.

I hope this demystified and relieved some concerns when needing to push a large bulk volume of items into your Coveo organization. Once you've got your JSON data in the proper format you can easily move from Step 1, to Step 2, and onto Step 3 in less than 10 minutes. Perhaps the most time consuming part of this whole process is getting your data in the right format.