Reading time: 5 min read

It's way easier than you might think but complicated enough that there are crucial steps that must be done. Let's do it together. We can break it down into three areas.
- Azure AD Configuration
- Sitecore Identity Server Configuration
- Sitecore Configuration
Azure AD Configuration Setup
Before we bother with setting up Sitecore or the Identity Server, we need to have an application service setup within Azure AD. The steps are fairly simple.
Within your Azure Portal navigate to Azure Active Director then App registrations and finally New registration. Once there fill out the form to create a new registration for your Sitecore environment.
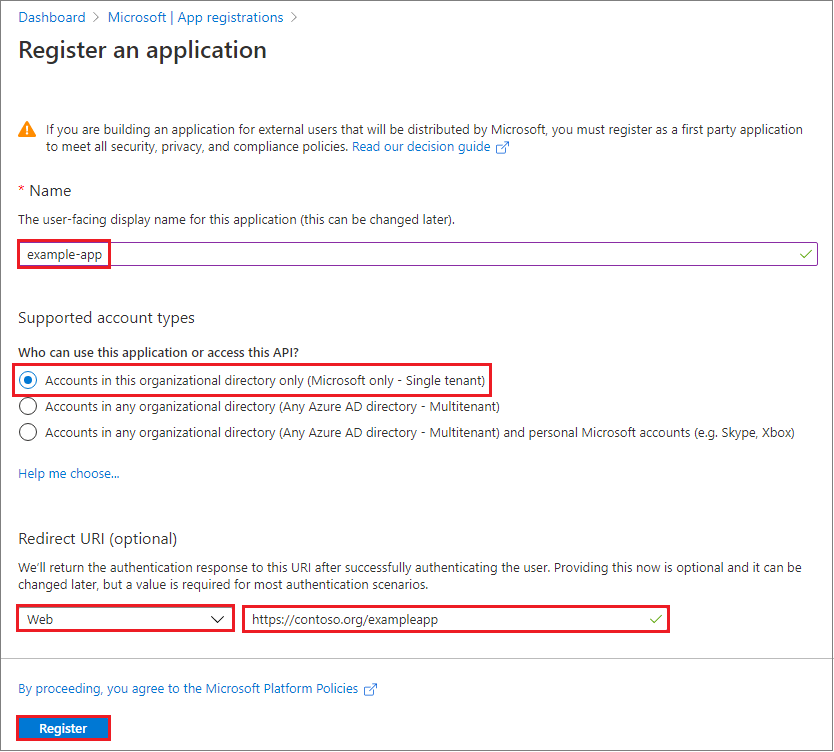
Redirect URI
Where it talks about the redirect uri, you will want to point it back to your Sitecore Identity Server OIDC page. Namely: https://sxa10identityserver.dev.local/signin-oidc. Your URL might be slightly different depending on the location of the Identity Server.
Get The Client ID And Tenant ID
With the registration done, navigate to the Overview page and collect the Client ID and Tenant ID.
Update Manifest
Open the Manifest page and on the right hand side you'll see a set of data. Update the groupMembershipClaims value to SecurityGroup.
ID Tokens
Open up the Authentication page and on the right, scroll down to Advanced Settings. Ensure that ID tokens is checked.
Configure Sitecore Identity Server
In order to get Sitecore Identity Server configured, you really only need to update a single file.
Within our Identity Server, let's open up the following file: ./sitecore/Sitecore.Plugin.IdentityProvider.AzureAd/Config/Sitecore.Plugin.IdentityProvider.AzureAd.xml
We're going to take a look at this file in pieces:
- Client Id & Tenant Id
- Transformations
Configuring Client And Tenant Ids
The first part is setting up our Client ID and Tenant ID by replacing the {Place ClientId/TenantId here} with the correct value obtained while setting up your AD environment..
<AuthenticationScheme>IdS4-AzureAd</AuthenticationScheme>
<DisplayName>Azure AD</DisplayName>
<Enabled>false</Enabled>
<ClientId>{Place ClientId here}</ClientId>
<TenantId>{Place TenantId here}</TenantId>
Leave the AuthenticationScheme as is as this will make it easier down the road when referring back to it.
Next, switch Enabled to true.
And finally, enter in the ClientId and TenantId values you obtained within the Azure Ad environment as part of the app registration.
Setup Transformations
Under ClaimsTransformations you'll see a hierarchy of tags. Each tag is uniquely named and this is important hence the defaults of ClaimsTransformation1, ClaimsTransformation2, etc. It's safe to leave the defaults as is. Any new transformations you create should either just increment the number or be something entirely different.
Admin Role Mapping
Several other tags are commented out, both of which offer the ability to give you permission within Sitecore at a certain level. You will need some form of transformation that allows you access into Sitecore as just doing the default transformation alone, will not grant you access. In the example below you can see how we setup a user with Admin priviledges.
<AzureADUserToAdminUser type="Sitecore.Plugin.IdentityProviders.DefaultClaimsTransformation, Sitecore.Plugin.IdentityProviders">
    <SourceClaims>
        <Claim1 type="groups" value="a9bb60b6-40d2-4e2a-88b8-0e47ee2d078e" />
    </SourceClaims>
    <NewClaims>
        <Claim1 type="http://www.sitecore.net/identity/claims/isAdmin" value="true"/>
    </NewClaims>
</AzureADUserToAdminUser>
The important piece is the Claim1 value under SourceClaims. You will need to replace this value with the ObjId of an Azure Ad Security Group that you are in and can work as an admin security group.
The type and value in NewClaims will map to a Sitecore configuration entry later so it is important to ensure they're correct.
Optional Role Mapping
The other claim transformation that is commented out is an example of doing a security group mapping to a Sitecore role.
You can get creative in your group mapping. Such that if you wanted a user in two separate groups before they could be mapped to a role or as an admin, you can simply add a Claim2 tag with the objId value of that group.
<AzureGroupTransformation type="Sitecore.Plugin.IdentityProviders.DefaultClaimsTransformation, Sitecore.Plugin.IdentityProviders">
    <SourceClaims>
        <Claim1 type="groups" value="21a88c58-9e7f-439d-b8fe-fd883c620031" />
    </SourceClaims>
    <NewClaims>
        <Claim1 type="role" value="sitecore\Author" />
    </NewClaims>
</AzureGroupTransformation>
The same thing goes here replacing the guid with the correct ObjId from Azure AD.
Configure Sitecore
While configuring the Identity Server was relatively easy, configuring Sitecore will be a tad bit more complicated and will obviously vary slightly with your intended configuration.
We will start with creating a patch file. Within that file, we will focus on three main areas.
- Identity Providers Per Site
- Property Initializers
- Configuring Site Neutral Links (Optional)
Identity Providers Per Site
The following config snippet will apply the Identity Provider authentication to all sites in your list.
<identityProvidersPerSites hint="list:AddIdentityProvidersPerSites">
    <mapEntry name="all sites" type="Sitecore.Owin.Authentication.Collections.IdentityProvidersPerSitesMapEntry, Sitecore.Owin.Authentication" resolve="true">
        <sites hint="list">
        <site>regexp:.*</site>
        </sites>
    </mapEntry>
</identityProvidersPerSites>
Property Initializers
The property initializers below will map what we created in Sitecore Identity Server and when a user logs in, map those settings to the appropriate user values. In this case, the IsAdministrator attribute and the Email attribute.
<propertyInitializer>
    <maps>
      <map name="set IsAdministrator" type="Sitecore.Owin.Authentication.Services.DefaultClaimToPropertyMapper, Sitecore.Owin.Authentication" resolve="true">
        <data hint="raw:AddData">
          <source name="http://www.sitecore.net/identity/claims/isAdmin" value="true" />
          <target name="IsAdministrator" value="true" />
        </data>
      </map>
      <map name="set Email" type="Sitecore.Owin.Authentication.Services.DefaultClaimToPropertyMapper, Sitecore.Owin.Authentication" resolve="true">
        <data hint="raw:AddData">
          <source name="email" />
          <target name="Email"  />
        </data>
      </map>
    </maps>
</propertyInitializer>
Configuring Site Neutral Paths (Optional)
This step is optional because if your site is anonymous but your backend utilizes AD you might not see the need to add this. It should be noted though that some folks found that once AD was added, the showconfig.aspx could not be accessed without an infinite loop being present in the authentication.
If that is happening, then use this below and just add /admin as a path.
Where this comes in play though is if you want your site to require AD authentication. Perhaps you have secured content being a security group or you just want to know the user for personalization.
<pipelines>
    <owin.cookieAuthentication.validateIdentity help="Processors should derive from Sitecore.Owin.Authentication.Pipelines.CookieAuthentication.ValidateIdentity.ValidateIdentityProcessor">
      <processor type="Sitecore.Owin.Authentication.Pipelines.CookieAuthentication.ValidateIdentity.ValidateSiteNeutralPaths, Sitecore.Owin.Authentication">
        <siteNeutralPaths hint="list">
          <path patch:after="path[value='/-/speak/']">/</path>
        </siteNeutralPaths>
      </processor>
    </owin.cookieAuthentication.validateIdentity>
</pipelines>
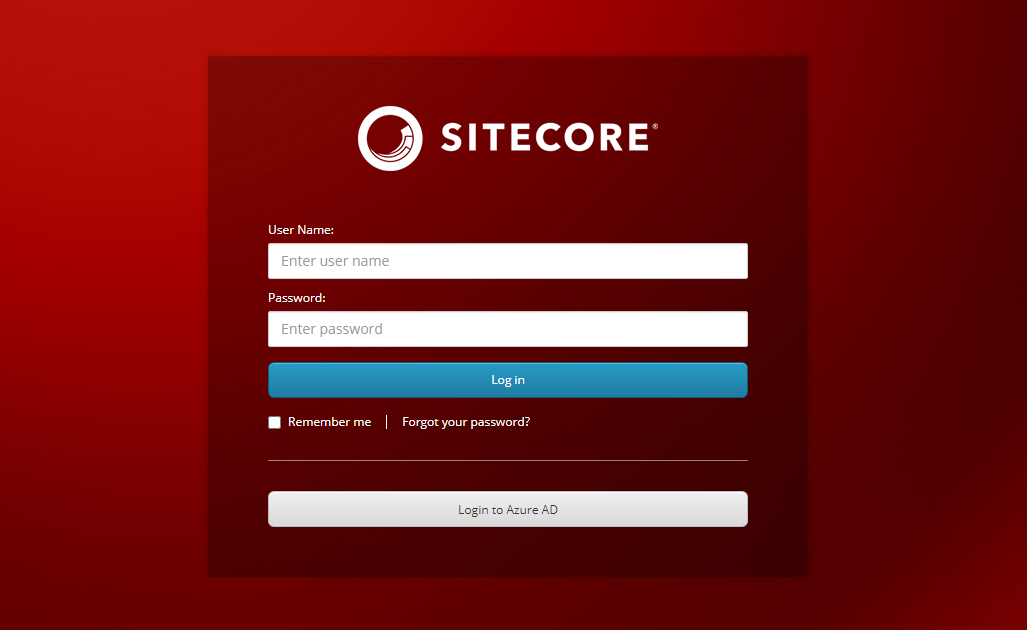
With that done, you can merge these three into a single patch file. Restarting your Sitecore Identity Server and your Sitecore server should now present you with the ability to log in to Azure AD.
This concludes setting up AD Authentication with the Sitecore Identity server. In a future article we'll cover mapping additional fields as well as altering the Sitecore username.
